Being part of the Avio System, Wings IOboxes serve as hardware interfaces and are used for various tasks such as light control via DMX, switching or serial control. They are able to communicate independently on the network and are displayed as network nodes in the Avio Manager.
The following IOboxes are available:
Wings IObox DMX ...offers one input and one output for DMX512.
Wings IObox Relay ...offers 16 floating relays.
Wings IObox Remote ...offers 16 switch inputs.
Wings IObox Serial ...offers four serial interfaces.
Wings IObox XXX Pro ...all the above IOboxes are also available as Pro version offering the following functions additionally:
Lua scripts for implementing logic functions
KNX support for building control
Serial control of other devices via drivers and LAN
Hosting of touch interfaches created using Wings Touch
Via an RJ45 port and a network cable IOboxes are connected to the common network architecture and communicate via Avio protocol. Power is supplied either via network cables or, if supported by the switch, vie the external, original power supply unit. A web browser allows configuration of the Wings IOBoxes.
All settings are stored on the internal memory and, if available, additionally on an SD card by the Wings IObox. The configuration saved on the SD card can be transferred to any other IObox. If a defective IObox needs to be replaced, thanks to the information on the SD card the Wings IObox can immediately be set up correctly and is ready for further use.
This topic provides information on the following:
Controlling devices via DMX or relays
Remote control via IObox Remote
Serial cotrol of devices via IObox Serial and drivers
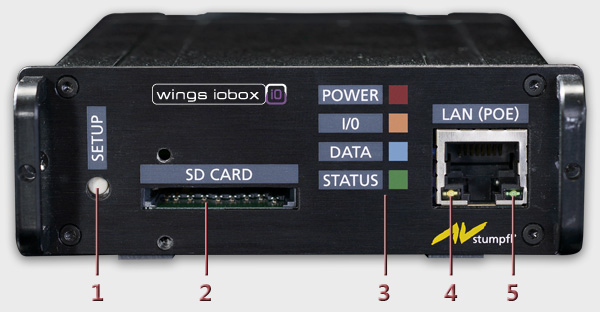
The front sides of all IOboxes are identical:
Setup button for resetting to the default configuration. See also Resetting to the default configuration. If the button is only pressed briefly, the IObox is marked in green in Avio Manager for 45 seconds.
SD card slot for automatic backup of the configuration. Included in the delivery is a lockable retaining clip.
LEDs for indicating operating statuses:
Power ...lights up in red when power is supplied.
I/O ...lights up in yellow while information is being received or transmitted via in- or outputs.
Data ...lights up in blue while Avio data packages are being transmitted
Status ...flashes in green, after IObox has booted and is ready for operation.
The yellow LED at the RJ45 port indicates that there are LAN activities.
The green LED at the RJ45 port lights up when a 100 MBit-connection has been established.
All IOboxes are provided with a power socket in the left corner of the rear side for supplying power via the original power supply unit.
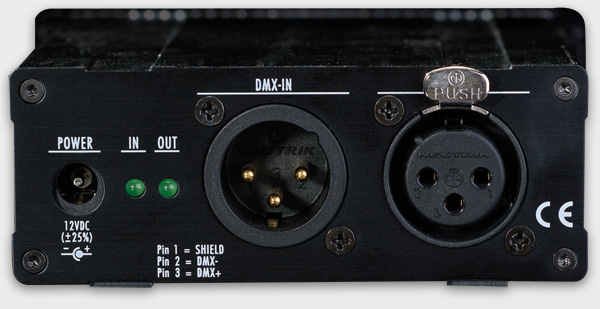
Next to the POWER socket there is also one DMX-IN and one DMX-OUT port on the rear side of the IObox DMX. IN-LED lights up when signals are being received. Out-LED is permanently when the unit is in working order as in such a case a DMX signal is always transmitted.
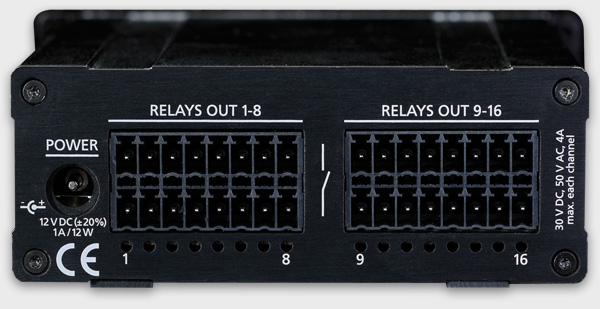
In addition to the POWER socket, relay outputs 1 to 16 are located on the rear of IObox Relay, which can be connected via the supplied printed-circuit board connectors (FMC 1.5 by Phoenix Contact). The corresponding LEDs below the relay contacts light up when the contacts are closed.
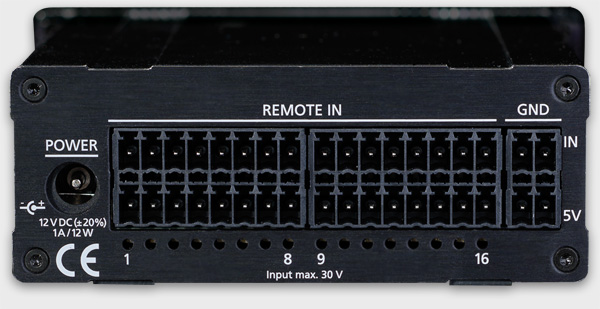
In addition to the POWER socket the rear side of IObox Remote accommodates switching inputs 1 to 16, which can be connected via the supplied printed-circuit board connectors (FMC 1.5 by Phoenix Contact). The corresponding LEDS below the switching contacts light up when voltage is applied to the IN-contacts (above), i.e. normally when they are connected to the 5V contact at the bottom. The four contacts on the right are grounded (GND).
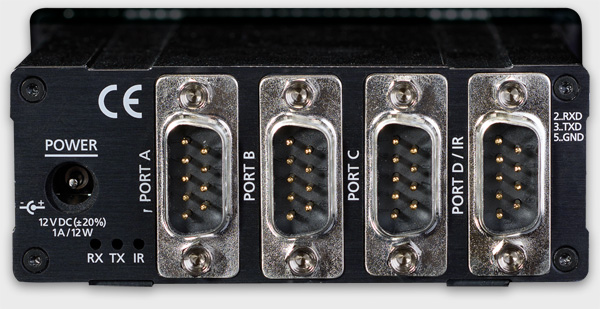
In addition to the POWER socket, the rear side of IObox Serial also contains interface ports A to D. LEDs RX, TX and IR (bottom left corner) indicate when information is received or transmitted.
Note: It is planned to use port D for an optional IR-diode for controlling IR-controllable devices.
The following applies to all Wings IOboxes
10/100 MBit RJ45 Ethernet connection with Power over Ethernet (IEEE 802.3af-2003)
Power supply: 12 V, 1A max.; only the supplied AC adapter may be used for external power supply.
Width x Height x Depth: 98 mm x 34 mm x 137 mm
Wings IObox DMX
Ports: 1 DMX 512 input, 1 DMX 512 output with 3-pin sockets XLR-M (In) and XLR-F (Out) (acc. to IEC 61076-2-103)
A shielded cable with an impedance of 110 ohm must be used. The output must be terminated with a 120-Ohm resistor after the last device. A max. number of 32 devices can be connected to the output without any repeater.
Wings IObox Relay
Ports: 16 Relay switch outputs
Maximum contact load: 30 VDC, 48 VAC, 1.5 A
Resistance of closed contact: 30 mA (at 1A, 6VDC)
Isolation resistance of open contact: 1000 mOhm (at 500VDC)
Minimum contact life: 150,000 switch cycles at a load of 1.5A, 48VAC
Wings IObox Remote
Ports: 16 digital inputs
Maximum input voltage: 30 Volt, minimum input voltage 2 Volt (for logic 1)
Wings IObox Serial
Ports: 4 RS232 connectors (Sub-D 15 mm)
The modules can be configured in a web browser.
Connect your Wings IOboxes to the network and hook up the power supply.
 If you have no Wings IObox you can simulate it for test purposes...
Start the Avio Manager or, if it is already open, click Refresh a the top of the module in order to display the Wings IOboxes as network nodes.
To open the configuration dialog right-click the Wings IObox and select Open in Web Browser.
The following configuration menus are available at the top: Values, Connect, Connections, Logic and Setup.
Values ...displays the value status of the DMX channels selected under Select Port.
Connect …is used for connecting to other nodes. On the website of the corresponding IObox it is possible to make incoming (reading) connections.
Section Local Node shows the ports and channels of the module for which the web site was opened. Here the channel can be highlighted another node is to write to.
Section Remote Nodes shows all nodes of the network. Every time menu item Connect is clicked the network is read in. It allows selection of the channel which is to write to the local channel selected before.
Note: Currently, there is no option to decide whether the connection is to be scaled or if the values are to be transferred as they are.
Connections … displays the node connections, which may also be deleted, if necessary. Since every node saves only its own connections click Get remote nodes to read in the entire network with its AVIO nodes and to display the outgoing connections.
Logic ...is used for installing and configuring scripts that allow mathematical or logic functions, for example. See also Avio Scripts.
Setup …serves for configuring name, network address and logging. It also allows the IObox to be locked and reset. After making the alterations in the Setup menu you have to restart the IObox be clicking Restart at the very bottom or disconnecting it from the mains supply.
Disconnect the IObox from the mains supply.
Using a pen, press and hold the setup button at the front while connecting the box to the mains supply. Hold the button pressed until booting is done.
Using Wings IObox DMX you can control devices via Wings Vioso RX or Wings Touch.
This can be done as follows:
IObox Remote allows control of playback and executing of triggers in Wings Vioso RX. A great variety of different trigger functions offer a wide range of control functions. See also Trigger actions. However, it is also possible to control other Avio devices via IObox Remote.
In order to execute trigger actions you start by creating the corresponding trigger in Wings Vioso RX and entering a suitable name. See Creating triggers.
In Avio Manager the triggers can be found under Wings Vioso RX - Triggers and under Wings Vioso RX - Control the functions Play, Pause, Start Presentation, Continue, Stop and Escape. You can now make the connection with the corresponding IObox Remote channel. See also Wings Avio Manager.
For sending serial commands via RS232 interfaces you need an IObox Serial or any IObox Pro for sending commands via LAN. In addition to this it also requires a driver for the device to be controlled which needs to be loaded into the IOBox. Available drivers are listed in Wings Vioso RX after clicking Extras - Open folder  Drivers.
Open the IOBox in the web browser by right-clicking the IObox node and selecting Open in Web Browser. In the web browser menu on the left click Driver and Add a Driver on the right.
Click Browse... and select the appropriate driver in the file dialog. The supplied drivers can be found in the following folder:
C:\ProgramData\AV Stumpfl\Drivers
Note: This folder is usually hidden and not displayed in the Explorer. In such a case search for the drivers by entering *.ptd or *.asd in the search field.
Click Open following which the driver is loaded and listed under Add existing driver.
Under Add existing driver click the required driver following which the driver will be installed in the IObox and appears on the setup page.
Make the appropriate settings as follows:
At Control via RS232 select serial for Connectiontype. For Com Port assign interface 1 (port A) to 4 (Port D) and enter the necessary interface parameters. Frequently, the default values for the driver are already preset.
For Control via LAN select network for Connectiontype. For Type enter TCP or UDP protocol and the IP address and port of the device to be controlled. Frequently, the default values for the driver are already preset.
Following this click on Save to accept the configuration.
In Avio Manager under node IObox you will find the loaded drivers and their commands. Link up the commands with other channels as desired. More about this can be found in topic Linking driver commands.

Any changes, such as deleting or updating drivers requires the IObox to be restarted (interrupt power supply or click Reset in the browser) otherwise double entries may appear in Avio Manager.
If a driver receives many commands for parameter polling this may have a negative effect on the IObox performance depending on the response time of the queried device. In such a case you can extend the polling interval or even disable it in the driver using parameters DefaultPollInterval and PollInterval. See also Creating drivers.
 for
for  followed by choosing the corresponding IObox. Enter a name and click
  If the IObox is not listed...

