KNX Control
KNX is standardized network communications protocol for intelligent housing and building technology in accordance with EN 50090 and IS/IEC 14543. KNX can be used for devices by different manufacturers that support KNX. These devices can be dimmers, switches, roller shutter switches, weather stations but also heating and ventilation systems, etc. All these devices communicate via the KNX bus. Which key takes effect on which device is defined by programming the KNX bus. For programming the bus system Engineering Tool software (ETS) is used that is provided by the KNX Association.
This topic covers the following items of KNX Control via the Avio system:
Requirements
Configuration
Importing driver files
Editing names in driver files
Setting refresh addresses
Creating a IP/KNX Router configuration file
Starting KNX
Creating a Force Read Channel
Test mode and bus monitor
Merging two Knx.xml files
Requirements
Usage of KNX functions in the Avio System requires a KNX installation including KNX/IP gateway. The following interfaces were tested:
IP Interfaces (Tunneling):
-
MDT SCN-IP000.01
-
GIRA 216800
-
Siemens N148
IP Router:
-
Siemens N146
-
ABB IG/S 1.1
The routers need to be configured in a way which allows the packages to be distributed along the IP network.
KNX addresses that need to read out explicitly (without waiting for an acknowledgement) require setting of the read BIT in the ET software. This is recommended for a correct display of values upon starting Avio Service.
For configuration we recommend using an ESF file of the KNX installation exported from the ETS. The ESF file contains the controllable resources of the KNX installation and makes these available to the Avio System. Usually, the ESF file is provided by the provider of the electrical installation. If you want to program KNX systems yourself you can find a description here of how an ETS for up to 20 devices can be obtained free of charge.
The following data types are supported:
Note: With Float data types the decimals are currently cut off. A full support of Float data types is planned as of September 2014 and will be implemented via an update of Wings AV Suite and firmware for the Wings IOboxes.
Back to topic selection
Configuration
The KNX software for the Avio System is integrated into Avio Service and all Wings IObox Pro units. Configuration requires Avio Service. The finished installation can be loaded to one Wings Obox Pro.
Before you can open the Avio Service KNX dialog you need to enable the KNX function.
-
Right-click the Avio Service tray icon  and select Functional Groups.
-
In the dialog popping up enable this functional group by clicking KNX following which it is then listed in yellow at the top. Finish by clicking Apply Changes.
-
Under Control Settings select Enable KNX and click Apply Changes.
-
Click on the Avio Service tray icon again and select Configure KNX Drivers... (enabled) following which the KNX configuration dialog for importing and editing the driver files appears.
Back to topic selection
Importing driver files
As explained further above the resources of a KNX installation can be loaded by means of an ESF file.
-
In the Avio KNX dialog click on Import Esf File...  a file dialog will appear.
-
Select the required ESF file and click Open following which the ESF file is automatically converted into a Knx.xml driver file and imported.

-
Existing Knx.xmlcan be imported likewise by clicking Import KNX Driver File  .
.
-
Driver files can also be dragged & dropped into the field below KNX Driver files and imported.
-
All imported Knx.xml driver files are saved to folder C:\ProgramData\AV Stumpfl\Wings Avio Service\drivers\. This folder can be opened by clicking Open containing folder  .
.
-
A new and empty Knx.xml driver file can be created by clicking Create New KNX Driver File  .
.
-
Click  Remove to remove a highlighted driver file from the field.
Back to topic selection
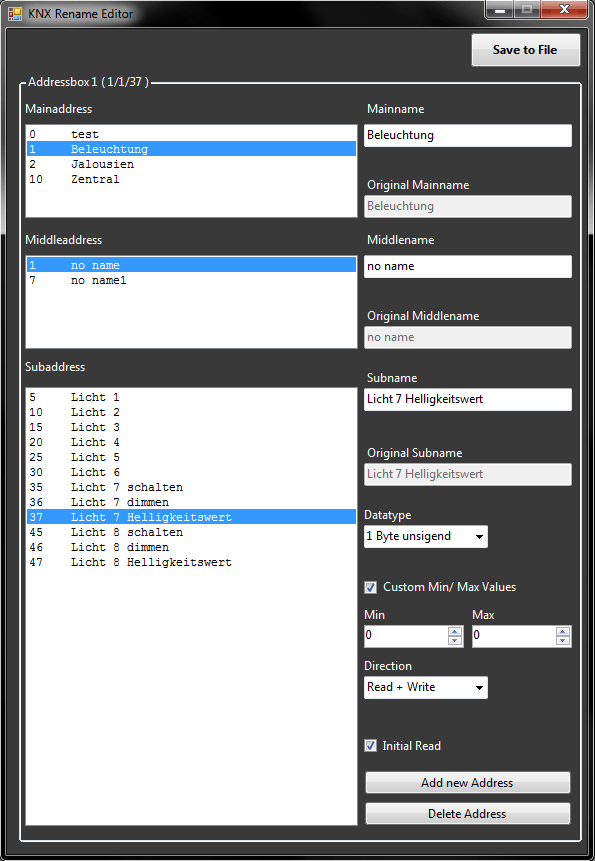
Editing KNX driver files
Names and refresh addresses in the imported KNX.xml files can be edited.
Editing the names
-
Open KNX Rename Editor by right-clicking the desired driver file and selecting Edit Names in KNX Driver File.  Show dialog.
-
If a Mainaddress, Middleaddress or Subaddress are selected the entries in the right column are updated. The names can be changed as desired. The original name is the first name that was defined upon creating this address (e.g. during ESF import). If name is left empty the original name is saved as name.
-
Data type defines the data type for this address. The ESF file does not say whether the data type is unsigned or float. Float is the more usual mode. If it is unsigned it needs to be changed manually.
-
Custom Min/Max is only visible if the data type allows it. These values are used for channel creation (e.g. in order to limit temperature ranges)
-
Direction defines the writing direction. Currently this has no effect and will be used for a future program extension.
-
When Read-Init is enabled the corresponding port information is read upon initialization to obtain the correct parameter without having to wait for a change at the bus. The Read Bit must have been enabled before during KNX programming.
Back to topic selection
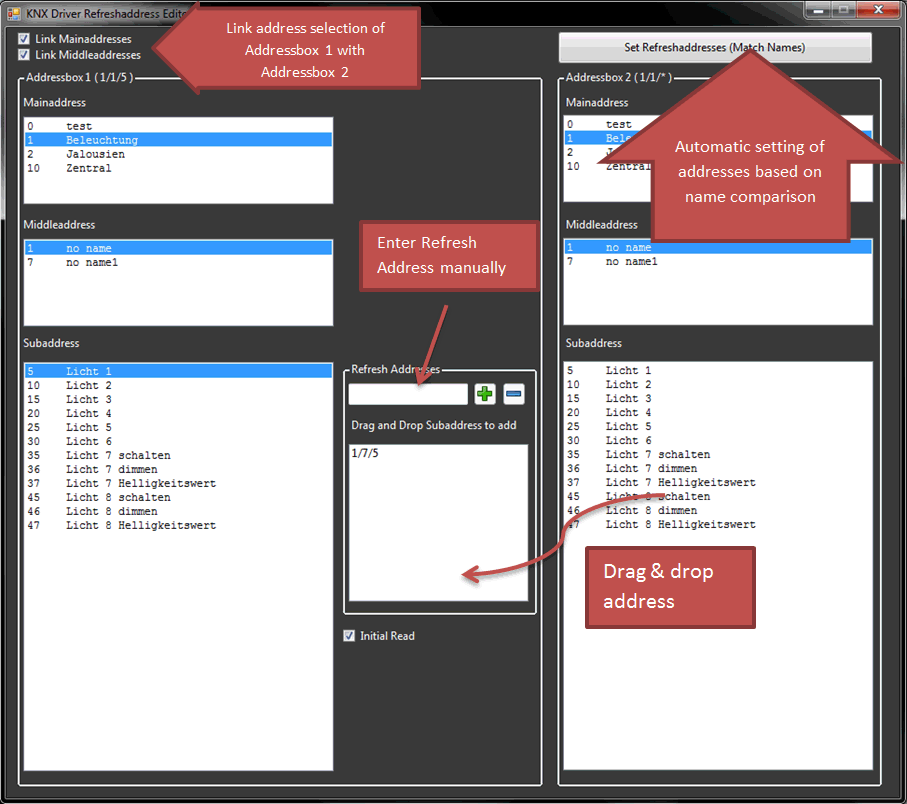
Setting refresh addresses
-
Open the KNX Driver Refresh-Address Editor by right-clicking the desired driver file and selecting Edit Refresh-Addresses in KNX Driver File. Show dialog with explanations
-
When a write message is sent by the KNX bus to its own address or to a refresh address the corresponding Avio port is updated.
-
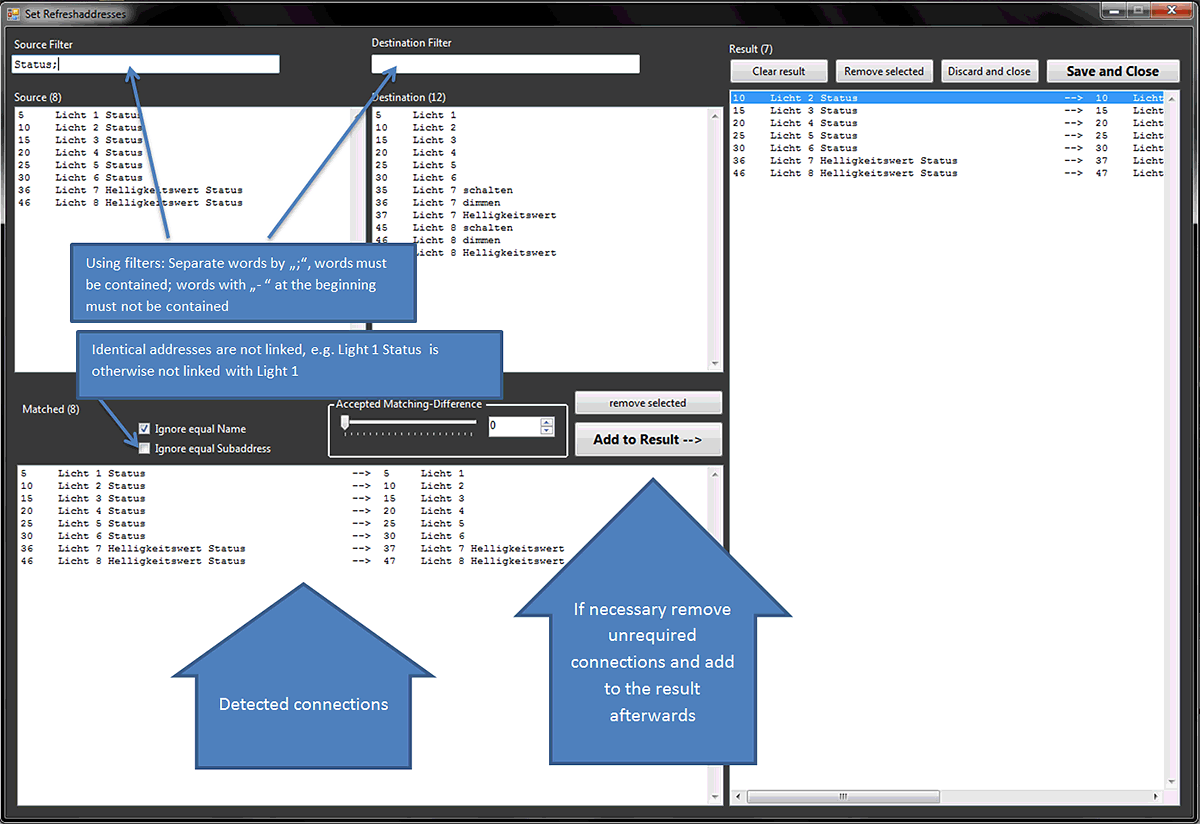
Refresh addresses can also be set automatically by name comparison. Show dialog with explanations
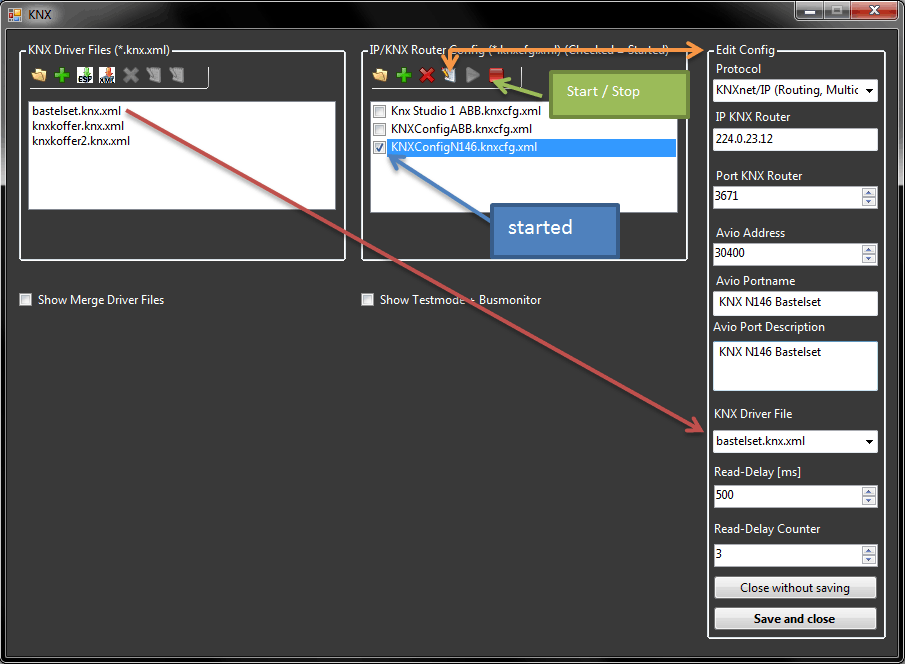
Creating an IP/KNX Router configuration file
The IP/KNX Router configuration file defines the interface via which KNX communication is to be established.
-
In the KNX dialog under IP/KNX Router Config click button following which the Create KNX Config dialog is opening.
-
Under Filename enter the required file name. The suffix must be KNXcfg.xml and the file name must not yet exist.
-
Under Protocol select the required protocol for the router:
-
KNXlib/IP (ABB old) ...special implementation
-
Knxnet/IP Routing, Multicast, preferred ...for Siemens N146 and compatible devices (preferred protocol via Multicast)
-
Knxnet/IP Tunneling ...for Siemens N148 and compatible devices (direct connection, beta)
-
KNX-Router IP and Port are suggested and may have to be adapted (depending on the KNX installation).
-
Under KNX Driver File select the corresponding Knx.xml driver file that was previously imported.
-
Under Avio Port a free Avio port is suggested but may also be defined independently, if necessary.
-
At Avio Port Name enter a port name to be displayed in Avio Manager.
-
At Avio Port Description you can enter a description to be displayed in Avio Manager by mousing over the port name.
-
Existing configuration files can be imported using drag & drop.
-
After creation of a configuration file the Editor allows entry of a Read-Delay:
-
Read Delay ... defines the time delay between read requests.
-
Read Delay Counter ...defines the number of read requests before a time delay. This function serves for reducing the load on the KNX bus.
Open the Editor by highlighting the required KNXcfg.mxl file and click  .
.  Show Editor dialog with explanations
Back to topic selection
Starting KNX
After creating the configuration file it can be started, executed by Avio Service and displayed in Avio Manager.
-
Right-click the required KNXcfg.mxl file and select Start IP/KNX Router Config. Following this you are prompted to restart Avio Service which you can do by clicking Restart Service.
-
Alternatively you can start and stop the configuration by highlighting the required KNXcfg.xml file followed by clicking  and
and  .
.
-
Starting and stopping always requires a restart of Avio Service.
-
After transferring the KNX configuration to Avio Service for execution it is automatically executed when the computer is booted the next time.
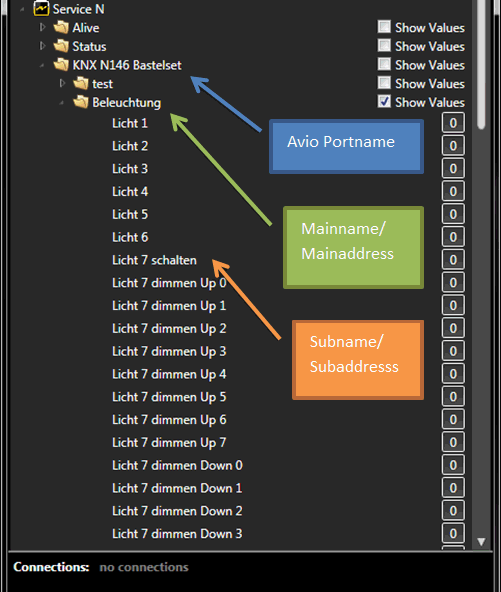
When the configuration is correct, the KNX port is listed in Avio Manager as Avio Service subfolder with the specified port name. When the KNX port is opened the channels are listed as follows:
Avio Manager dialog with explanations
For a subaddress an additional Force Read Channel can be enabled in order to query the value of the subaddress/channel. In the bus system the read flag must be set for this address in the ETS software. This is how you proceed...
Back to topic selection
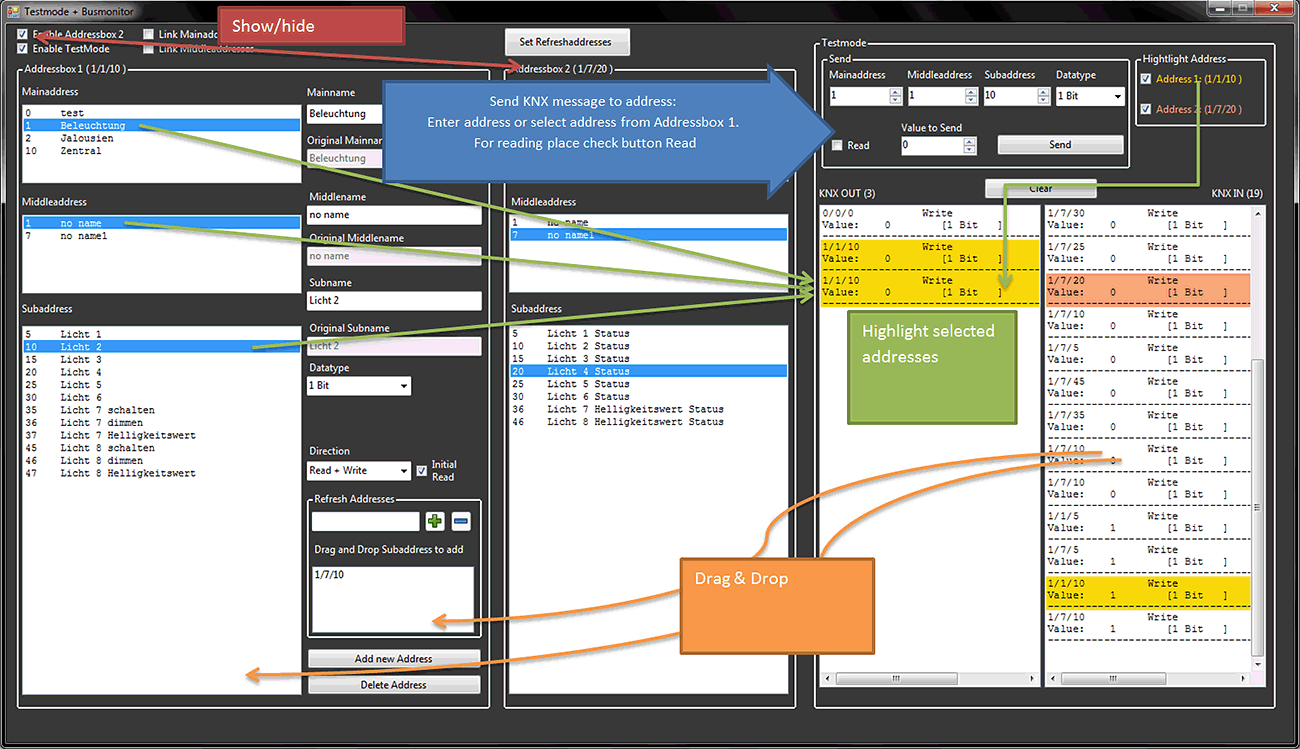
Test mode and bus monitor
After checkmarking Testmode + Busmonitor a dialog opens. Here a KNX Driver File and a KNX Router configuration need to be selected. Following this test mode and bus monitor can be started by clicking on Start. If these files are not available a new file can be created during file selection.
Show dialog with explanations
-
All incoming and outgoing packages are recorded. It is attempted to detect the package data type. If the data type cannot be detected the package is marked with !!.
-
All KNX messages can be dragged and dropped into the Subaddress field and thus added. This allows adding unknown addresses to the KNX Driver file.
-
Enabling Highlight Address allows highlighting of the selected address in the list. This is possible for both address boxes.
-
The Send Block allows certain messages to be sent to a KNX address. This address can be selected from Addressbox 1 or be entered manually. If necessary the data type must be defined. Furthermore, the Read Flag can be set in order to make a read request. These messages are displayed in the KNX OUT Box.
Back to topic selection
Merging two Knx.xml files
Function Merge Driver Files can be used to merge two driver files. Checkmark Show Merge Driver Files and the corresponding menu is opened. Enter both files. The first file is both the source and the target of the merge process.
If the files differ in their main or middle name the following dialog is displayed:
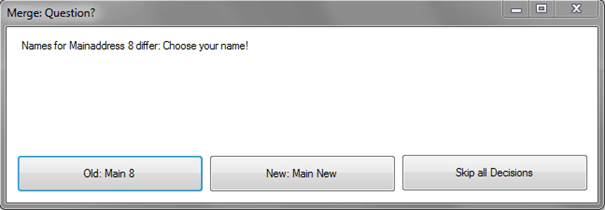
Now you can choose which name is to be used, i.e. Main 8 (file 1) or Main New (file 2) in our example here. It is also possible to skip any further decisions which means that the old names are used. After this the following dialog opens:
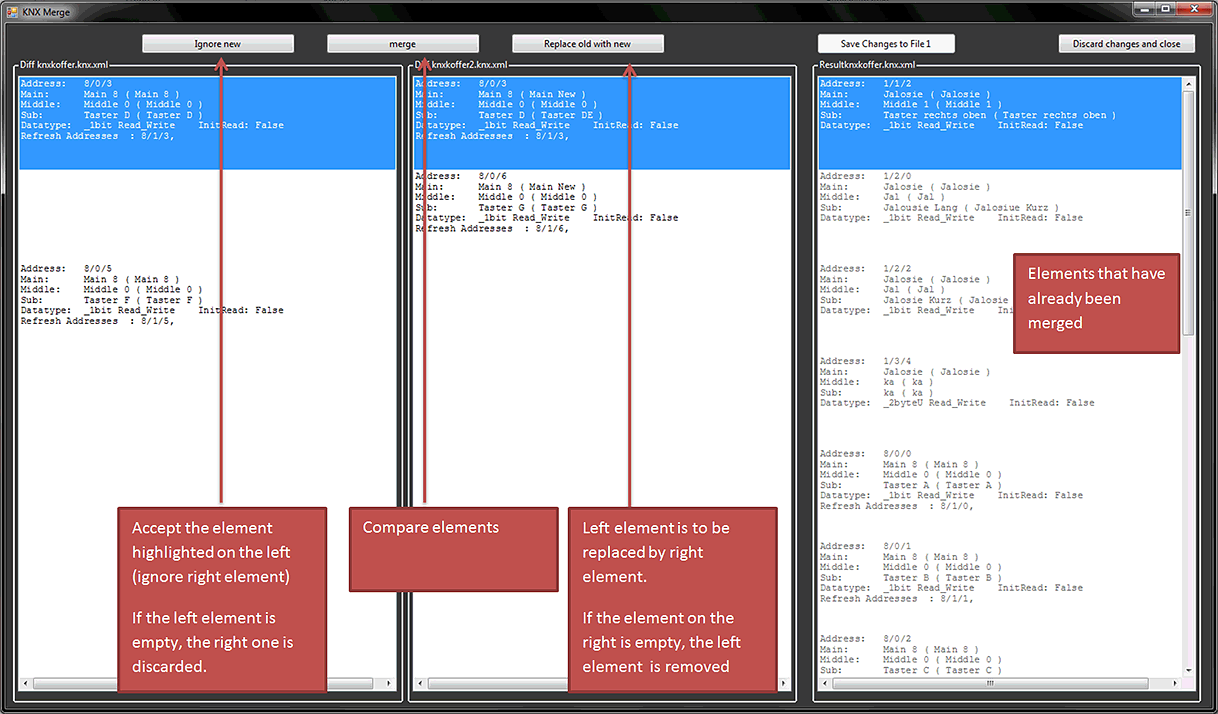
For every line (column 1 +2) one of three options must be selected. As soon as one option has been selected the result of the selection is moved to the Results column. on the right.
When everything has been merged you only need to click Save Changes to File 1 to save everything to the first file.
Back to topic selection
 and select