 and
and

 can be
found in the function bar below the main menu.
can be
found in the function bar below the main menu.As a necessary precondition for this workshop you should already have
added media files to the Media Pool. See Workshop Capturing pictures and
sound. Now we can start arranging a show in the timeline. This
workshop will show you how to edit objects and how to use the pre-defined
ramps and effects. As mentioned before, any faulty editing steps or clicking
the wrong buttons can be undone or situations be restored by using the
Undo Function. The Undo/Redo keys  and
and

 can be
found in the function bar below the main menu.
As was mentioned before, the way (media) objects are edited is identical for all types of media. This is why the explanations below apply to all types of media. Let's start with a few basic "finger exercises".
Note: The screenshots are based on Wings Vioso but it shouldn’t be any problem to follow and work through the workshop.
Unless you have already done so, load your project Exercise 1. After starting up Wings Vioso RX, dialog Create new project pops up. After clicking Last Projects you will be presented with a list containing your exercise as well.
Click on category
 Pictures and, if applicable,
select a folder below it to list the required pictures on the right.
Using the mouse, grab a picture and, while keeping the mouse button
pressed, drag it into a picture track, which can be recognized by
a cactus, the symbol for pictures. Let go of the mouse button and
an object is created. Note:
Grabbing pictures is easier when
  Lightbox View is selected
in the Media Pool.
For editing, the toolbar
at the left side of the timeline is of central importance. Usually
the tools should have their default setting. If you are not sure,
click on 
 Reset tools in the toolbar to reset
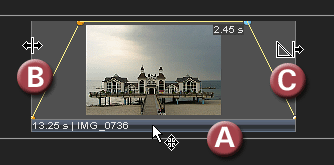
the tools. Now you can grab the object at the info line (A) and shift
it in time (to the right or left) or to other picture tracks. If this
is not possible, check whether the dragging tool is set to
 Unconfined
dragging.
You can have a list of tools printed and place this sheet next to the keyboard to remember the tools and the shortcut more easily. Click Print Toolbar list.
Now grab the beginning of the object (B) to extend or shorten it. The end can be modified the same way; fade-in and out times will not change. The yellow ramp band represents the degree of transparency. When it runs at the top of the object, it represents full opacity, while, at the bottom near the info line, it means that the object is fully transparent.
To change fade-in
and fade-out time enable tool 
 Stretch/Compress
fades. Alternative shortcut via key D,
as in "Dissolve". Dragging the object beginning or
the end (C) changes the fade-in or out time. The time is displayed
at the top node, when you highlight it. The overall duration of the
picture object is displayed in the info line to the left of the name.
 Info on how to change the
time display...
Set tool back to
 Move fades.
Test the effect in
the preview window. If the screen window is not open, click 
 Show preview screens
in the
function bar below the main menu (Shortcut via F10).
Using the mouse, move the Locator to a location in front of the object
and press the space bar to play back the object. Press the Esc
key to stop playback.
But playback can also be started in a different way: When you click the empty space of a track and position the Locator you only need to briefly click the right mouse button additionally while keeping the left mouse button pressed. To stop, simply click the timeline. Just try it a couple of times and will get extremely fast.
Drag a second picture from the Media Pool into the picture track and move the picture object created thus (D) on top of the first one to produce a dissolve in the overlapping area.

Grab the dissolve at the hatched area (E) and the mouse pointer is provided with an X-symbol. Now move the dissolve in time by moving it to the right or the left. This way dissolves can also be synchronized with music. More about this later on.
Now
change the length of the dissolve. For this purpose you need to enable
tool  Stretch/compress fades. To
avoid having to use the mouse you should get used to enabling the
tools via the keyboard keys. Start by clicking
  to reset the tools. While holding down the D
key
  Stretch/compress fades is
enabled. So hold down the D
key and drag the beginning (F) or the end of the fade with the mouse.
If you want the dissolve time to be displayed numerically, you need
to highlight one of the upper dissolve nodes beforehand by clicking
on it.
Play back the dissolve at full screen size. Click a location before the first object to position the Locator. Press the F5 key for the render display to start and the fullscreen picture will be displayed. Start playback by pressing the space bar. Stop playback by pressing the Esc key, pressing it once again will cause the screen to return to window size.
Note: By default the render display
with full screen display appears on Monitor 1. If you want to output the
full screen to another monitor you need to change the settings in the
Display Properties.  And
this is how it is done...
In the Media Pool highlight several pictures. This works just like in the Windows Explorer:
Hold the Ctrl key down to highlight a number of pictures by clicking them.
Press the Shift key while clicking two pictures to highlight all other pictures located between those two as well.
An additional alternative: Right-click the Media Pool and a context menu will pop up offering six different file selection functions. Just try it out.
 On the lightbox in the Media
Pool, check the images for their suitability for dissolves. Define a suitable
sequence of images accordance with the previous chapter. If you don't
know anything about this yet, find the corresponding information under
Sorting on the lightbox.
Now drag the highlighted pictures into the picture track to a location behind the existing picture objects and a dissolve sequence will be created. Fade-in, display and fade-out times are identical and chosen in accordance with the standard settings. Choose your own standard settings for future applications: Create a picture object with the required time settings. Right-click this object and select Ramp – Set durations as default. Any further sequence of pictures dragged into the picture track will be created in accordance with these default settings.
Now we want to add
a piece of music to the timeline. To do so, click category  Audio
in the Media Pool and drag the desired audio file into an audio track.
Try to place the dissolves in a way which fits in harmoniously with
the music. Of course these dissolves can also be varied in length.
Keep testing the effect by playing back the sequences and continue
practicing what you have learnt so far.
With a high
number of objects in the timeline tool 
 Shift following objects can be very
useful. Enable it by clicking the icon with the mouse or press Q. Now shift the dissolve (G) and
any objects following will be shifted along (H). You can also grab
the dissolve directly at the beginning if tool
 Move fade is enabled. Shortcut via
key A.


Tool 
 Shift following objects can also
be used for shifting objects (I) and for adjusting the right object edge
(fade-out). Just try out how the various functions work and what effect
they have. This may be a good idea if you need a gap to add a new image.
The next step is fading
in a title. Image IMG_0369
is very suitable for a title fade-in as it has large quiet areas.
We need a second picture track for the fade-in. If you've got only
one picture track in your project you need to right-click the picture
track head (landscape
symbol) and select Insert track
 Picture.
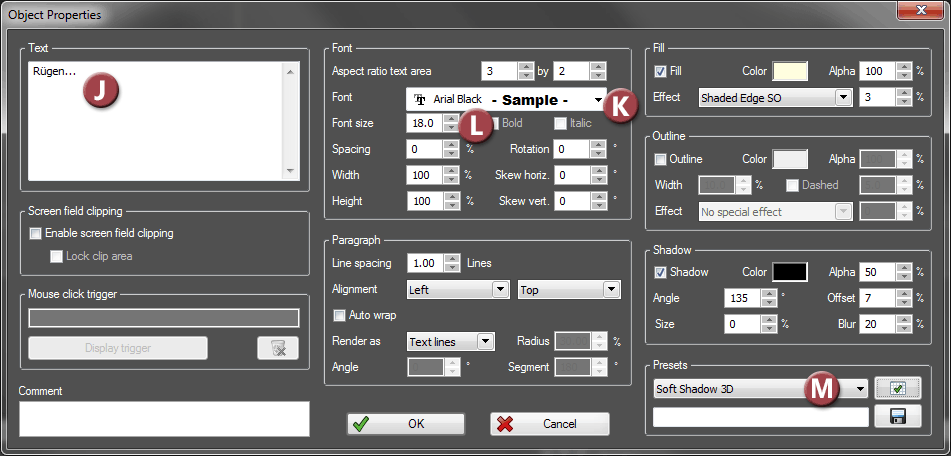
Right-click the picture track and select Insert Text Object. Right-click the text object and select Properties. Under Text enter the title (J), for Font select a bold font, e.g. Arial Black (K) and for Font size about 18 % (L). . Note: The Wings Vioso RX text dialog does not contain the effect options on the very right..
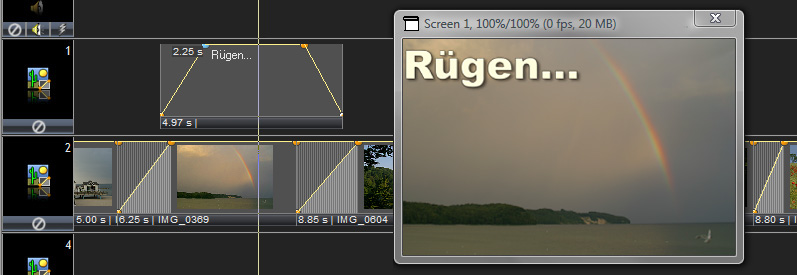
If the track containing the text object is located below the track containing all the other pictures, grab its track head and drag it to a location above the other track for the text to be shown on the screen. Place the text object parallel, i.e. at the same location in time, with picture object IMG_0369 to produce a fade-in. Grab the Locator and move it and you can see the dissolve in the screen window.
In-Screen-Editing allows you to improve positioning of the title in the screen. Right-click the text object following which a yellow frame with its handles appears on the screen. Keep the C-key pressed, grab the title with the mouse and drag it to the desired location (N). To return the screen to normal right-click the screen and select Reset Pan/Zoom.
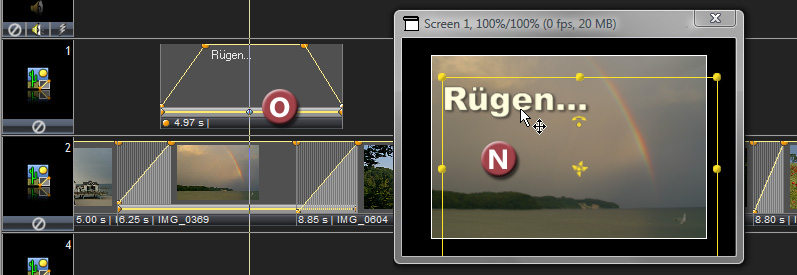
If the title keeps
moving during playback the C-key had been pressed at the wrong moment.
To remedy this problem, right-click the keyframe highlighted in blue
(O) and select Properties.
At the bottom right corner click  , and the location is applied
to the entire object and the dialog closed. Workshops Camera
movement across still pictures and Editing and integrating videos
provide more information about In-Screen-Editing.
The next step will be to show you how a title can be faded in softly via a modified ramp and how you can add a motion effect to your title.
By using ramps, dissolves can be given an individual touch. As you know, every object has four orange standard nodes. They are linked up by a ramp band which has different functions depending on the type of media. For images and videos, it changes the transparency. For audio objects the ramp band changes the volume. Via pre-defined ramps the dissolve characteristics can very simply be changed.
In the Media Pool
click category Ramps 
 and folder *imported
below it. Here you will find a few dissolve ramps imported from a
template while creating the project. If you project does not contain
any ramps you can also some at a later time. See Importing
from other projects.
If you click on one of the ramps, it is displayed in a large size including all its nodes in the Preview Window. Now drag ramp Soft 2 from the Media Pool onto the title dissolve and use Fade 3 for the fade-out.
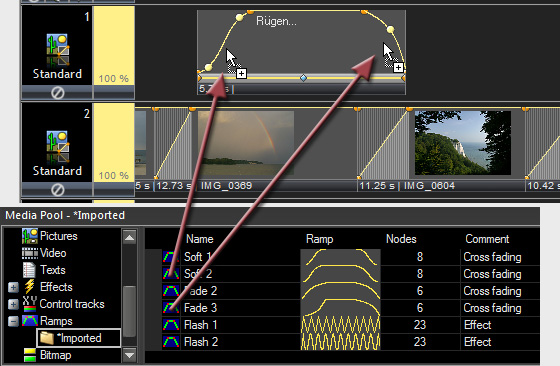
Start playback to test the new ramps. The same way try some other ramps as well and change the fade-in and out times until you find that the effect is harmonious.
You may have noticed that only that portion in the object is replaced that was selected with the mouse when dragging the ramp onto it. All in all, a ramp consists of three parts: fade in, middle portion and fade out. After clicking ramp Flash 1 or Flash 2 in the Media Pool, you can see in the Preview Window, that these ramps only have nodes in the middle portion. The other ramps, on the other hand, have nodes in the fade-in and fade-out part only.
Now drag ramp Flash 2 onto the middle portion of the title. Fade-in and fade-out are maintained and only the middle portion is provided with this blinking effect. Have a look at the effect by playing it.
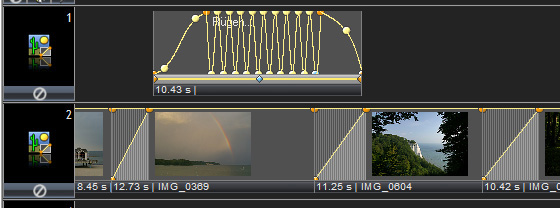
This effect is not particularly suitable in this location, so you should remove it again. In its place you could drag ramp Soft 1 onto the middle portion. As Soft 1 does not have any nodes in the middle portion, the blinking effect has disappeared.
You could go on to improve the crossfades of other objects by adding ramps. The nodes in a ramp, too can be changed. More information on this can be found in topic Editing the ramp band. A ramp that you consider particularly suitable for the dissolve can also be turned into a standard ramp by double-clicking it in the Media Pool. It can be recognized by the yellow symbol and the red frame around it.
Now let's try out some other transitions. Dissolves are a nice stylistic device but it may be useful to have alternatives at the ready if the motif does not allow good dissolves. Save the project status, but leave the project open.
In addition to fades, Wings Vioso RX offers other ways of designing the transition between picture objects, i.e. by means of visual effects. The following effects have the advantage that there can be no irritating superimposition of the graphic structures of two images.
For the motion effect you should choose a different picture object. Move the first picture object node again from the bottom to the very top so that the picture object starts at full opacity and movement and fade-in do not overlap.
In
the Media Pool, click category Control
tracks 
 and folder *imported
below it for the imported control tracks with the effects to appear.
Drag the first effect Move in from
the left (Einschieben von links) onto the title object.
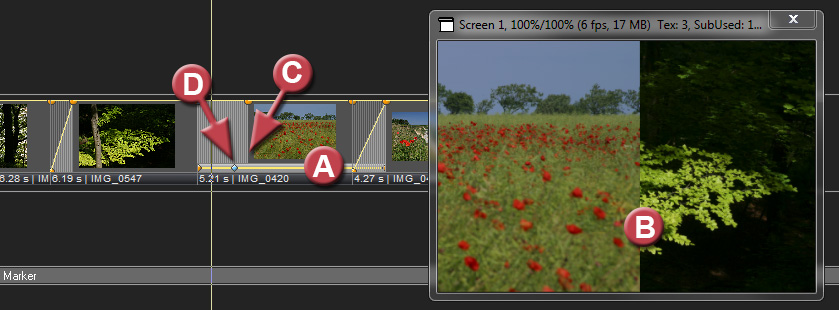
You can now recognize a control track with keyframes (A and D) in the object. These keyframes contain the data for position and size of the image. Just start playback and have a look at the effect. The new images is moving onto the previous one (B) from the left.
Please note that the hatched overlap area must be located behind the last keyframe (C). If this is not the case (E/F), the previous image will disappear before the new image has reached its end position (G). In such a case you would have to extend the overlap area.
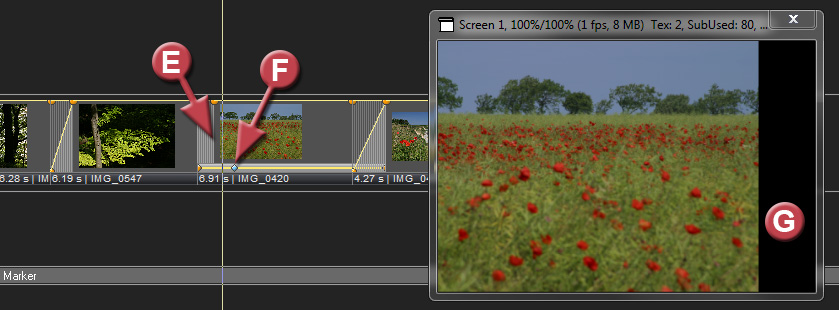
The speed of the movement depends on the location of the keyframe (F). Moving it to the right reduces the speed since there is more time for the movement available. Moving it to the left speeds the movement up. Unfortunately, keyframes cannot be edited when they are located in the overlap area (D). But there is a solution for that, too.
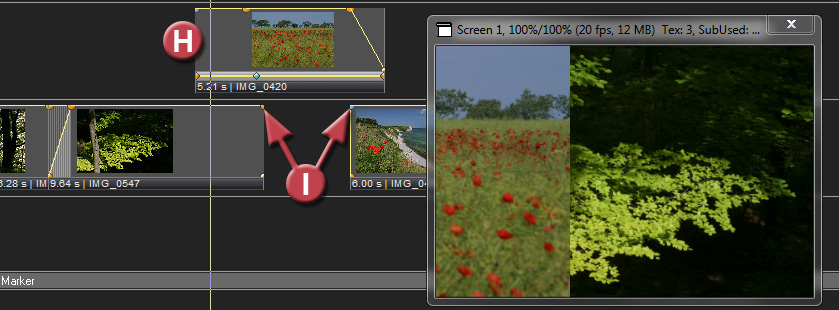
Hold down the V key for vertical shifting and move the picture object onto the track above it (H). Reduce the fade-out or fade-in time of the objects below it by moving the upper node to zero (I). Keyframes and dissolve ramps can now be edited independently of each other.
Try out other effects, too by dragging them onto the object. The former effect is replaced by the new one, just like for ramps. If you particularly like an effect you can make a corresponding note in column Comments. You can also edit or modify effects or create new ones. Information on editing keyframes and creating your own effects can be found in the tutorial about camera movement or in topic Visual effects.
The next step is to create your soundtrack. This you can do in the tutorial Creating and editing soundtrack.