 and Redo
  keys can be found in the function bar below the main menu.
As a necessary precondition for this tutorial you should already have created a project. You can use pictures and audio files from the Wings Vioso RX DVD or from the USB stick, which were saved to folder My documents on the harddisk during the Wings Vioso RX installation. We will show you how to add these media files to the Media Pool. Please note that all media files contained on the Wings Vioso RX DVD are protected by copyright. See Also Copyright for media samples.
As you may well suspect, the Media Pool accommodates all media files of a project, e.g. picture, audio, video and text files. In addition to this, other items which are also important for your project, such as screen and device configurations and a collection of user-defined dissolve ramps are also managed in the Media Pool.
Clicking the wrong buttons while trying to reproduce the workshop is
really no problem. Virtually anything can be undone. The Undo Function
will help you undo or restore editing steps most easily. The Undo
and Redo
keys can be found in the function bar below the main menu.
Note: The screenshots are based on Wings Vioso but it shouldn’t be any problem to follow and work through the workshop.
Folder Media
Samples contains various picture and audio files which you
can use for this workshop. In the main menu click Extras
followed by Open folder  Media Samples
and Windows Explorer will appear. If this is not the case the sample
files may be missing on your computer. Insert the Wings Vioso RX
DVD or plug in the USB stick and click Install
sample media in the selection dialog. Do not change the default
folder My documents as storage
location.
Media Samples
and Windows Explorer will appear. If this is not the case the sample
files may be missing on your computer. Insert the Wings Vioso RX
DVD or plug in the USB stick and click Install
sample media in the selection dialog. Do not change the default
folder My documents as storage
location.
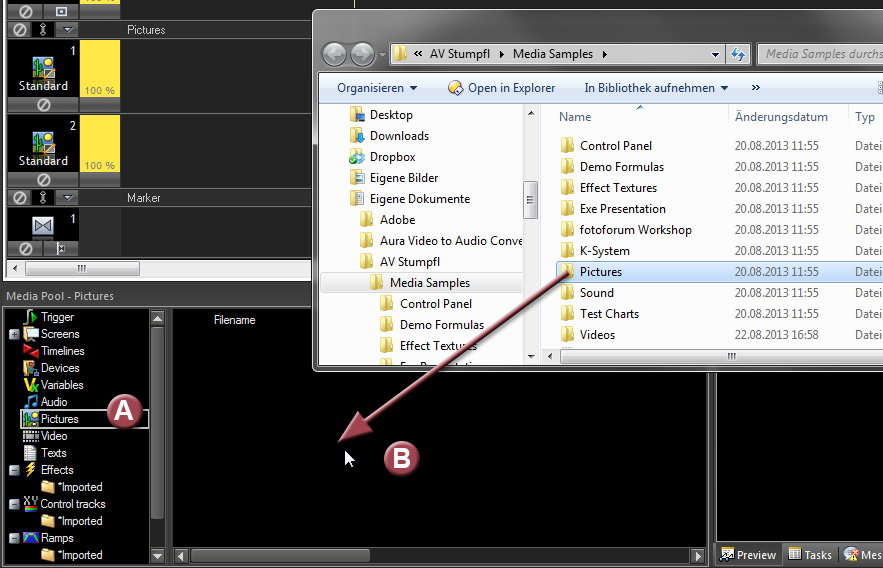
In
the Media Pool on the left highlight category  Pictures
(A). Bring the Windows Explorer window to the foreground and drag
and drop folder Pictures into
the Media Pool (B), following which the files are listed in the Media
Pool.
Pictures
(A). Bring the Windows Explorer window to the foreground and drag
and drop folder Pictures into
the Media Pool (B), following which the files are listed in the Media
Pool.
Since
Wings Vioso RX
renders the media display data in the background it may take a while
before the pictures are displayed. The number of files remaining to
be processed is indicated in the bottom right corner on tab  Tasks.
In
the Media Pool click category  Audio
and drag and drop folder Sound
from the Windows Explorer to the Media Pool.
Audio
and drag and drop folder Sound
from the Windows Explorer to the Media Pool.
When you highlight an audio file in the Media Pool, the corresponding graphic representation of the audio is displayed in the Preview window. If necessary you need to click tab Preview beforehand.
When
you click on category Pictures
and highlight a picture file, the picture is enlarged and displayed
in the Preview window.
If you have added large amounts
of data into the Media Pool, you may be confronted with blue crosses in
the Media Pool as an indication that display data have not been created.
In such a case you can have the display data created all at once. Just
click on  Create display data in the tool
bar below the main menu. This may take a while, depending on the number
of files. You can, however, continue editing, since this process is running
in the background.
Create display data in the tool
bar below the main menu. This may take a while, depending on the number
of files. You can, however, continue editing, since this process is running
in the background.
Wings Vioso RX offers various ways of creating new audio files, e.g. recording sound via a sound card, copying sound from audio CDs. All these procedures are explained in more detail in the Wings Vioso RX Help files, in the following chapters:
Copying audio samples from audio CD
Recording sound via a sound card
As an example, we will show you how to copy a piece of music from an audio CD.
Insert an audio CD into your CD ROM drive. If the Windows Media Player should start up a little later, abort it.
 You can prevent the Media
Player from starting up by holding the Shift
key for a few seconds while inserting the CD into the CD ROM drive.
You can prevent the Media
Player from starting up by holding the Shift
key for a few seconds while inserting the CD into the CD ROM drive.
In the main menu click Media Pool and Create new files.
In the left window section, click on the plus sign next to Audio and Pictures to display the subordinated items. These are the options for creating new media files. Now click Audio CD.
In the centre of the pop-up dialog you will find a list of audio tracks of this CD starting with 01. Should this list be empty, choose the correct CD drive at the top.
As target directory, Wings Vioso RX has chosen the corresponding folder. You don't need to make any changes.
If you have access
to the Internet, you can download the names of the music titles and
other information from a data base on the Internet. To do so, click
on 
![]() Track
names from Internet database. When there is no Internet connection,
you are requested to dial up.
Track
names from Internet database. When there is no Internet connection,
you are requested to dial up.
If you do not have access to the Internet or if the name of your audio CD is not contained in the database, you can enter the base file name, e.g. an abbreviation of the CD title. In combination with the number, the tracks are then clearly defined. However, you can also enter individual names for your tracks. Just mark a name on the list and click the name again. Enter the corresponding name and press the Enter key.
Highlight a title
and click  to listen to the sample.
Some, usually professional
sound cards, do not support this function. For these cases, you can directly
connect a headset to the CD ROM drive.
If you click any other titles while playing back, playback changes over to the selected titles.
Click on  to terminate playback.
Highlight the titles you want to copy (... one or more).
Click on  . The dialog appearing allows
you to keep track of the progress. The copied titles can then be found
in the Media Pool.
. The dialog appearing allows
you to keep track of the progress. The copied titles can then be found
in the Media Pool.
If you only require a small
portion of a piece of music, you can also copy portions. You should, however,
choose a larger section which leaves you enough scope for editing the
sound object at a later time. Further information can be found upon pressing
the F1 key.
Terminate the Record Dialog by clicking OK.
You have now added a number of files to the Media Pool and may continue adding further files at any time. As you can image, a comprehensive show may comprise hundreds or thousands of media files in the Media Pool. In the following we will show you how to view or listen to media files and how these files can be structured and organized in a system.
In
the Media Pool click on category
Audio and highlight an audio
file to make the graphic of the audio appear in the Preview window.
Move
the mouse to the  Preview window (you may have
to activate it beforehand) and the mouse pointer will be provided
with a Play symbol. After a mouse-click playback is started at exactly
this location in the audio file. Click the preview window once again
to stop playback. Alternatively, you can also start playback via the
Play button in the Media Pool.
Preview window (you may have
to activate it beforehand) and the mouse pointer will be provided
with a Play symbol. After a mouse-click playback is started at exactly
this location in the audio file. Click the preview window once again
to stop playback. Alternatively, you can also start playback via the
Play button in the Media Pool.
If you click any other files in the Media Pool while playing back, the corresponding files are immediately played back. This way, pieces of music can easily and comfortably be compared and selected.
You can also sort the listed audio files according to different criteria. In the line containing the column headers click on Duration. Following this, all audio files are sorted in a descending order in accordance with this criterion. Click on Duration again to reverse sorting, i.e. the longest piece of music is now at the top of the list. After clicking on Name the files are again in alphabetical order.
Now click on Pictures
and highlight a picture file to display the picture in the Preview
window.
Of course, it is also possible to sort the pictures in accordance with the available criteria. Moving the scroll bar at the bottom to the right will cause further criteria to appear. Under Comment you can enter your personal remarks with regard to a file. Using the mouse, you can grab a column at its header and move it to any location, e.g. column Comment to the very left. This means that the columns can be arranged and organized in any desirable way.
For category Pictures
you can choose a different form of display which allows several pictures
to be viewed at a glance, just like on a lightbox. Just click on button
 Lightbox view in the function
bar below the main menu.
Lightbox view in the function
bar below the main menu.
Just like on a normal lightbox you can sort and move the pictures by grabbing them with the mouse and dragging them to the desired location. In order to have free spaces for sorting, right-click the first picture in the top left-hand corner and Insert empty row.
You can also test dissolves of pictures. With the right mouse button, drag a picture onto another picture and a test dissolve will be displayed in the timeline window as long as the right mouse button is kept pressed. You can also test dissolves with various other pictures by just dragging the picture onto other pictures. If you don't like the dissolve time, you can change it by hitting a number key on the main keyboard between 0 (zero seconds) and 9 (10 seconds).
This test functions is an excellent means for evaluating individual pictures. Right-click a picture with the mouse-pointer and move the mouse-pointer slightly on it to make the picture appear in the timeline window.
The left side of the Media Pool consists of categories. They help you organize everything contained in the Media Pool. You can create as many folders and subfolders for every category as you like and name them in accordance with the contents. These folders are created, shifted and renamed, just like in the Windows Explorer. By highlighting a folder its contents are displayed in the right section of the Media Pool.
Right-click category
Pictures
and select New Folder. Name
the new folder to specify a group of motives or a topic, e.g. Landscape and press the Enter
key.
Now right-click folder Landscape to select New Folder; Name it for example, Coast. Repeat this procedure and create a new subfolder in folder Landscape called Forest, for instance.
These folders can
now be used to accommodate the corresponding pictures. Click on category
Pictures.
Keep the Ctrl key pressed
and highlight a few pictures with coastal motives on them. Grab them
and move the pictures into folder Coast.
Do likewise with any other groups of motives.
When clicking one of these folders in the Project Explorer, the pictures contained therein will be displayed.
This way, contents can also be organized in accordance with other criteria, e.g. according to Pop, Classic, Noises, Language, etc. for Audio.
For sorting a vast number of pictures into various folders you can open the corresponding folder in a separate window. Right-click a category or a folder and select Open in new window.
In list view, the folder contents can also be sorted in accordance with certain criteria. To do so, click at the header of a particular column, e.g. Name, for all the lines to be sorted in accordance with this criterion. Click again to reverse sorting. Sorting works likewise for all columns. Tip: When you hold down the Ctrl key while changing over to lightbox view the current sorting order is taken over from the list into the lightbox view.
Presumably you may not be able to see all columns. Move the scroll bar to the right to see even the very right columns. If one of the last columns appears to be more important to you, drag the corresponding header to another location, e.g. further to the left. This way the order of columns can be arranged in accordance with your individual requirements.
A final tip: Any folders on the hard disk that contain nicely structured files can easily be transferred to the Media Pool by dragging the folder from the Windows Explorer and dropping it onto a Media Pool category or a subfolder of it. However, this works only if the folder on the hard disk contains only one type of media, e.g. only pictures, audio or videos.
 Please bear in mind that the folders in the Project Explorer
do not necessarily exist
on your hard disk, but are only used for structured filing withing Wings Vioso RX! Wings Vioso RX only stores the
references to the media files on the hard disk.
Please bear in mind that the folders in the Project Explorer
do not necessarily exist
on your hard disk, but are only used for structured filing withing Wings Vioso RX! Wings Vioso RX only stores the
references to the media files on the hard disk.
If you would like to take a break, save your
practice project by clicking on 
![]() Save project in the function bar
below the main menu. You should now go on to the tutorial
Editing sequences of pictures and objects. You will be supplied
with some basic information about how to deal with objects, which you
may use for sound and video editing as well.
Save project in the function bar
below the main menu. You should now go on to the tutorial
Editing sequences of pictures and objects. You will be supplied
with some basic information about how to deal with objects, which you
may use for sound and video editing as well.
