Screen
 Aspect ratio = 16:9
Timeline
tracks Number of video tracks =
0 (...will be created automatically
at a later time)
In this tutorial we are referring to videos in the media samples that were copied to hard disk when installing Wings Vioso RX from a DVD or USB stick. Unless they are available you can also use other videos.
Video objects can be edited just like any other objects, which means that you can consolidate and practice what you have learnt in previous tutorials. The new topics for video editing are as follows:
Creating a project
Importing and playing videos and testing the performance
Frame-accurate cutting
Editing and synchronizing video sound
Optimizing the video image
Before starting this tutorial you should already have performed the following steps or worked through the following tutorials:
Creating a project for a digital AV show
Capturing pictures and sound
Editing sequences of pictures and objects
Creating and editing a sound track
As mentioned before, any faulty editing steps or clicking the wrong buttons can be undone, or situations be restored by using the Undo Function. So you needn't worry at all – just go ahead!
Start Wings Vioso RX and create a new project using the Wizard for Audiovision. In the dialogs make sure that the following settings are made:
Screen
Aspect ratio = 16:9
Timeline
tracks Number of video tracks =
0 (...will be created automatically
at a later time)
For this project videos and images with different aspect ratios are added, which requires some adjustments. Everything you have learned before you can also use for video editing.
Note: The screenshots are based on Wings Vioso but it shouldn’t be any problem to follow and work through the workshop.
Start by importing the videos into the currently created project.
In the Media Pool
click on category  Videos.
In the main menu click Extras
and Open folder
Videos.
In the main menu click Extras
and Open folder  Media Samples and double-click
folder Videos. Drag all videos
except video Hannover Aegi.mp4 and
folder Timelaps into the Media
Pool.
Media Samples and double-click
folder Videos. Drag all videos
except video Hannover Aegi.mp4 and
folder Timelaps into the Media
Pool.
Note: Please note that the videos are protected by copyright and must only be used for the tutorials in Wings Vioso RX. See also Copyright for media samples.
In the Media Pool
there are now four videos available and Wings Vioso RX
is rendering display data for the first video in the background. For
rendering of display data to be completed for all videos click  Options in the toolbar and
select Project Options - Display data. Under Video
click
Options in the toolbar and
select Project Options - Display data. Under Video
click  and select When adding files. Close the dialog
by clicking OK.
and select When adding files. Close the dialog
by clicking OK.
Now click  Create display data (twice,
if necessary) for the button to be enabled . Following this,
display data are created for all videos located in the Media Pool.
Depending on the computer performance and the processor type this
takes up to 10 minutes. But once this has been done, there is nothing
in the way of swift editing. The number of files remaining to be processed
is indicated on tab
Create display data (twice,
if necessary) for the button to be enabled . Following this,
display data are created for all videos located in the Media Pool.
Depending on the computer performance and the processor type this
takes up to 10 minutes. But once this has been done, there is nothing
in the way of swift editing. The number of files remaining to be processed
is indicated on tab  Tasks
in the preview window.
Tasks
in the preview window.
The list shows all the video data to be processed.
If a progress bar is visible, the task is currently being processed. The
clock symbol signalizes that a task is waiting. The letter behind the
file suffix signifies the type of tasks: Q
means Quick Preview, P means Preview. The number of files
that can be processed simultaneously depends on your processor (number
of available processor cores). Click  to delete the task. Click
  to
move the task to the top position where it is the first to be processed.
Click
to
move the task to the top position where it is the first to be processed.
Click  to move the task
to the end of the list.
to move the task
to the end of the list.
In the Media Pool
you can see for which of the videos display data have already been
created as any additional symbols have disappeared. Videos with blue
or yellow crosses are still being processed (A). Highlighting
a video in the list results in a preview on tab
 Preview, similar to images and audio
files.
Preview, similar to images and audio
files.
Drag video Carnival and drop it into the black timeline space below the last track (C). Following this, Wings Vioso RX creates a video and a sound object and places them in sync into new and grouped tracks.
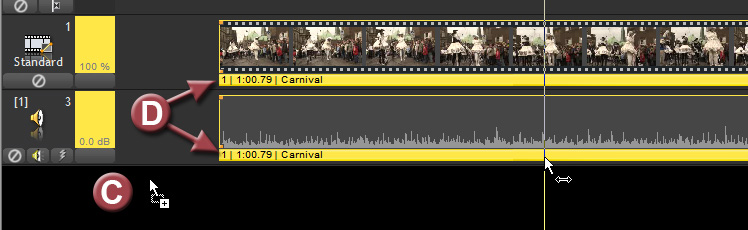
The group index is shown at the beginning of the info line (D). Grabbing one of the objects highlights both of them. This is useful for shifting objects as picture and sound remain in sync.
Move the Locator to a location in front of the video and play it by pressing F5 followed by pressing the Enter key. As you may have noticed the video has a slight yellow color cast as white balance was not set optimally during recording. Later on you will find out how to remove a color cast. Important note: When you start playback with the mouse or by pressing the space bar video is only displayed in preview quality. Full quality can only be achieved in presentation mode, i.e. by pressing the F5 key.
Now drag video Laterna Magica into the existing video track behind the previously created video object Carnival. Since in this case sound is not created automatically you need to drag the video file once again into the audio track in order for the audio object to be created. When you play back the video the audio will presumably be out of sync with the image as video and audio objects are not accurately aligned.
Highlight the video object and right-click the corresponding audio object and select Align following which both objects are aligned exactly at the beginning.

Grouping
these objects will make them stay in sync. Highlight both objects
with the Ctrl key held down,
right-click on of the objects and select Grouping
 Create new group.
Note: Video and sound are always placed in separate objects in Wings Vioso RX. The extracted video sound can be edited just like any other sound.
Tipp: If you have imported many videos as raw material into the Media Pool, you can highlight all videos in the Media Pool and drag them all together into the timeline. The individual videos are then displayed in one track one after the other and can be looked through for rough cutting.
The same way, you can also drag other videos into the timeline, e.g. Hannover Central Station.mp4. This video and some ones are UHD-resolution videos which put higher demands on the computer performance. If the videos do not run smoothly you should do the performance test.
In the Media Pool right-click the video file Hannover Central Station and select Performance Test. Click Start following which a test is run finding out about the decoding rate.
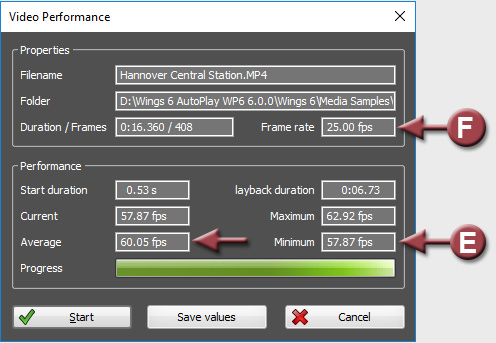
The values below Performance are highly interesting. The minimum value (E) should be about 25 to 30 percent higher than the frame rate (F) i.e. about 33 frames per second in our case. This computer might run into problems when dissolving two such videos. Close the test dialog by clicking Cancel. By the way, the main processor actually plays a more important role than the graphics card when it comes to video decoding.
You will probably have noticed that the video Laterna Magica also shows some other scenes at the beginning and the end. These parts should be cut off and you will even be able to do this frame-accurately as the preview data contain all the individual video frames. They are only at a lower resolution to allow even complex shows containing a lot of HD or 4K videos to be edited swiftly.
Move the Locator to
the beginning of the video object and click button  or the plus sign on the numerical
keypad three times to stretch the time axis to allow accurate editing.
Now click the info line of video Laterna
Magica and the sound object will also be highlighted.
or the plus sign on the numerical
keypad three times to stretch the time axis to allow accurate editing.
Now click the info line of video Laterna
Magica and the sound object will also be highlighted.
For the highlighting to remain you need to grab the Locator at the little triangle in the time display at the top. If you move the Locator across the object the screen window will show that the content keeps moving frame by frame. Move the Locator to the location where the first scene is faded out and the second one starts.
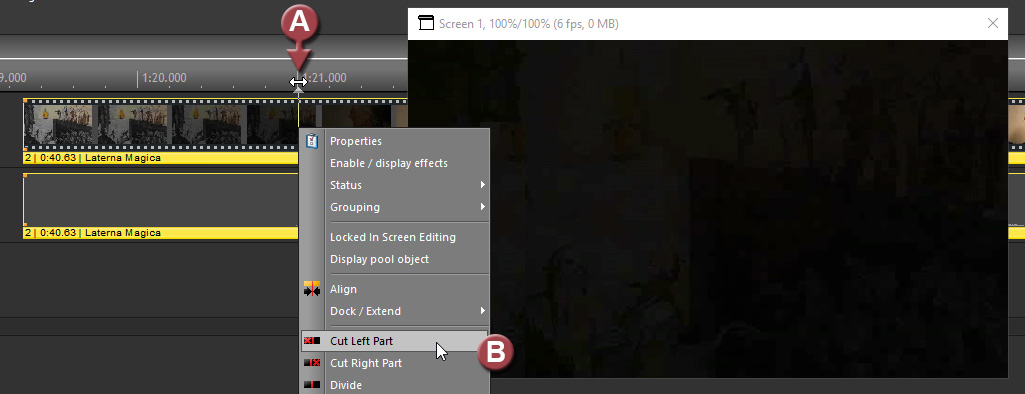
The Locator is now at the accurate cutting position. Right-click the Locator and choose Cut Left Part. Now play back the beginning of the video and check whether the video starts in sync with the speaker. Cut off the last scene with the graphics likewise. Of course you need to Cut Right Part in this case. Note: Only if both objects are highlighted are they both cut off at the same time.
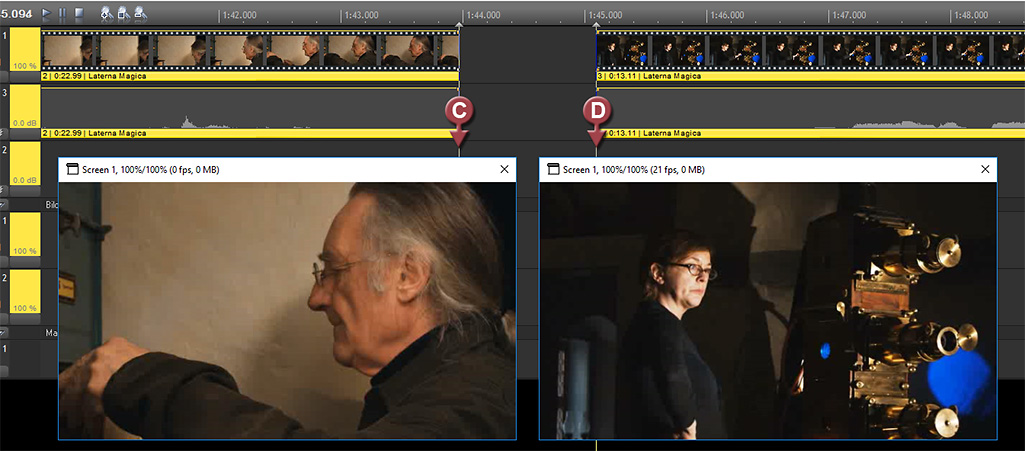
Check the cuts by playing back the video. When changing over from the speaker to the projector the lady is moving down her arm and putting her hand on her hip. Cut off this movement as described above. Place the Locator as seen in the illustration and select Divide for the first cut (C) and Cut Left Part for the second cut (D).
You can now make a
hard cut or dissolve the two objects created. Just try out both. It
works the same way as for pictures or sound. For a hard cut you may
want to use tool  Snap enabled which can be
enabled by hitting the L key.
Change the time scale back to normal by clicking
Snap enabled which can be
enabled by hitting the L key.
Change the time scale back to normal by clicking  or hitting the X key (multiplication) on the number
pad.
or hitting the X key (multiplication) on the number
pad.
A tip for later: When there are many video clips in one track of your project and you cut off the unwanted video portions you may end up with a lot of gaps between the video objects due to the cuts. There is a function which allows automatic closing of these gaps: Highlight video track and pertaining audio track by clicking the track head while holding the Ctrl-key down. Right-click such a gap and select Close gaps - On whole track. Refer also to Efficient cutting of video and sound.
For the optimization of the video image the real-time effects offered by Wings Vioso RX can be quite useful as they allow non-destructive editing without rerendering the video file. The effects are rendered by the graphics card during playback in real-time. This is a great advantage compared to classic video editing programs. Eco and Starter licenses do not offer all the effects covered herein.
As
mentioned above the video Carnival had a yellow touch due to an incorrect
white balance and was not very brilliant either. For improving sharpness
and color saturation there is a preset available. In the Media Pool
in category  Effects
click on folder #imported
and the effects will be listed on the right. Drag the effect preset
Video Optimization onto the
video object Carnival and
the image will improve. The actual effects that become effective can
be displayed. Right-click the video object and select Enable/display
effects following which the effects along with their parameters
appear in the Properties Table.
Effects
click on folder #imported
and the effects will be listed on the right. Drag the effect preset
Video Optimization onto the
video object Carnival and
the image will improve. The actual effects that become effective can
be displayed. Right-click the video object and select Enable/display
effects following which the effects along with their parameters
appear in the Properties Table.

Use base effect Sharpness to set the sharpness (A) and Saturation to set the color saturation (B). The small slider controls will only appear after clicking the area after the value, i.e. where the slider controls are hidden. Once the slider control has appeared you can move it using the mouse. For a fine adjustment use the mouse wheel which allows very accurate setting.
To be able to judge sharpness the screen window should be a large as possible and ideally output size, e.g. 1920 x 1080 pixels. Change to output size by right-clicking the screen window and selecting Restore output size. If your monitor is not big enough an error message will appear. In such a case you need to manually adjust the screen window to the largest possible size. Place the screen window in a location which allows access to the Properties Table. For the adjustment it’s no big problem if the screen is not completely visible on the right.
Start the presentation in the window by pressing Ctrl + F5. Playback is now at full quality based on the original video data. When you check or uncheck Active at the top of the Properties Table you can compare the video with and without effects. The right degree of sharpness in particular should always be judged with the video running. Too much sharpness may cause the moving details to become grainy. Try to optimize also other videos and produce the optimal sharpness.
Tip for NVidia graphics cards: Usually, the tonal values of the video image are wrongly interpreted by Nvidia graphics cards making a video dull and lacking contrast. The best solution to this problem is to correct this in the Nvidia system control. Further details can be found here . Notebooks normally don’t offer this option and you can correct dull video images using the effect Level (with the Advanced License and up) or the base effect DefaultYUV. When you are affected by this problem you can use Preset Video Optimization + Contrast Increase instead of Preset Video Optimization as effect Levels is already contained (works with the Advanced license and up).
Now
let’s turn to the correction of the color cast. Right-click the video
object Carnival and select
Enable/display effects. In
the Properties Table click the plus sign in front of Effect
2. Below it click Effect
and select effect MultiplyColor
by clicking button  . Don’t
panic - the image will now look all green. The filter color still
needs to be set to light blue, which is the complementary color of
the color cast.
. Don’t
panic - the image will now look all green. The filter color still
needs to be set to light blue, which is the complementary color of
the color cast.
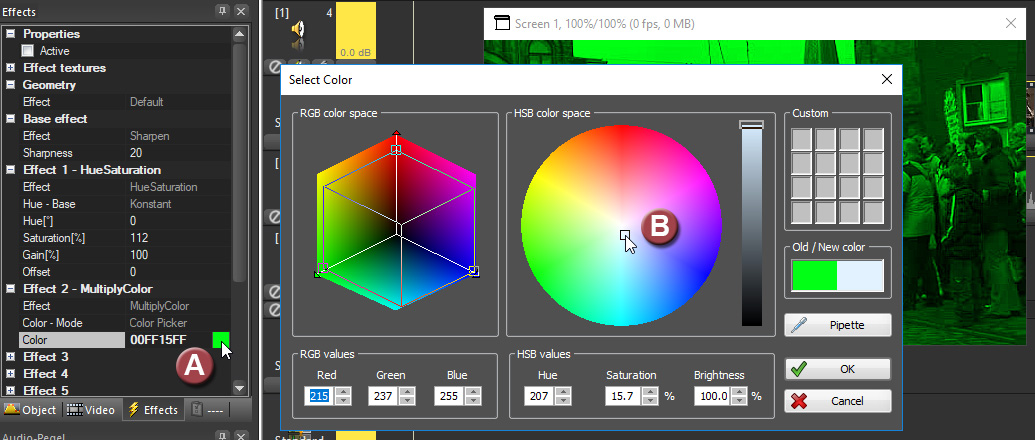
Next to Color click the green field (C) and move the square in the color circle to light blue. The change can immediately be seen on the screen. Click OK to close the dialog. All effects can be tested by checking and unchecking box Activate. The best way is to start the presentation in the screen again by pressing Ctrl + F5.
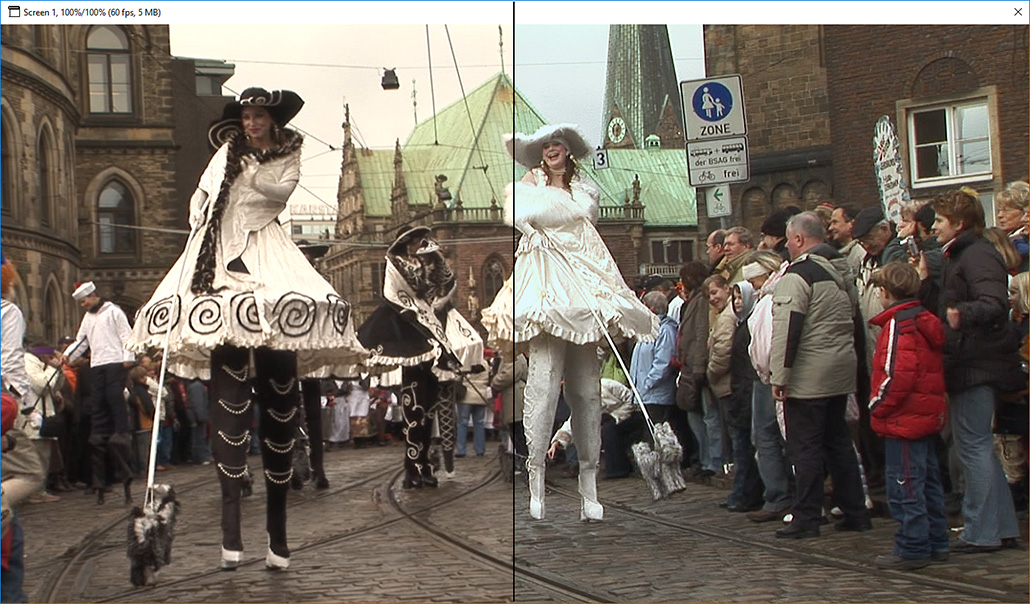
Above you can see the image on the left without effects and on the right with effects.
Now you have learned a few basic editing steps for video integration and have been given some basic information. It is important to know that video sound must be extracted and will then be available for editing just like any other sound. For subsequent synchronization a number of special functions are available which can be found in the topics for video editing.
See also