Optimizing Windows 10
Below you will find a few tips for optimizing your Windows 10 PC, sorted
according to importance. The first set of suggested measures is appropriate
in most cases, the second category just helpful, whereas the settings
at the end of the list are for experts who are setting up computers used
only for presentations.
 The modifications suggested
below deviate considerably from the standard and security settings and
serve for optimal and trouble free presentation only. Before making these
modifications create a restore point, that allows you to change back to
the old configuration, if necessary. For computers that are also used
for other purposes it may be useful to create a new user, e.g. "Presentation",
which lets you start the computer with this user profile for presentations.
The modifications suggested
below deviate considerably from the standard and security settings and
serve for optimal and trouble free presentation only. Before making these
modifications create a restore point, that allows you to change back to
the old configuration, if necessary. For computers that are also used
for other purposes it may be useful to create a new user, e.g. "Presentation",
which lets you start the computer with this user profile for presentations.
Recommended
measures
Installing additional software
Settings for visual effects, driver updates
and remote desktop
Configuring screen savers, sounds and user
interface
Setting up Power Options
Disabling automatic playback
Disabling indexing
Disabling automatic hard disk
defragmentation
Graphics card and drivers
Enabling high-performance
graphics chips for notebooks
Useful
measures
Adjusting folder options
Limiting the activities
of the Action Center
Measures
for mere presentation computers without Internet connection
Avoiding
the login dialog when starting up the computer
Turning problem reports
off
Adjusting firewall, defender and windows updates
Turning the user account control off
Searching
for interfering tasks
Additional
software
For certain functions, Wings Vioso RX
requires installation of additional software that should be on any presentation
PC.
DirectX
9.0c of June 2010 is required for running Wings Vioso RX.
This DirectX version must be installed in addition to DirectX 10,
11 or 12. If you should have problems, we advise you to get the latest
DirectX 9 update which can be downloaded from the Microsoft website.
ASIO4ALL
allows usage of standard WDM sound
cards for multi-channel playback provided they feature a 5.1 output.
This tool can be found at www.asio4all.de.
Note: If you are using a real ASIO
sound card with separate ASIO driver you should not install ASIO4ALL
as this may cause conflicts.
Although Acrobat Reader is not necessary
for Wings Vioso RX
it allows display of any information available in PDF format. It can
be found on the Wings Vioso USB-stick or on the Adobe website.
Recommended measures
The settings listed below are useful and are mostly made in the Control
Panel, which can be opened by clicking the Windows icon  and selecting Control
Panel . You'd better leave this dialog open and select Display
and Large icons or Small
icons, as the following explanations refer to this type of display.
and selecting Control
Panel . You'd better leave this dialog open and select Display
and Large icons or Small
icons, as the following explanations refer to this type of display.
Settings for visual
effects, driver updates and remote desktop
Visual effects
Right-click the Windows
icon and select Control
Panel.
Click System
followed by clicking Advanced System
Settings.  If
Option "System" cannot be selected...
If
Option "System" cannot be selected...
On tab Advanced
under Performance click on
Settings.
Click Adjust
for best performance. Close the dialog by clicking OK.
 If
you should find out that important functions have been turned off you
can turn them on again individually in the above dialog box. In our experience
semi-transparent windows and font smoothing, etc. use up less performance
than many people may think.
If
you should find out that important functions have been turned off you
can turn them on again individually in the above dialog box. In our experience
semi-transparent windows and font smoothing, etc. use up less performance
than many people may think.
Hardware
Click tab Hardware
and Device installation settings.
Select No
and close the dialog by clicking Save
changes.
Now
that the automatic search function for drivers has been disabled, you
may have to perform a search manually.
Remote
Select tab Remote
and clear the check box Allow Remote
Assistance connections to this computer.
Click OK
and close this System dialog
box, too.
Configuring
screen savers, sounds and user interface
Screen saver and energy saving measures may seriously affect the presentation
run on a presentation PC. It may also be useful to have a black or gray
desktop, in order to prevent some Windows desktop images from being displayed
on the screen in case of problems.
Right-click the Windows
icon and select Control
Panel. If
icon “Personalization” cannot be selected...
Click Personalization
and select a semi-transparent theme. Info:
Such themes are better suited for playback of single-display shows
than high-contrast themes.
At the bottom click
Desktop background and for
Background select Solid
color. Select the black or gray color pattern and close the
dialog.
In dialog Personalization
click Sounds at the bottom
and select No Sounds for Sound Scheme. Remove the checkmark
next to Play Windows Startup Sound.
In order to mute the
Action Center sound for incoming notifications highlight entry Notification in field Program
Events under Windows Default
and select option (None) under
Sounds. Close be clicking
on OK.
In the bottom right
corner click Screen Saver.
Under Screensaver click (None) and clear check box On resume, display logon screen.
Close the dialog by clicking OK.
Now check the size
settings for texts and icons in the programs. Click on the Windows
icon , select Settings
and System.
The value next to
Change the size of text, apps, and
other items: should be 100%.
If this is not the case move the slider to the very left until the
value is 100 %. The value for scaling can be set separately for every
monitor or projector. If you need to enlarge the interfaces for usage
on a 4k monitor mind the following notes.

Important
note: With a value above 100 % for text size and interface,
the Wings program window and the screen are scaled up and the presentation
becomes blurred. To prevent this you can uncheck Enable
scaling by Windows in the Global Options under User
interface before the presentation. See Options
- Global Options - User interface.
With
Windows 10 the taskbar is usually shown on all monitors. This may
be disturbing when the fullscreen is not open.  This is how you restrict the
taskbar to the primary monitor
This is how you restrict the
taskbar to the primary monitor
Setting up Power
Options
The follow steps allow you make numerous settings for energy management:
Right-click the Windows
icon and select Control
Panel. If
icon “Power Options” cannot be selected...
Click Power
Options, followed by clicking Show
additional plans and select High
performance.
On the right click
Change plan settings and select
Never for Turn
off the display and Put the
computer to sleep.
Now click Change
advanced power settings. In this dialog choose High
performance [Active] and make the following changes below:
Hard
disk - Turn off hard disk  Never
Never
Sleep
- Sleep after Never
Sleep
- Allow Hybrid Sleep Off
Sleep
- Hibernate after Never
Power
buttons and lid - Power
button action
Shut down
PCI
Express - Link State Power
Management
Off
Display
- Turn off display after Never
Multimedia
Settings - When sharing
media Prevent
idling to sleep
Close the dialog by
clicking OK.
Disabling
automatic playback
On the Control Panel
click AutoPlay. If
this option cannot be selected...
For all media change
the settings to Take no action
and click Save.
Disabling
indexing
Windows 10 automatically creates an index for the contents for certain
folders and updates it regularly. Since these hard disk accesses are superfluous
for presentation computers you should disable indexing.
On the Control Panel
click Indexing Options. If
this option cannot be selected...
Click Modify
followed by clicking Show all locations.
Clear check box Change selected locations and there
will be no more entries below.
Close the dialogs
by clicking OK or Close.
Disabling
automatic hard disk defragmentation
After a pause of approx. 30 minutes Windows 10 automatically starts
hard disk defragmentation. This might lead to problems during a presentation.
The defragmentation result achieved such is also anything but good. This
is how you can turn off automatic defragmentation:
On the Control Panel
click Administrative Tools
followed by clicking Task Scheduler.
In the dialog on the
left, open the following tree structure: Task
Scheduler (Local) - Task Scheduler
Library - Microsoft
- Windows and highlight Defrag.
In the window at the
top you will find a Scheduler entry which you delete by right-clicking
it.
Now close the Task Scheduler dialog.
It's
a good idea to use a good defragmentation program, e.g. O&O
Defrag and defragment the hard disk after playing all media but
before actually starting the presentation. SSDs do not require any defragmentation
On the contrary, it would even reduce their life time.
Graphics
card and drivers
For smooth playback of high-resolution
HDAV shows a high-quality, fast 3 D graphics card with a lot of graphics
memory and an up-to-date driver are highly important. Color rendering
must be set to a minimum color depth of 24 bits or better even 32 bits.
For fluent movements and panning, the refresh rate should match the display
and the frame rate of the video. See also Media
integration.
Right-click a free
area on the Windows Desktop and select Display
settings. At the bottom click Advanced
display settings.
At the bottom click
Advanced display settings
followed by selecting Display adapter
properties at the very bottom. In the dialog displayed select
tab Monitor. For Screen
refresh rate choose 60 Hertz for usage with projectors or LCD
displays, or 50 Hertz playback of PAL videos on monitors or projectors
that are able to play 50 Hz without any problems. Always choose a
screen refresh rate that corresponds to the frame rate of the video
used or a multiple of it. See also Media
integration.
Below it you can select
the Color depth. The best
choice is 32 bits. Some graphics
cards to not allow selection of the color depth, e.g. Intel graphics
chips. If a more powerful graphics card is available you should enable
it. See Activating
Nvidia Optimus graphics chip below.
Note: This setting is usually not
available for notebooks.
Enabling
high-performance graphics chips for notebooks
Modern notebooks are slim and economic and usually
feature main processors with integrated graphics capability and a graphics
chip by Nvidia or AMD Radeon. You need to make sure that always the better
graphics chip is used for Wings Vioso since the integrated graphics processor
offers less performance. The procedure is similar for Nvidia and AMD Radeon.
Detail information on both system can be found below.
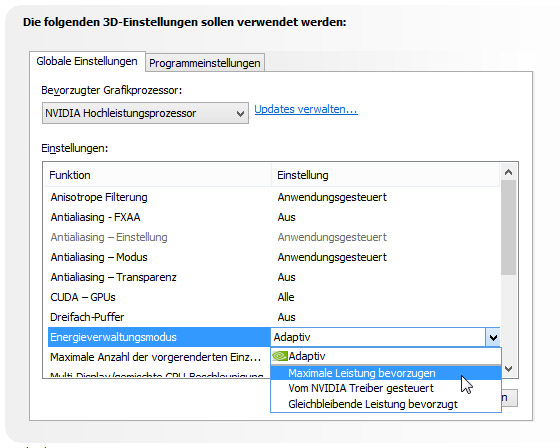
Nvidia Optimus
Right-click a free
area on the Windows Desktop and select Nvidia
Control Panel.
In the dialog on the
left under 3D Settings click
Manage 3D settings.
On tab Global
Settings under Preferred graphics
processor choose setting Nvidia
high performance processor.
On tab Program
Settings click Add
and select Wings5.exe which
can be found at “C:\Program Files (x86)\AV Stumpfl\Wings 5”.
Some notebooks may show reduced performance
after playback start due to inappropriate power management. In such cases
change the settings in the Nvidia Control Panel as follows: Click Manage 3D Settings and select tab
Global Settings. In the list under
Settings change the setting for
Power management mode from the
default setting Adaptive to Prefer maximum performance. Show
settings.
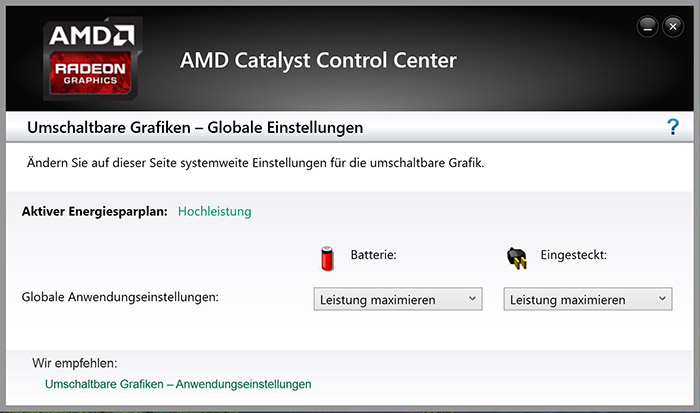
AMD Radeon mobile
Right-click some free
area on the Windows Desktop and select Configure
switchable graphics.
For Global
Application Settings select setting Maximize
performance for Battery
and Plugged In
Show settings.
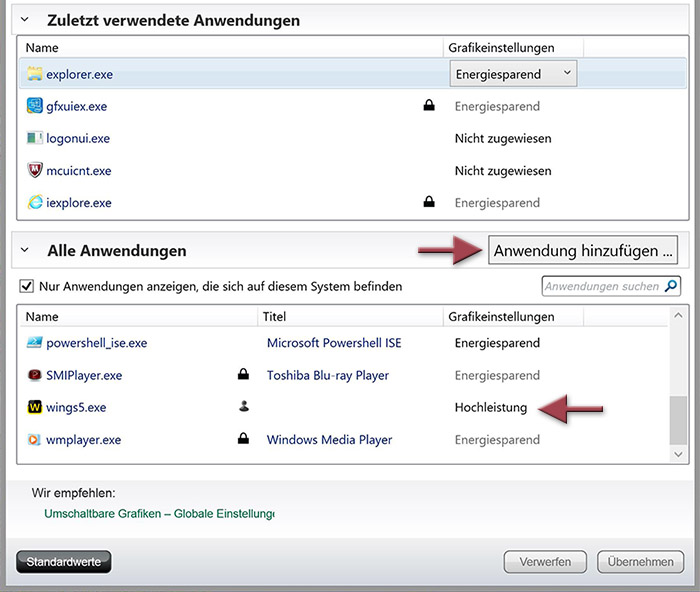
In the dialog below
click Switchable graphics - Application
Settings. In the dialog popping up click Add
application and select Wings5.exe
which can be found at “C:\Program Files (x86)\AV Stumpfl\Wings 5".
In the list highlight
Wing5.exe and in column Graphics settings select High
performance,
Show settings.
Click Accept
and close the dialog.
If you want to play you shows as EXE
presentations you need to add every EXE presentation to the Application
Settings as explained above.
Useful measures
Here you will find a few recommendations that are not absolutely necessary
but that may facilitate working with media and Wings Vioso RX.
Adjusting folder options
Right-click the Windows
icon and select Settings.
In field Find a setting enter
Folder and from the suggested
topics select File Explorer Options.
At the top of the
dialog box select tab View.
Clear the check box
next to Hide extensions for known
file types.
Under Hidden
files and folders click option Show
hidden files, folders and drives.
Click OK.
It is a good idea to
adjust the folder views for different contents to meet your requirements.
Start by adjusting
the folder view (e.g. for files, images or videos) as desired. Open
the File Explorer, click tab View
at the top and select the desired view.
Then click tab File and select Change
folder and search options.
Click the View
tab, click Apply to Folders.
Repeat these steps for all types of folders (files, images, videos,
etc...)
Limiting
the activities of the Action Center
The Windows Action Center, via popups, automatically informs about problems
and incidents that may not altogether be so important and which may disturb
during a presentation.
Click on the Windows
icon , select Settings
and System.
On the left, click
Notifications & actions
following which the notifications appear on the right. Normally, it
should do if Hide notifications while
presenting is turned on.
As an alternative,
you can also turn off the entire Action Center. Click Turn
system icons on or off and switch the Action Center off.
This means that Windows will no longer inform you about problems via
the Action Center.
Close the dialog.
If you have not done so already, disable
the Action Center sound for incoming notifications. Click the control
panel icon Sound and
highlight entry Notification
in field Program Events under
Windows Default. At the bottom
click Sounds and select option
(None). Close by clicking
OK.
As an alternative, the Action Center can
be disabled. In the Task Bar click the Action Center icon  and the button Quiet
Hours. If this button is not visible click on Expand.
and the button Quiet
Hours. If this button is not visible click on Expand.
Measures for mere presentation
computers without Internet connection
The following steps should
only be performed by experts for computers that are not connected to the
Internet and are exclusively used for presentation purposes.
The modifications suggested below deviate considerably from the standard
and security settings and serve for optimal and trouble free presentation
only. Before making these modifications create a restore point, that allows
you to change back to the old configuration, if necessary. For computers
that are also used for other purposes the steps described below should
not be performed.
Avoiding
the login dialog when starting up the computer
For permanent installations,
which are activated in the morning via timer control and run automatically,
the logon dialog may be a nuisance. There is a way around this.
Please note that avoiding the logon dialog
and the password query may allow unauthorized access to your data!
Call dialog Execute by pressing the Windows-key
and R.
Enter netplwiz and click OK,
and the User accounts dialog
will pop up.
In the field, highlight
the user account that is to log in automatically in the future.
Clear check box Users must enter a user name and password
to use this computer and click OK.
In the following dialog
enter the password twice for the specified user account and click
OK.
Next
time Windows starts up the user is logged in automatically.
See
also Automatic
computer startup and show start
Turning
problem reports off
Changing these setting
also affects the Help suggestions by Windows and should only be made by
experienced users.
On the Control Panel
click Problem Reports and Solutions
and Change settings on the
left.
Under Choose
how to check solutions to computer problems select Off.
Close the dialog by
clicking OK.
Adjusting firewall, Defender, Java
and Windows updates
Important
note: These settings should only be
changed, if your computer is not connected to the Internet and is run
within a network controlled by you. Otherwise there is a security risk!
Right-click the Windows
icon and select
Control Panel.
Click Windows
Firewall and on Turn Windows
Firewall on or off.
Enable Turn
off Windows Firewall, click OK
and close the Firewall dialog.
Now
disable the Defender functions.
Click
on the Windows icon  ,
select Settings and Update & Security.
,
select Settings and Update & Security.
Click
Windows Defender on the left
and change Real-time protection to Off.
If any other security software has been installed
these Defender On-Off Settings are disabled as they are controlled
by the other security software.
Unfortunately, Windows Defender automatically
reenables this setting after a while or after a restart. If
you want to permanently disable Windows Defender...
It
is not useful to have the presentation computer automatically search for
updates automatic updates should be disabled. Unfortunately, Windows 10
does not offer an explicit disabling function. However, this function
can be disabled as follows:
On the keyboard, press
the Windows key
+ R to open the Run dialog.
Enter services.msc and confirm with the Enter
key following which window Services
will open up.
In the list of services
select Windows Update and
double-click it.
In the window popping
up select Startup type and
entry Disabled and confirm
by clicking OK.
Following this click
Java (32 bits) in the Control
Panel. Click tab Update and
remove the checkmark next to Automatic
search for updates. Close the dialog by clicking OK.
Disable automatic update for all programs
(e.g. Adobe Photoshop). If your computer runs an anti-virus program, disable
it before you start the presentation.
Turning
the user account control off
These steps prevent continual
prompting for permission for tasks requiring administrative rights. Important note: Since turning the
user account control disables some Windows 10 security functions, only
experienced PC users should do so.
Right-click the Windows
icon and select
Control Panel.
Click on User
Accounts and click Change
User Account Control Settings.
Move the slider to
the very bottom to Never notify me
and click OK. Answer the following
warning with Yes.
Searching
for interfering tasks
If no sufficient performance
could be achieved, despite heeding the tips above, the reason may be difficult
to find. Usually, it's some programs that are still active in the background
that you need to track and deactivate. In order to prevent the installation
from becoming inoperative by deactivating any "essential" programs,
you should create restore points
for Windows. How this is done, is explained in the Windows Help. Otherwise
a defective installation may never be repaired again.
Following the tips for PC
optimization is at your own risk. We cannot accept any liability for any
damage that may be caused. If necessary, ask a computer expert to perform
these measures for you to rule out any damage.
Determining and removing
tasks
The paragraph above contains
some information for optimizing tasks. If your program still does not
run without any problems, you can have a look at the Task Manager and
see which tasks and processes are being performed. The next step is to
find out if any of the tasks performed interferes with Wings Platinum.
Right-click a free
area in the task bar and select Task
Manager.
Click on tab Processes for a list with the currently
running processes to be displayed. To find out what the abbreviations
stand for, have a look at the Windows Help or the Internet, e.g. at
http://frankn.com (German).
Terminate one process
after the other and keep checking whether the malfunction has been
eliminated, e.g. jerky playback for HDAV shows. Start with user-specific
processes and make a note of the process you have just terminated.
Although Windows will refuse to terminate "essential" system
tasks, some crashes may be caused by terminating tasks.
Once you have found
out about the interfering task, uninstall the corresponding program
or disable it, e.g. via the system configuration (msconfig.exe). After
restarting, check whether a disabled program is actually no longer
running.
If this does not help
to eliminate the problem, it may be due to the devices or drivers. Update
all drivers and test disabling those devices in the device control system
which are not really necessary.
See also
Saving resources