 This workshop refers to the
full versions. With the Basic or Demo License, however, most of the command
are reproducible. Information about the restrictions can be found in the
Help topics under Licenses
and functions.
This workshop refers to the
full versions. With the Basic or Demo License, however, most of the command
are reproducible. Information about the restrictions can be found in the
Help topics under Licenses
and functions.In this lesson you will find out about how to create a new project for a digital AV show via a Wizard. Wings Vioso RX is configured for your show, i.e. the wizard asks you about the format of your show or the number of tracks you want to work with.
Step by step, the Project Wizard will help you start your project. It is important to establish a sound basis for your project. Changes in the settings can be made at any time later on. We'll start with a simple project.
This workshop refers to the
full versions. With the Basic or Demo License, however, most of the command
are reproducible. Information about the restrictions can be found in the
Help topics under Licenses
and functions.
Start up Wings Vioso RX. If this has already been done, click on File – New in the main menu.
In the dialog box popping up, select Project Wizards in the left dialog window .
From the list displayed, select Creation of a new AV project and click OK.
Here you can make some settings for the screen used for displaying your show.
Specify the Aspect ratio of the screen you want to use for your show. It is useful to choose the same aspect ratio as that of your pictures. The aspect ratio can still be changed at a later time via the Screen Properties.
The settings under Screen Settings can normally be left as they are. The picture display data size is automatically adjusted to match your monitor. Of course, modifications are also possible at a later time, e.g. for presentations on a video projector.
Click Next twice.
This dialog allows you to select a project template which is used as a basis for taking over Media Pool components into the new project. This way you can use Presets of ramps and effects as templates for a new show.
Place a checkmark next to Add Media Pool components from following project template.
The preselected template Default Pools contains a few ramps and control tracks for effects. If you want to import ramps from a different project template, highlight the corresponding template by clicking it.
Click Next.
Select the components you want to import. Without previous selection of a separate template you should leave the settings for control tracks and ramps.
Click Next.
Here you can enter the number of tracks you want to use for programming. Choose 2 sound, picture and video tracks each. Leave 1 marker track and set the universal track to 0.
Click Finish to create the project and make the Timeline window appear.
The empty program window has the following components:
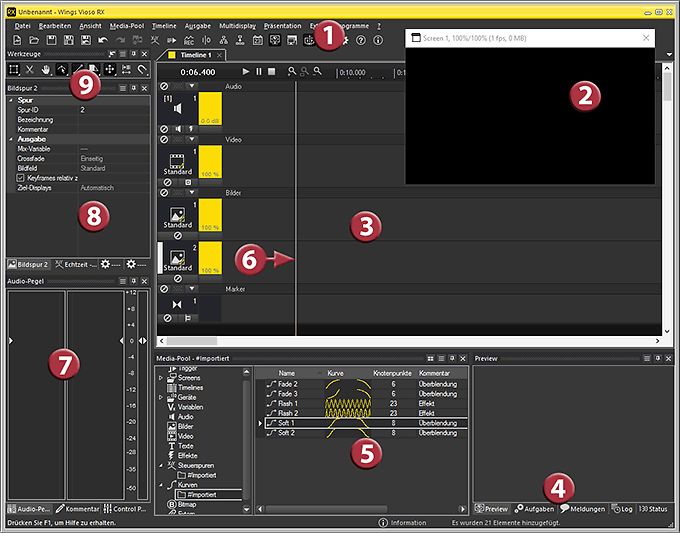
Main menu and the Function bar below the main menu with buttons
Screen for preview display
Timeline with tracks. In the picture, the green group tracks, among other things, are not displayed.
Preview Window to display media and messages, switchable to tabs Tasks, Messages as well as Log and Status information.
Media Pool with a number of different tabs for various categories
Locator which marks the corresponding position in time
Audio level control, additional tabs for comments and Control Panel
Properties Table, shows the parameters for highlighted objects in the timeline
Toolbar for selecting various editing modes.
 For a high-resolution monitor you’d better
use the Wings Vioso RX
scaling function in order to scale menu names and buttons to an easily
readable size. See Options - Global Options - User interface.
For a high-resolution monitor you’d better
use the Wings Vioso RX
scaling function in order to scale menu names and buttons to an easily
readable size. See Options - Global Options - User interface.
Before you actually start editing
you should create a project folder and save the show. Click 
![]() Save in the toolbar below the main
menu and a dialog box will appear. Select the appropriate drive, create
a new folder for your project and enter a name for your show. Finish by
clicking on Save.
Save in the toolbar below the main
menu and a dialog box will appear. Select the appropriate drive, create
a new folder for your project and enter a name for your show. Finish by
clicking on Save.
By default the render display with full
screen display appears on Monitor 1. If you want to output the full screen
to another monitor you need to change the settings in the Display Properties.
 And
this is how it is done...
And
this is how it is done...
You should now go on to the tutorial Capturing pictures and sound in order to import material for your first project.
