 and
and  .
But let's get started now...
.
But let's get started now...As a necessary precondition for this tutorial you should already have
completed tutorial Editing sequences of pictures and objects where we
have used pictures to show you how to edit objects and ramps. You may
even have dragged a few sound objects into the timeline and found out
that they can be edited and dissolve just like picture objects. However,
there are a few audio-specific functions, such as setting the volume,
audio cuts or correct audio level control. This and more is what you will
find out about in this lesson. As mentioned before, any faulty editing
steps or clicking the wrong buttons can be undone or situations be restored
by using the Undo buttons
and .
But let's get started now...
Load your tutorial project and start with a simple audio dissolve.
Note: The screenshots are based on Wings Vioso but it shouldn’t be any problem to follow and work through the workshop.
In the Media Pool click category Audio. Drag audio file Einsamer Wolf (A) followed by Rattlesnake onto an audio track. Move them on top of each to produce a dissolve. By the way, audio dissolve are frequently called crossfades in musical jargon. Play the crossfade and, if necessary, extend the overlapping area by shifting the objects (B).
Audio file Einsamer Wolf is to be used as a sort of low-key overture, so Rattlesnake should be slightly louder and more dominant. Therefore you must change the volume. Highlight object Rattlesnake and the parameters will be displayed in the Properties Table. Right-click object Rattlesnake and select Properties. Under Peak Level / Sample you can see that this piece of music has a peak level of 0 dB which means that the volume cannot be increased without losing information during output. Click OK without making any changes.
We therefore have to reduce the volume of Einsamer Wolf. Right-click this object and select Properties. Reduce the volume with the slider by five to six dB. Tip: The volume controls allow very selective adjustment. They can be grabbed and moved with the mouse, that's clear. But you can even change the volume by exactly one dB by clicking either below or above the slider. Move the mouse wheel, and the volume is changed in tenths of dBs. Finish by clicking OK. The set volume is displayed again in the info line in front of the file name.
Now play this part
and make adjustments, if necessary. You may have the feeling that
this dissolve is not really harmonious enough Well, let's try
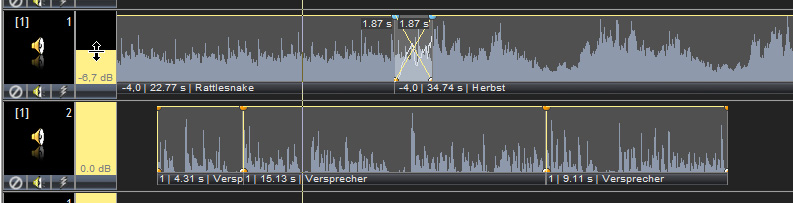
an asymmetrical dissolve. Move one of the objects onto a second audio
track. If it should remain fixed in time you hold the V
key to temporarily enable tool 
![]() Vertical dragging.
Vertical dragging.
This way, you can edit both the superimposition of audio information and both ramps independently (C) and have maximum freedom to do whatever you feel like. Let's try to create a dissolve as illustrated below.

Place further pieces of music one after each other. Usually, moving them on top of each other will achieve good results, in particular when you shape the dissolve ramps by means of nodes. Adjust the volume of every object to match the existing objects in the audio track. To provide ample scope for adjustments, start by reducing the existing pieces of music in volume.
Hold the Ctrl key and click the info line of both objects to mark them. Right-click one of the sound objects and select Special Functions – Change volume. Reduce the volume with the slider by six dB and click OK. This will reduce the volume of both objects, while the relation of the volume values will remain constant.
Prior to the sound montage you can cut a sound object by moving beginning or end of the object with the mouse. If you want to cut off a large chunk, it is easier to use the functions in the context menu. Right-click about the location in the sound object where you want to make the cut and select Cut left part, Cut right part or Divide. Practice using these functions for a number of sound objects and add further pieces of music to your sound track.
High-quality recording of language is a very delicate task. The text must be formulated, you need a good microphone and a quiet room with good acoustics. In addition to the speaker you need at least one extra person for the technicalities and for speech control during recording.
If possible, do not connect the microphone directly to the computer – sound card microphone inputs do not allow for high quality. It's better to apply the microphone signal to an external preamplifier first – this could be a recorder in Record Pause Mode or an audio mixer – to amplify it before it is recorded via the sound card's Line Input. Any details as to how record with a sound card can be found in the Help under Recording sound via sound card.
Just continue recording and stop only for longer breaks. The less the speaker is aware of the technical details around him, the better will be the quality of his speech and you can fully concentrate on speech control. You will end up with a recording consisting of several large files which can be edited unhurriedly at a later time. Once the rough version is located in the timeline, you can cut it up into pieces and compare different versions. The best versions can be exported as new files, so you can delete the large file containing the rough version from the hard disk after editing is completed. Exporting, however, is not absolutely necessary. Taking into consideration that you will only need about 10 percent of the rough version it would clearly be a waste of space to continue using the large file and the rough version for your project.
This tutorial will help you to find out about the principles of speech cutting illustrated at an example file.
Drag file Versprecher from the Media Pool into an audio track in parallel with the arranged pieces of music. If there is no vacant audio track, you can simply drag the sound file into the empty dark gray area of the timeline. A new audio track is then created automatically for the object.
To
be able to listen to the speech object without music, you should deactivate
all other audio tracks by clicking button  in the track head, which
then turns into a red symbol
in the track head, which
then turns into a red symbol  .
.
First of all you should
listen to the whole speech file in one go. You may have noticed that
the file contains a few slips of the tongue which you may want to
cut out. Start out by enlarging the display. Click the zoom-in button
 at the top left side of the
timeline three times. As an alternative, you can also use the plus key on the numeric keypad for
zooming.
at the top left side of the
timeline three times. As an alternative, you can also use the plus key on the numeric keypad for
zooming.
Now grab the lower separation line in the track head with the mouse and pull it down (A) to increase the track height. You can even choose a larger track height than in the illustrations to allow accurate editing.
Now play the sound object until you hear the first slip of the tongue and stop. Move the Locator to a position before the slip of the tongue, right-click the Locator in the sound object and select Divide (B).

Now move the Locator to a position after the slip of the tongue but before the part that is correct again. (C). Right-click the Locator in the sound object and select Cut left part and the mistake will disappear (D).
Now you only need
to remove the gap. Press the F3 key
or click  Snap to Objects in the function
bar and the Locator will turn magnetic. Click the track head of the
track containing the sound objects to be edited and it will be highlighted
in yellow. This restricts the magnetic effect to this track only.
Now grab the right sound object at the very beginning of the info
line and move it towards the other object until it snaps accurately
in place (E).
Snap to Objects in the function
bar and the Locator will turn magnetic. Click the track head of the
track containing the sound objects to be edited and it will be highlighted
in yellow. This restricts the magnetic effect to this track only.
Now grab the right sound object at the very beginning of the info
line and move it towards the other object until it snaps accurately
in place (E).
Play the section to
check whether cutting was ok. You may have to press the X-key
on the numerical keypad (multiplication) to return to the normal display.
As an alternative, you can also use the zoom button for this purpose.
All the other mistakes
can be cut out likewise. Don't forget to deactivate Mode Snap
to objects by clicking on
(...or, alternatively, by briefly pressing the L
key). After the sentence finishing with "... von
British Columbia bewahrt." there
should be no further mistakes. This is where you should divide the
object. Example file "Versprecher"
in the audio track should now be split up into four objects. The
first three objects should be used as comments. The last part does
not contain any slip-ups and is finished. There are two ways to continue.
We would like to show you both.
The first would be Grouping, which means that the "audio chunks" are sort of stuck together and can be shifted just like one object. Hold the Ctrl key and click the info line of the first three objects to mark them.
Right-click
one of these objects and select Grouping  Create new group.
Following this, these three objects are defined as Group 1, which can also
be seen at the beginning of the info lines (F).
Whenever you grab one of these objects, all other objects of this
group are highlighted as well and can be moved along.
Create new group.
Following this, these three objects are defined as Group 1, which can also
be seen at the beginning of the info lines (F).
Whenever you grab one of these objects, all other objects of this
group are highlighted as well and can be moved along.
An alternative is to export these three objects into a new file. This is a good way when your rough version is a very large file out of which you only need a little portion. Before exporting you should make sure that the cut is alright. After exporting the cuts can no longer be changed, they will be a fixed component of the new file.
Mark
the three objects. Right-click one of these objects and select Special Functions Export.
Click on  Select Filename and enter
a name, e.g. "Victoria", followed by Enter.
Leave the preset format 32 Bit Float.
It is absolutely loss-free, even with an incorrect audio level.
Select Filename and enter
a name, e.g. "Victoria", followed by Enter.
Leave the preset format 32 Bit Float.
It is absolutely loss-free, even with an incorrect audio level.
Check Replace original objects by exported audio file and click OK. Now a new file is created and the three objects in the audio track are replaced by a single one.
 With
a Pro or Vioso License you can also use the efficient Cut Mode for cutting.
See Cutting
objects in Cut Mode.
With
a Pro or Vioso License you can also use the efficient Cut Mode for cutting.
See Cutting
objects in Cut Mode.
After cutting the comment, you can combine it with some music. To do so you need to harmonize the volume of music and voice, i.e. turn down the music when the voice part starts.
On two audio tracks, arrange comments and music roughly as illustrated below (G). Right-click the track accommodating the comment objects and choose Select all objects. Right-click the comment object and select Special Functions – Change volume. Finally, click on Peak Search. Note down the approximate values displayed for RMS level. They should be around minus 16 dB. The RMS level informs you about the loudness of a sound object. Click on OK.
Determine
the RMS level of the piece of music likewise. It will probably be
distinctly higher for music. Should "Inf"
be displayed you need to reactivate the audio track by closing the
dialog box and clicking on . With the slider
adjust the RMS level
to correspond to the values of the comment object. Approximate or
average values will suffice. Now click OK.
Both audio samples should appear to be equally loud.
Tip: By the way, the volume control allow very selective adjustment. It can be grabbed and moved with the mouse, that's clear. But you can even change the volume by exactly one dB by clicking either below or above the slider. Move the mouse wheel, and the volume is changed in tenths of dBs.
Play back comments and music together. At present they are equally loud, but we will have to reduce the volume of the music while the comment is spoken so that the spoken comments are intelligible. This is done by setting nodes as you will remember from chapter dissolve ramps. However, since this would be pretty tedious we can use a function for this job.
Right-click
one of the comment objects and select Special
functions  Level reduction... In the
corresponding dialog select All objects
at the top in order to cause a level reduction of the music for all
comment objects. In the middle select On
all other audio tracks so that the level reduction applies
to all music objects.
Level reduction... In the
corresponding dialog select All objects
at the top in order to cause a level reduction of the music for all
comment objects. In the middle select On
all other audio tracks so that the level reduction applies
to all music objects.
After clicking OK the ramp bands of the music objects have been modified in accordance with the comment objects (H). It is import to place all the comments at their correct location within the show before applying this function. If this is not the case undo this step and reapply this function after placing the comments correctly. Further information on the level reduction function can be found in the help topics under Level reduction for spoken comments.
You can now arrange both music and comments on your sound track. Try to coordinate pictures with sound and turn it into a harmonious little practice project to be played back in Wings Vioso RX.
Tip: The yellow track sliders allow you to change the volume for all objects on this track during playback. This way the degree of music level reduction for the comment can be determined by ear. Note down the dB value and move the slider back to zero dB. The dB value determined such can be entered in the level reduction dialog.
When you have finished the soundtrack and start creating the presentation data, e.g. audio CD, video or EXE presentation, you should check and correct the audio level of the complete soundtrack. See Determining the soundtrack peak level. Further valuable information on how to deal with volume and audio level in the sound track can be found at Tips for volume and audio level.
