 Before starting this tutorial
you should at least have worked through tutorials 1 to 3 and have a basic
knowledge of how to edit objects. The first tutorial of this workshop
is Creating a project for a digital
AV show.
Before starting this tutorial
you should at least have worked through tutorials 1 to 3 and have a basic
knowledge of how to edit objects. The first tutorial of this workshop
is Creating a project for a digital
AV show.Camera movements will help you exceed the limits of still pictures. A camera movement only shows a certain section of a large picture. This section can change its position and size in dependence of time, thus producing a movement or zooming effect. The picture should be extra high-resolution to provide for sufficient picture information when zooming into it. In this example, we will use a demo picture from the sample media that can be found on the USB stick or on the AV Stumpfl website.
Before starting this tutorial
you should at least have worked through tutorials 1 to 3 and have a basic
knowledge of how to edit objects. The first tutorial of this workshop
is Creating a project for a digital
AV show.
You can continue editing your practice project or you create a new one, with an aspect ratio of 16:9 at best. See Creating a project for a digital AV show.
Add picture Heidelberg-Panorama to the Media
Pool. This picture is part of the sample media copied from the USB
stick or DVD to your hard disk during the installation. In the Media
Pool click category  Pictures.
Open the folder by
clicking Extras in the main
menu followed by Open folder  Media
Samples and double-clicking folder Pictures
and Camera. Drag image Heidelberg-Panorama from folder
Camera and drop it into the
Media Pool. See also Copyright
for media samples.
Media
Samples and double-clicking folder Pictures
and Camera. Drag image Heidelberg-Panorama from folder
Camera and drop it into the
Media Pool. See also Copyright
for media samples.
Normally, the presets are added to the Media Pool when you create the project using a Wizard. If folder #Imported is missing in Media Pool - Control tracks in your project you need to import it. Highlight category Control tracks, right-click some empty space in the right Media Pool section and select Import from template.... Highlight template Default Pools and finish by clicking Open.
Via presets a camera movement can be created in a simple and fast way. Only the required start and end portion for the camera movement need to be adjusted manually.
Drag picture Heidelberg-Panorama into a picture track and extend it to about 15 seconds.
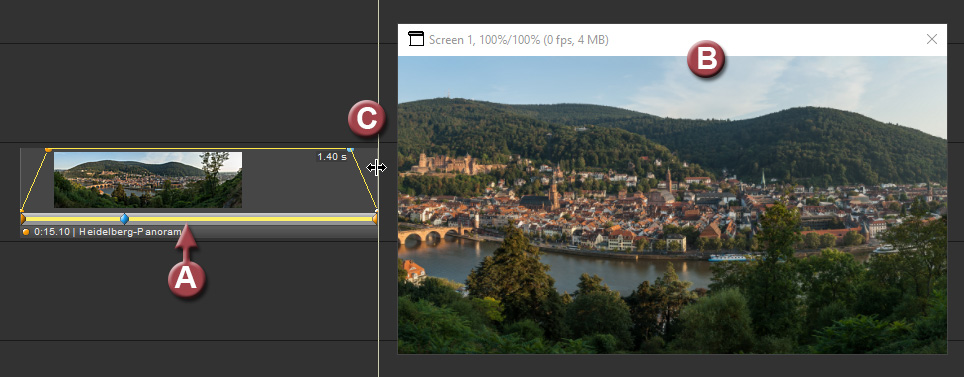
In the Media Pool on the left click category Control tracks, followed by clicking folder #Imported and drag the Preset Panning from right to left onto the picture object following which a control track is created (A).
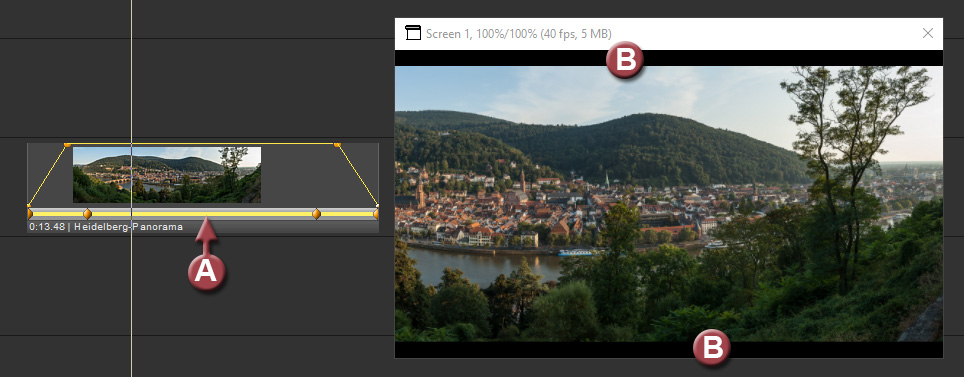
When you start playback before the picture object by pressing the space bar, the camera movement can be viewed in the screen window. Unfortunately, black bars will still be visible (B) as the portion is not yet correct. Since every picture differs from an other, you need to adjust the beginning and the end of the camera movement manually to match the motif.
In order to adjust the portion for the camera movement start, right-click the first key frame and select Properties (C), following which the Properties Dialog with all the parameters of the key frame appears.
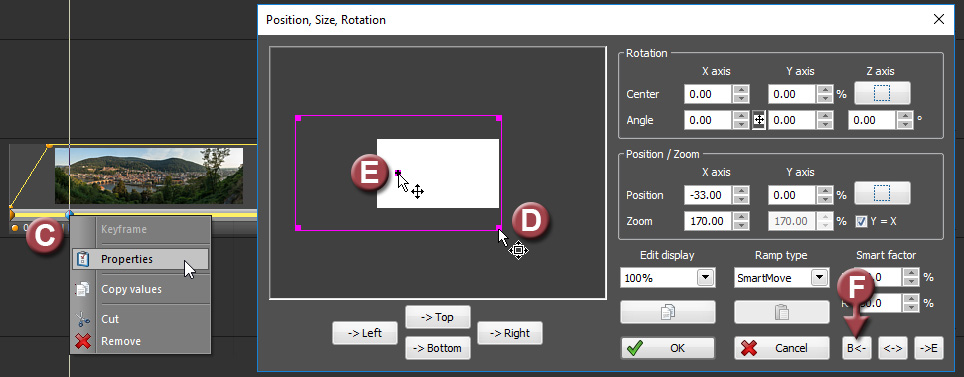
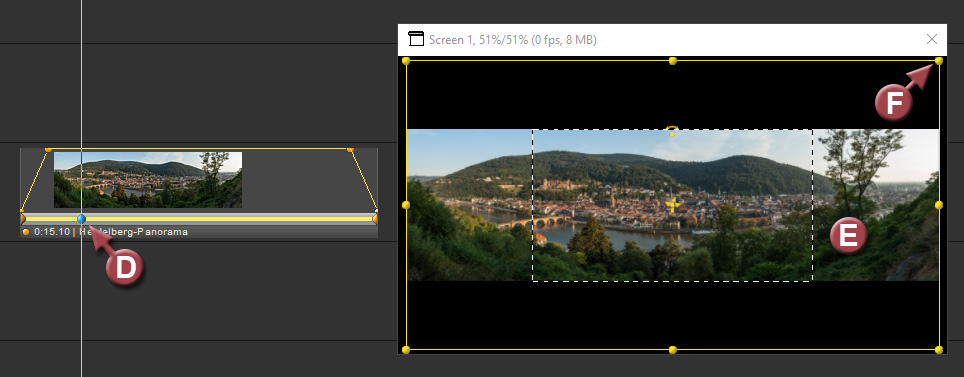
Drag the magenta-colored
frame at one corner (D) and enlarge the image until the black bars
have disappeared and the image fills the screen. Arrange the windows
so that you have access to the screen window and can see it. By grabbing
the mark in the center (E) you can also correct the portion which
should look as illustrated below. Finish by clicking button B in order to take
over the position values for the beginning of the picture object (F).
in order to take
over the position values for the beginning of the picture object (F).
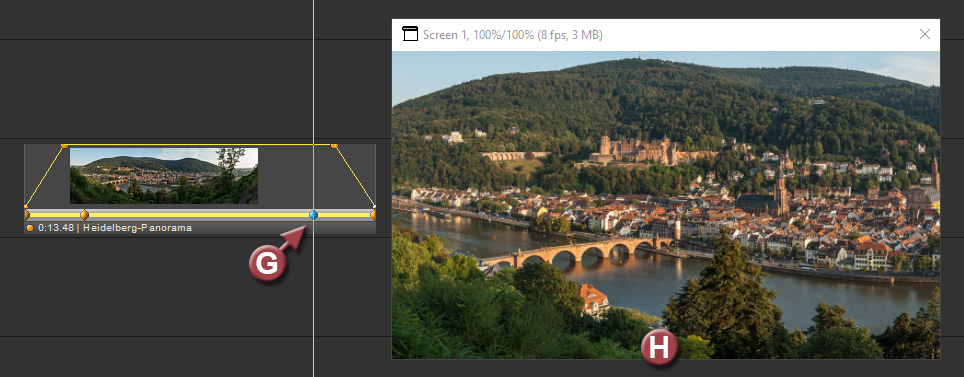
Adjust the portion
for the end of the camera movement likewise. Right-click the second
key frame (G) and select Properties.
Enlarge the image slightly more than that for the start so that bridge
and castle are well visible. When adjusting the portion as illustrated
below (H) finish by clicking button  E in order to take over the position
values for the end of the picture object.
E in order to take over the position
values for the end of the picture object.
When you play back the camera movement the screen window should always be fully filled and towards the end of the movement there should be a slight zoom towards bridge and castle. Play back the camera movement in full-screen mode, i.e. by pressing the F5 key. As you may notice sharpness is lacking although the panorama image has a width of 13385 pixels.
The reason for this lies in the display data which were created for the monitor or projector width when importing the image. Since the image was clearly enlarged for the camera movement the display data need to be optimized. In the main menu, click Media Pool - Optimize display data... The settings in the dialog are ok if the last two options in the dialog are checked.
Click Start and the required size is computed and the new display data created.
Following this full screen playback in presentation mode should be appropriately sharp. Depending on the response time of projector or monitor the image may become slightly blurred if the camera movement is fast. In such cases you may have to slow down the camera movement. This is done by extending the object and increasing the distance between the key frames. The basics for such changes can be learned further below in the tutorial.
Note: The screenshots are based on Wings Vioso but it shouldn’t be any problem to follow and work through the workshop.
Keyframes are time markers that contain values for influencing the image. In order to use keyframes ) for controlling images you need to be familiar with the way they work. When images are edited on the screen, the appropriate object is automatically provided with control tracks and keyframes. Keyframes are actually markers containing the values for certain parameters to influence the image, i.e. in this case for size, position, rotation of image or video. The area between two keyframes contains consecutive intermediate values, which become visible as motion, zoom or rotation. This is an example:
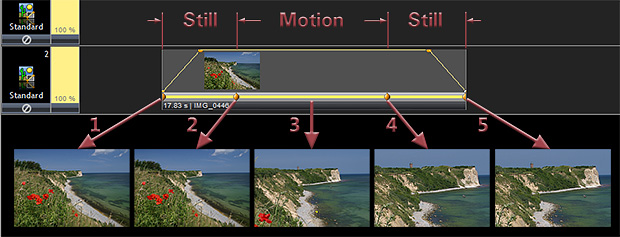
The key frames in the control track define position and size of the picture. Between (1) and (2) the image does not move, as both keyframes contain identical position parameters. In the first (2) and next set keyframe (4) different locations are saved, that's why the image moves and is expanding. The intermediate positions (3) are created consecutively. At the end, between (4) and (5), the image is still again.
And this is exactly what you are going to practice now. Although In-Screen-Editing allows very simple editing, you should get used to following the basic steps described below:
Concept: Please consider carefully what keyframes you require for your effect and where in time they need to be located.
Time position: Move the Locator to the location where a keyframe is to be created or to the keyframe you want to edit.
Tools: Activate the required tools. Use the temporary activation option by holding the corresponding keys during editing. This has the advantage that you need not reset the tool. In topic Toolbar you will find a printable list of tools including shortcuts that should help you to learn the ropes.
In Screen Editing: Only the last step is editing of the object in the screen.
This is the approach we will also follow in this tutorial. It does not make sense to move images back and forth in the screen without realizing which keyframe you are actually editing. Now let's start with the tutorial. It will also give you some insight on how to design a camera movement.
Drag and drop image Heidelberg-Panorama again into the picture track and hold down keys Ctrl + Alt while doing so. Holding these two keys down causes automatic creation of a control track with a key frame (A) and the image fits the format of the screen (B). Extend it to about 15 seconds (C). When the display duration is not displayed in the object info line, you can activate it under Options – Global Options – Objects.
Using the mouse, move the keyframe to the position where the camera movement is to start, i.e. in the first quarter of the object (D). In the screen click the panorama (E) following which the content is reduced in size and a yellow frame with eight handles appears. The dashed frame (E) marks the portion that is later to be visible on the screen during the presentation.
First
you need to adjust the portion to match the start of the camera movement.
As the image should not move during the fade-in, the keyframe values
you are going to create must also apply to the object beginning. This
is done by enabling tool  Keyframes
constant from object beginning, which is best done via key
B. Hold the B
key down, drag one of the screen handles in the corners (F)
to enlarge the picture and let go again of the B
key. Grab the image at a location where there is no handle (G) and
move it to the left. Hold the B
key down as well. The fact that tool Keyframes
constant from the object beginning is enabled can be seen from
the symbol near the mouse pointer (G).
Keyframes
constant from object beginning, which is best done via key
B. Hold the B
key down, drag one of the screen handles in the corners (F)
to enlarge the picture and let go again of the B
key. Grab the image at a location where there is no handle (G) and
move it to the left. Hold the B
key down as well. The fact that tool Keyframes
constant from the object beginning is enabled can be seen from
the symbol near the mouse pointer (G).
Tip: When you drag it with the mouse you can move it beyond the screen and adjust the correct size and position in one go.

After letting go of the mouse the screen content is reduced in size so that the handles remain visible. This is done via the Auto Zoom function and applies only to the current representation on the screen used for editing but not to the camera movement itself. The percentage displayed in the screen window title bar shows by how much the representation on the screen is reduced in size (H); the two values stand for enlargement in X and Y axis. The area that will later on be visible during the show is marked by the rectangle which is dashed in black and white (G). So don't get confused: the decisive parts for your show are those that are visible within the white frame.
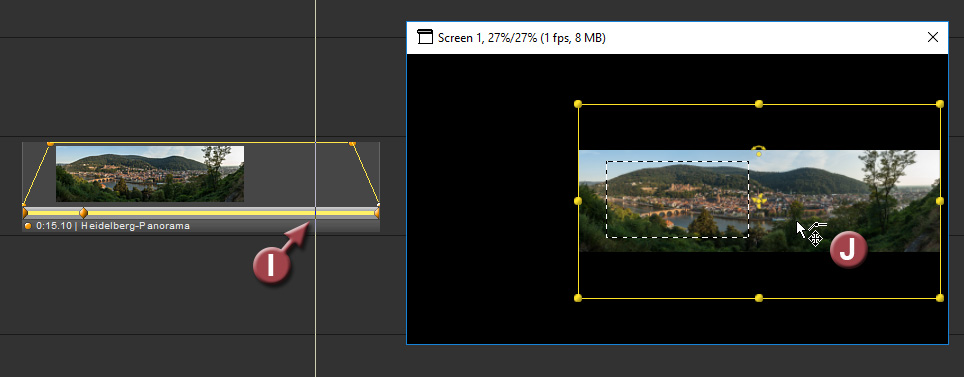
Once
the start portion has been set you can go on to set the end portion.
Move the locator to a location in the last quarter of the picture
object where the camera movement is to finish (I). Click the screen
and the second keyframe is created automatically. Move the picture
to the right by grabbing it again somewhere in the middle (J). Enlarge
the picture somewhat by dragging one of the handles in a corner so
that the bridge is well visible and the camera path is extended. Use
the illustration as reference. While adjusting the end portion hold
down the E key so that tool

![]() Keyframes constant until object end
is enabled and the values are automatically copied to the object ending.
As you may notice, Auto Zoom keeps adjusting the display on the screen
to keep the handles visible.
Keyframes constant until object end
is enabled and the values are automatically copied to the object ending.
As you may notice, Auto Zoom keeps adjusting the display on the screen
to keep the handles visible.
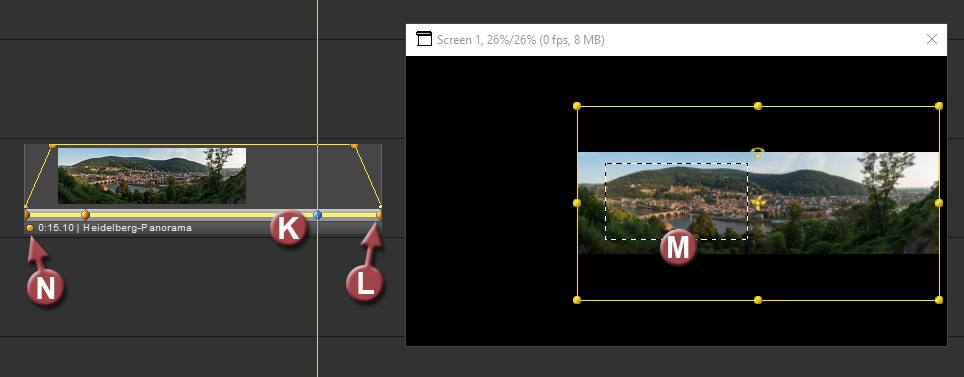
When
you look at the timeline you can see the second keyframe (K). It marks
the end of the movement as the selected tool Keyframes
constant to object end has caused its values to be automatically
copied to the end frame (L). Between Keyframe (K) and end frame (L)
the end portion (M) stays the same, i.e. the image is standing still.
By the way, the orange dot in the info line (N) is always shown when
In-Screen Editing has been selected for the object. In that case,
the corresponding object on the screen receives a yellow frame with
handles. This is very helpful for later on when it comes to editing
complex collages with a high number of objects on top of each other.
Now you have completed your first camera movement and want to play it. As you may have noticed, the Keyframe Editor closes as soon as you click some empty space in the picture track. Move the Locator to a position before the object and start playback by pressing the space bar. Leave the screen display at the reduced size for the time being. This way you can watch how the image moves below the dashed screen field frame. Stop playback by pressing Esc.
Tip: If the control tracks seem to be too small and you are having difficulties to hit the keyframe with the mouse you can have it displayed at a larger size. Click Extras - Options - Global Options - User interface. Check box Large control tracks and keyframes.
If the image keeps also moving during the fade in or fade out the values for start frame and first keyframe (O) or those for the second keyframe and the end frame (P) are not identical, which may be the result of a wrongly chosen tool (holding down keys B and E). However, this can be repaired very quickly.
If
the image starts moving during the fade in, highlight the first keyframe
as illustrated above (O) following which its parameters will be displayed
in the Properties Table. Click Copy
values followed by clicking on button 
![]() Copy values to beginning (Q). When
you test the camera movement the problem should be solved. This function
is very useful if the wrong tools are enabled.
Copy values to beginning (Q). When
you test the camera movement the problem should be solved. This function
is very useful if the wrong tools are enabled.
Reset the screen display to its default size by right-clicking the screen and choosing Reset Pan/Zoom. Move the Locator to a position before the object and start Presentation Mode by pressing the F5 key and playback by pressing the space bar. Following this, stop by pressing Esc twice.
You may have noticed that the image quality was not really excellent. By zooming in on the image, the display data are too low-resolution. To remedy this defect, you can optimize the display data. In main menu click on Media Pool and Optimize display data...
No more settings need to be made in the dialog. Just click Start for Wings Vioso RX to determine the size and render the appropriate display data in the background.
When
you start playback in Fullscreen Mode, the camera movement should
be displayed at high quality. The display data size is shown in the
Properties Table. Highlight the object and, in the Properties Table,
click on tab
Picture. Under Output
the current size is shown next to Display
data , e.g. 6546 pixels.
This value refers always to the long side of the image. A resolution
value that corresponds to the resolution of the original image will
not suffice and the image will be upscaled by the graphics card during
the presentation. Since this reduces the sharpness you should consider
changing the camera movement and reduce the zoom. Following this you
need to Optimize the picture size
again.
Now make some fine adjustments
to your camera movement. You can speed up the camera movement by moving
the two keyframes towards each other, which actually reduces the time
for the camera movement. As a user of the Pro License you can find
out about a new tool for shortening the object including keyframes.
Enable tool 
![]() Stretch/compress objects by holding
the W key down and grab the
end of the picture object to reduce it to about 7 to 8 seconds. The
duration is displayed in the info line.
Stretch/compress objects by holding
the W key down and grab the
end of the picture object to reduce it to about 7 to 8 seconds. The
duration is displayed in the info line.
When you play the object, you will notice that the camera movement has doubled in speed, as the entire object including ramps and keyframes was compressed. While looking at the camera movement, you may also have noticed that the movement starts and finishes somewhat abruptly. This can be changed by applying so-called SmartMove keyframes.
In
the Keyframe Editor right-click the first keyframe and select Properties. In the dialog popping
up you will find all keyframe values and properties. Under Ramp
type click  and select SmartMove.
Do the same for the second keyframe.
and select SmartMove.
Do the same for the second keyframe.
When
you play the camera movement now, it runs smoothly and without any
jerks. For the next camera movements you can choose this type of keyframe
already during creation by enabling tool 
![]() SmartMove Keyframes. This is better
done before In-Screen Editing so that the keyframes are created with
SmartMove characteristic. Note:
When presets are used for the camera movement - see above - SmartMove
keyframes are already included.
SmartMove Keyframes. This is better
done before In-Screen Editing so that the keyframes are created with
SmartMove characteristic. Note:
When presets are used for the camera movement - see above - SmartMove
keyframes are already included.
Once you have come to terms with the keyframes principle and have taken in In-Screen-Editing you will soon be able to cause the required effects.
A keyframe for a combined control track contains numerous parameters, which can be edited jointly via In-Screen Editing. Although individual parameters can be edited via the Keyframe Properties Dialog there is no graphic display of the parameter curves, which puts some limits to differentiated editing. See also Editing Keyframes via the Properties Dialog.
For these reasons, a combined control track can be converted into individual control tracks with parameter objects and then be edited in the Keyframe Editor. Following this, however, all parameters also must be edited individually. Therefore, you should only do so if you can't create the desired effect using combined control tracks. You may want to save the tutorial project before you continue.
Right-click the control track in the object and select Convert into single tracks. The Keyframe Editor will open up and seven tracks with parameter objects for various directions of movement (A) be displayed.
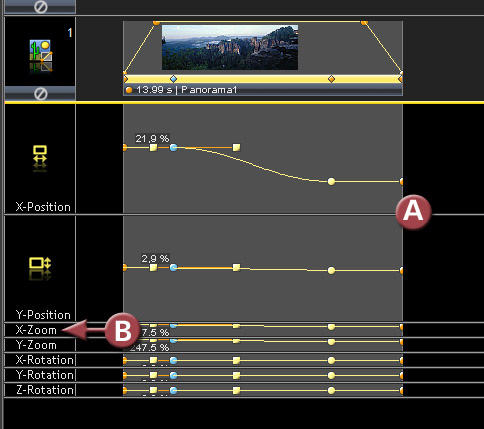
To see all tracks at full length, double-click one of the minimized tracks (B) while holding the Shift key down. The same way you can also minimize all tracks.
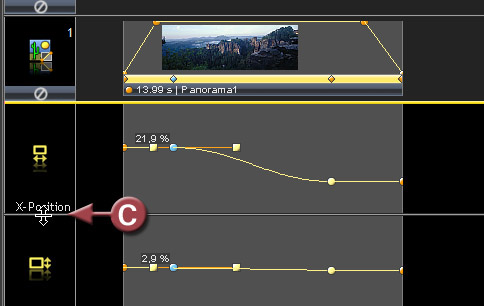
Increase the control track height for the X position. Grab the separation line (C) and drag it down until the track is double in height and the curve shape is clearly visible. More information about editing via the Keyframe Editor can be found in topic The Keyframe Editor.
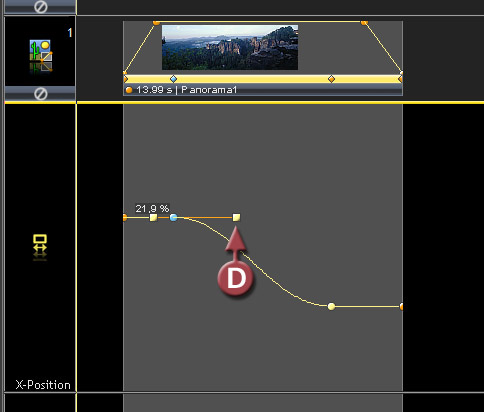
Acceleration and deceleration of the movement can be influenced by changing the ramp shape. To do so, highlight the node for the handles to become visible. Now drag the handle (D) in horizontal direction. Hold the H key down, to allow only horizontal extension of the tangent.
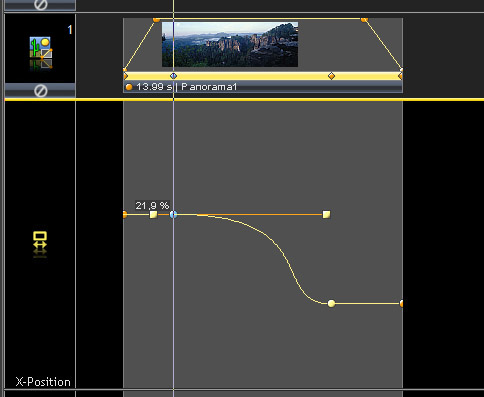
As you may have noticed, the ramp changes its shape. Play the camera movement and notice the change in acceleration.
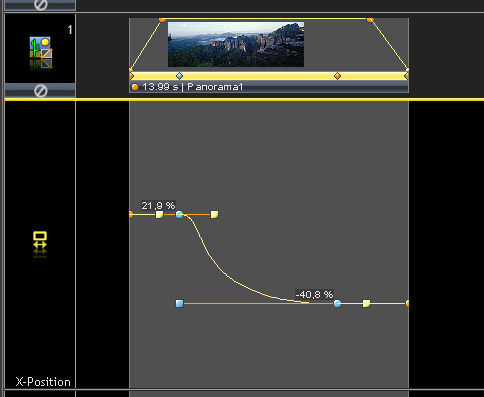
But you can also change the other keyframe as well. The illustration above shows an example with both keyframes being highlighted. By changing the tangents, the shape of the curve has changed completely. As mentioned above, you should make sure that you only drag the tangents in horizontal direction and do not rotate them accidentally. Otherwise the transition to the straight portion of the ramp will no longer be smooth.
At the example of the X position you have found out about the principle of editing in separate control tracks. Certainly, this works for the other parameters as well, but may be quite time-consuming. Therefore, you should edit individual control tracks if editing in combined control tracks turns out to be too difficult.