Recording DMX data
Wings Vioso RX allows recording of DMX data from other systems and their integration in a project. This means that you can use the DMX system you are familiar with to design the light concept or prepare other design projects and import these DMC data into Wings Vioso RX. These data can then be edited and synchronized with sound. This way, an SC Master unit or a computer with Wings Vioso RX and the corresponding modules can assume the task of a DMX player for an installation with perfect synchronization of sound and video.
In addition to the Wings Vioso RX Show Control Module you require the following interfaces with DMX-In and Out for DMX recording:
This is how you prepare for recording:
-
Create a project and add the necessary device ports for your DMX interface. If your device set has a certain address structure you need to observe the correct SC Net addresses when adding modules. See Wizard for Mixed Media.
Or, as an alternative,
... you can also open an existing project you want to add the DMX data to. However, this should be a project with the above-mentioned devices configured in the device control system. If necessary, add the corresponding devices. See further above in this topic.
-
Press the F8 key to enable the device ports. See Enabling device ports.
-
In the main menu Timeline click DMX Recording...
-
The device port has been preset. Modifications may be necessary if the project has more than one device port.
-
Under Channels you specify the range of DMX channels, i.e. which of the 512 DMX channels are used for recording.
-
For Ramp type you can choose between two types:
-
Steps ... is a universal setting and particularly suitable for function channels to achieve definite DMX values.
-
Ramp ... is a useful setting for dimmer packs or spot lights to achieve homogenous ramps. Under Data reduction you can choose the degree of accuracy for displaying a ramp and its nodes. But this can also be done at a later time. See Simplifying ramps.
-
If you have already configured DMX channels in the device control system – which is a good idea – you can specify under Base Address which DMX channel address is to be used for the first recorded DMX channel, e.g. 2/1. This can save a lot of time because it makes individual address allocation superfluous.
-
Now click on Start and start playback of your DMX system to begin recording. During recording, dialog or timeline won't change.
-
Once playback on the DMX system is complete, terminate playback by clicking on Cancel. Following this, a new timeline containing the recorded DMX data will be displayed.
Adding DMX data to a timeline
The data from your DMX system are now available in a separate timeline. Presumably, you may want to link up and synchronize the DMX data with a show. Therefore, you will have to copy the tracks containing the data objects into the timeline of the corresponding show.
-
Highlight all tracks that contain DMX objects by clicking a track head (Wings Vioso RX symbol) while holding the Shift key.
-
Right-click a free area of a track and choose Select all objects.
-
Right-click an object and select Copy which means that the objects are copied to the clipboard.
-
Open the timeline containing the show by double-clicking the corresponding timeline in the Media Pool or by opening the corresponding project.
-
Right-click the dark gray area below the tracks and select Paste clipboard to new tracks.
-
To prevent the DMX objects from being displaced against each other you should group them. Right-click all data objects, right-click one of the high-lighted objects and select Grouping  Create new group.
-
The objects can now be synchronized with the other sequences and edited. If some of the ramps have too many nodes – which may make editing a tedious job – you can simplify the ramps. See Simplifying ramps.
See also
Grouping tracks
Snapping to objects
Editing objects
Programming analog/DMX devices
Controlling with external input devices
 Further info
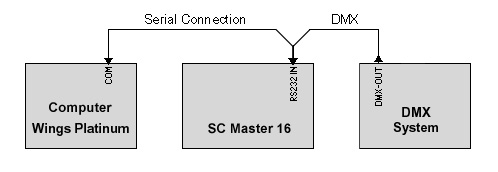
 Value In variables. See Using Wings IOboxes for control purposes and Recording Avio Channels using Wings XX.