Projection into a dome, i.e. onto a spherical segment, is regarded as the supreme discipline of projection. It requires the images to be aligned and deskewed in a most accurate way. Using Vioso calibration all this is done with the highest precision and within a much shorter time than with other systems. The essential advantages of Wings Vioso are as follows:
It requires no CAD model.
One camera is enough, no complicated camera array needs to be set up.
No markers are necessary.
The setup times are very short: less than 10 minutes for 5 projectors and less than 20 minutes for 12 projectors.
Below you will find some notes and considerations on how to implement a dome projection in the following order:
Contents for the dome projection
Hardware for the dome projection
Preparation of a fulldome show
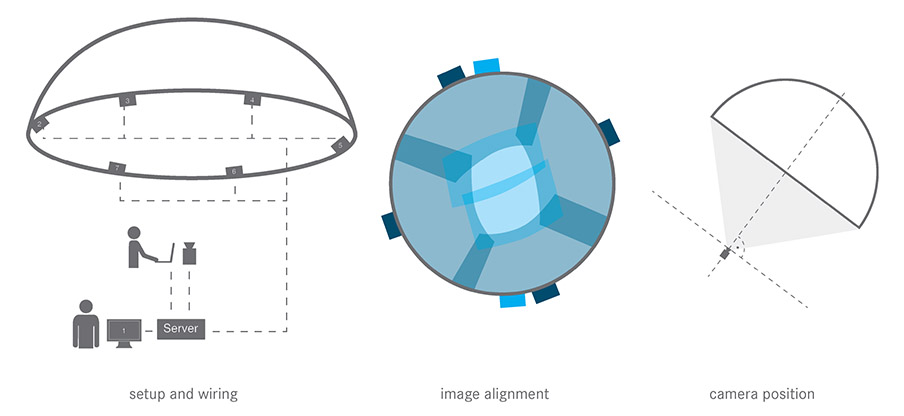
The basic design of a dome projection is relatively easy which can be recognized at a glance from the schematic diagrams below.
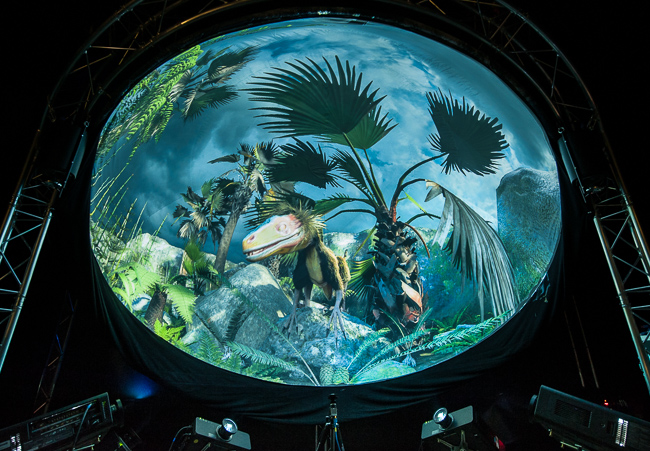
Typically, Domemaster content is used. These are videos or picture sequences with an aspect ratio of 1:1 with a circular image detail embedded in it. This content is frequently rendered in a fish eye perspective so that the proportions in the dome are accurate - usually based on a 180° dome (with the lower edge of the image at the equator)
Typical resolutions are powers of 2 due to historic and IT reasons. In the table below you will find typical characteristics of domemaster contents.
| Resolution | Playback as | Notes |
1K domemaster image, 1024 x 1024 pixels (1 MP) |
1x MPEG2 stream or 1x H.264 stream |
Frequently used for 1-projector planetariums, using projectors with 180° fish eye lenses or spherical mirrors. |
2K domemaster content, 2048 x 2048 pixels (4.1 MP) |
1x H.264 stream |
The current Wings Engines is usually able to display videos with H.264 coding and 2048 x 2048 pixels quite well (MainConcept demuxer). A 2K dome projection is therefore realized best using one overall video. |
3K domemaster content, 3072 x 3072 pixels (9.4 MP) |
2x H.264 stream with 3072 x 1536 pixels each |
3k can no longer be packed into one single video file. It requires two split videos so that the load on the processor cores is more efficiently distributed during decoding.. |
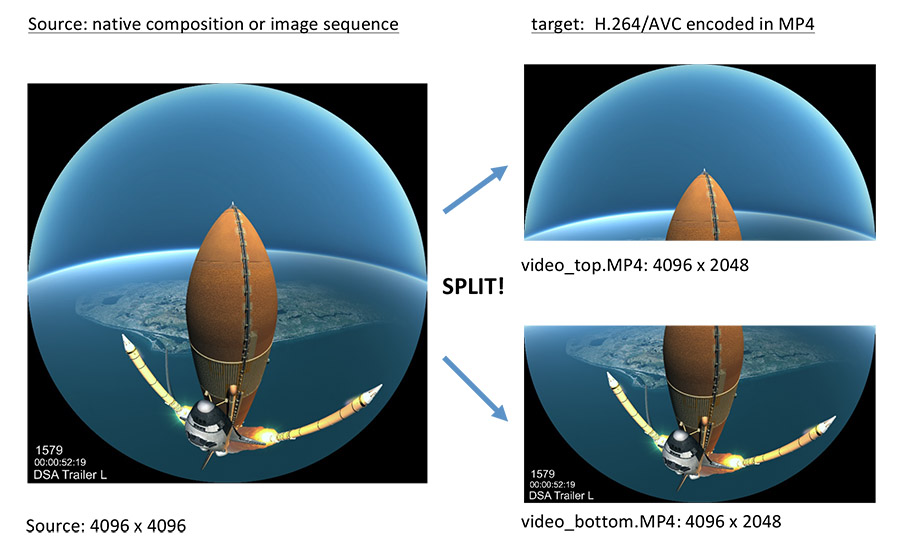
4K domemaster content, 4096 x 4096 pixels (16.8 MP) |
2x H264 stream with 4096 x 2048 pixels each | 4k domemaster content means four times 2k playback, i.e. the content is divided into two split videos with classic 4k content.. |
Note: Prior to the show, the source content, which is usually available as a picture sequence, must be prepared as described above. Native playback of picture sequences with intermediate video files cannot be recommended as Intermediate video data for systems with Quad or Hexa-Core processors require more performance than H.264 or WMV videos.
Media Server
For media servers, Wings Engine Stage Dual have proven most effective as their GPU platform is necessary for efficient playback in the dome. Depending on the number of projectors used several Wings Engine Stage units can be combined in the network as Master and Client.
Projectors
For dome projections, the choice and arrangement of the projectors requires a lot of thought and the following aspects need to be considered:
All the projector images should possibly be projected onto the dome surface at the same size since identical brightness of the projector images plays an important role.
Overlaps should have the same minimum widths. Equidistant projector arrangement helps to create uniform overlaps.
Use many small projector images instead of few big ones. The smaller the projector image the more uniform is its sharpness and the more homogenously distributed is the brightness. On the other hand, the presentation network is getting bigger and more complex.
Avoid widescreen formats as much as possible. Images projected by 4:3 projectors can be arranged more easily in the dome as the image height is the most relevant factor for arranging the images in the dome and lighting it.
Note: If you have no experience in projector configuration in a dome turn to a system house with experience in selecting projectors and lenses.
Example: Image positions of 12 projectors in a full dome
Camera for Vioso Calibration
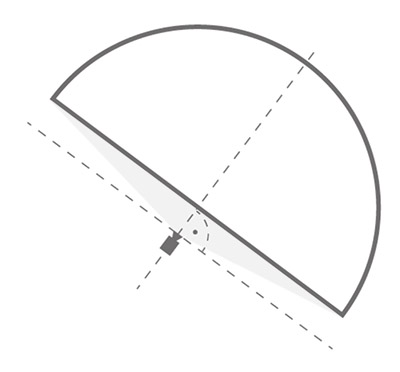
It requires a 180° fish eye camera located in the center of the dome which must be able to capture the entire dome surface, i.e. there must not be any rods or bars in the field of vision.
The camera signal must be distributed to all computers in a presentations network. Depending on the camera signal you need to consider video splitter, matrix, etc.
Various Camera types can be used:
High-resolution IP cameras, e.g. IDS uEye UI-5480 CP/SE with 180° fish eye lens (e.g. Fujinon FE185C046HA-1); the advantage of this IP camera solution is the fact that it can very easily be connected to every presentation computer via a jointly used GBit switch. This way these cameras are highly suitable for presentation networks using Wings Engines. They allow up to 5 Mega pixels resolution which are transferred at a speed of 10 to 12 fps via Ethernet and allow a fair scan speed. A slight disadvantage is the fact that these cameras need to be configured individually for every computer, e.g. alignment requires access to every computer in the presentation network (e.g. via KVM Switch or TeamViewer).
SLR
cameras with at least full HD live output connected via HDMI
output  HDMI distributor DVI
input (requires Wings Engine Stage), e.g. Canon EOS 5D Mark III with
180° fish eye. This produces a full HD signal which displays the dome
as an embedded circle. Although the test images have a low resolution
by comparison a very good dome result can usually be achieved at a
high scanning speed. Note:
The fish eye lenses must be an exact fit for the video image size
of the sensor to prevent the circular image from being cropped.
HDMI distributor DVI
input (requires Wings Engine Stage), e.g. Canon EOS 5D Mark III with
180° fish eye. This produces a full HD signal which displays the dome
as an embedded circle. Although the test images have a low resolution
by comparison a very good dome result can usually be achieved at a
high scanning speed. Note:
The fish eye lenses must be an exact fit for the video image size
of the sensor to prevent the circular image from being cropped.
(Semi-) professional HD cams with at least full HD output and 180° lenses. If the signal is to be transferred via HD-SDI a Wings Engine Stage is required turning this configuration into a good but expensive solution.
Align the projectors in a way which ensures that all images are equal in size, brightness and sharpness. The projector images must overlap to a sufficient extent; it’s always the location with the lowest overlap that is decisive.
In the projector menus disable any automatic settings:
No Keystoning
No Digital Zooming
No Overscan, etc..
Check: On the Wings Engine user interface open the alignment patterns. Every boundary line in the test pattern must be displayed fully and in the native projector resolution.
Adjust the projector images in terms of brightness and color behavior via the various projector menus on the basis of white and gray images.
Graphics card configuration
Supply of content to the projectors differs distinctly from a classic multidisplay show due to the multiple overlap of the projector images that makes different demands to the graphics card. This is why a Wings Engine Stage unit including Nvidia K5000 is required as the Nvidia Control Panel is used for creating a mosaic for playing the content to the projectors.
Connect your projectors to outputs A to D and switch them on.
On
the Wings Engine Stage desktop click  followed by clicking on Display Settings. Check whether
all four projectors have been correctly identified in addition to
the control monitor. If everything is ok close the dialog again.
followed by clicking on Display Settings. Check whether
all four projectors have been correctly identified in addition to
the control monitor. If everything is ok close the dialog again.
Click the Nvidia Control Center again and the Nvidia Control Panel will open. In the tree structure on the left below Workstation choose item Set up Mosaic and and click Create new configuration on the right.
Start with tab Select topology. Enter the Number of Display = 4 and Topology (rows x columns) = 2 x 2 an. In field Configuration Name enter the required configuration name and click Next.
Now select the four projectors under Quadro K5000 by providing them with a checkmark and click Next.
Drag one projector after the other down and drop it onto the mosaic field so that every field is assigned. The assignment can be arbitrary. Finish by clicking Apply and wait until configuration of the graphics card is complete. This may take more than a minute and give the impression that Wings Engine has crashed - be patient!
When dialog Arrange displays reappears click Finish. No additional settings are required on the fourth tab.
After reopening Display Settings a logic display is shown next to the control monitor:
For Master/Client configurations the clients' graphics cards are set up as exactly as explained above. With a setup of seven projectors, for example, you leave one output unused. In order for the graphics card to detect a projector there you need to load the projector EDID for this output. See Loading and saving EDID for outputs.
Creating a project for a fulldome show
Create a multidisplay show with an aspect ratio of 1:1 via the multidisplay wizard. See also Wizard for Mixed Media Projects. Here you need to consider the following:
Create a display using the resolution of the overall screen. Example:
1K
Screen 1
display with a resolution of 1024 x 1024 pixels
2K
Screen 1
display with a resolution of 2048 x 2048 pixels
3K Screen  1 display with a resolution of 3072 x 3072 pixels
4K Screen 1 display with a resolution of 4096 x 4096 pixels
Enable VIOSO Calibration.
Once the project has been set up and you want to use 1K or 2K dome content you can place the entire content as single video into one track which is assigned to the screen field Standard. The same applies to (test) images.
Now assign the displays by right-clicking Display 1 and making the following settings:

For Display PC choose Local Master PC and for Monitor choose Display A OUT or, alternatively, the display representing the the previously created logic display. For 1K and 2K dome content the next step is calibration.
For
3K and 4K
dome content you need to start by creating two screen fields for the split
videos. Right-click  Screen
1 in the right Media Pool section and select Add
screen fields...
Screen
1 in the right Media Pool section and select Add
screen fields...
Next to Screen fields enter 1 by 2, for Base name the required name, e.g. Split and check box One video track per screen field so that the corresponding number of tracks is created along. For information on how to create split videos proceed to item 6.
In combination with clients the following additional steps are necessary:
Adding
the used client servers to Media Pool  Devices:
Right-click the Device Pool and select Add
Client PC. Enter the corresponding IP addresses of the client
servers.
Devices:
Right-click the Device Pool and select Add
Client PC. Enter the corresponding IP addresses of the client
servers.
Creating a display for the clients with exactly the same size as “Display 1”: Right-click Display 1 and select Add multidisplay area. Enter the appropriate names for the new displays and assign Display PC and monitor correctly in the Display Properties.
Drag one split video each and drop them into the corresponding tracks that are assigned to the screen fields Top and Bottom. After this you align the video objects and, if applicable, the audio in time and group the objects. See Aligning objects and Grouping objects. In the screen window check whether the dome content has been arranged correctly.
If you have not prepared split videos yet...
In principle, a Vioso calibration is performed as described in topic Camera-based calibration. Below you will find the most important steps of a dome calibration.
Connect the camera and test whether the camera signal is received correctly. If necessary, use the corresponding camera software.
Place the camera a close to the center of the dome as possible. If the dome is tilted, the inclination of the camera should be parallel to the dome horizon (dome equator), otherwise at 90 degrees to the floor. The dome must be completely visible in the camera image.
Show test images on all projectors; the Wings Engine alignment tool is very suitable for this purpose. See also Displaying test images. Make all the necessary camera settings for a camera-based Vioso calibration, e.g. manual adjustment of focus, shutter, etc. See also Camera-based calibration.
Close all programs that may block the camera (preview programs, driver interfaces, etc.).
For
evaluation purposes drop the test image Domemaster
_4096px in a track with screen field Standard
in the Timeline next to the video dome content. The fastest way to
find it is to click Extras
- Open folders  Sample media. It is located
in folder Testcharts.
Sample media. It is located
in folder Testcharts.
Start the calibration via Wings Vioso. In the presentation network “Cluster calibration” will be opened automatically. For any more specific questions please turn to Vioso. See www.vioso.com.
Click Display Split and select the logic display to supply the projectors. It can be recognized by the high resolution.
Now enter 2 x 2 for horizontal parts and vertical parts for splitting and click Apply followed by OK. The projectors are now listed in the central field.
For setup method click curved screen/dome and for Camera for autosetup choose your camera. Following this, click Next.
For Projector arrangement choose Grid/Arbitrary. Enter a file name for the calibration and click Set. Click on Next and the camera image will appear.
Set up your camera using these parameters. The frame rate in particular has a considerable influence on the calibration. Using uEye cameras...
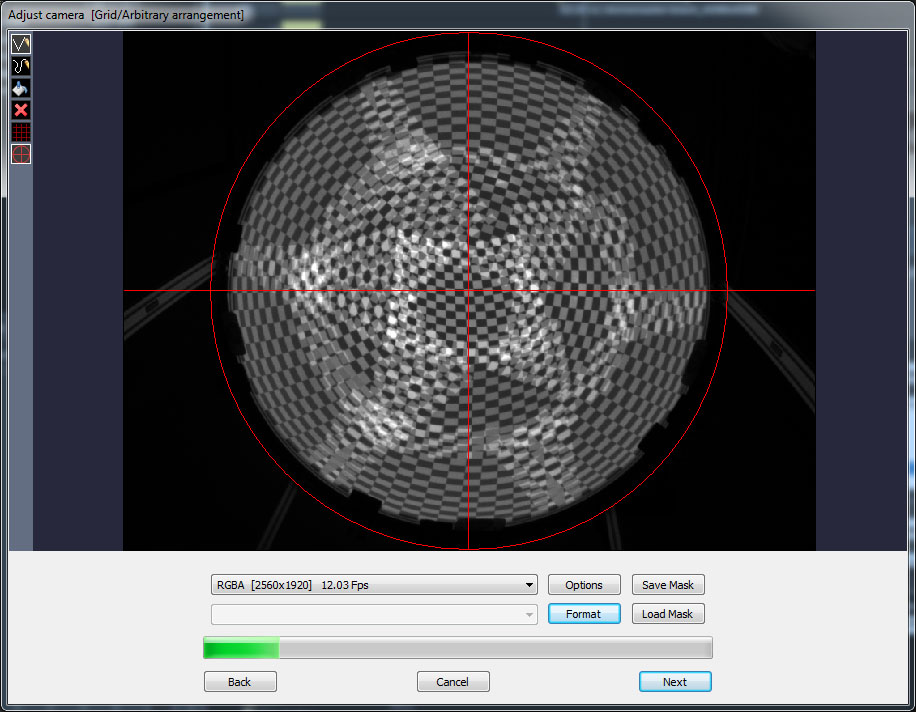
Activate
 Overlay crosshairs
and align the camera so that the image is exactly in the center of
the crosshairs. To achieve this the camera must be perpendicular to
the dome equator.
Overlay crosshairs
and align the camera so that the image is exactly in the center of
the crosshairs. To achieve this the camera must be perpendicular to
the dome equator.  Show Camera
arrangement...
Show Camera
arrangement...
Continue by masking the image so that no reflecting parts can be in the way of calibration. If in doubt, mask rather more than less. See also Camera-based calibration.
Start the calibration and follow the directions of the calibration wizard. See also Camera-based calibration.
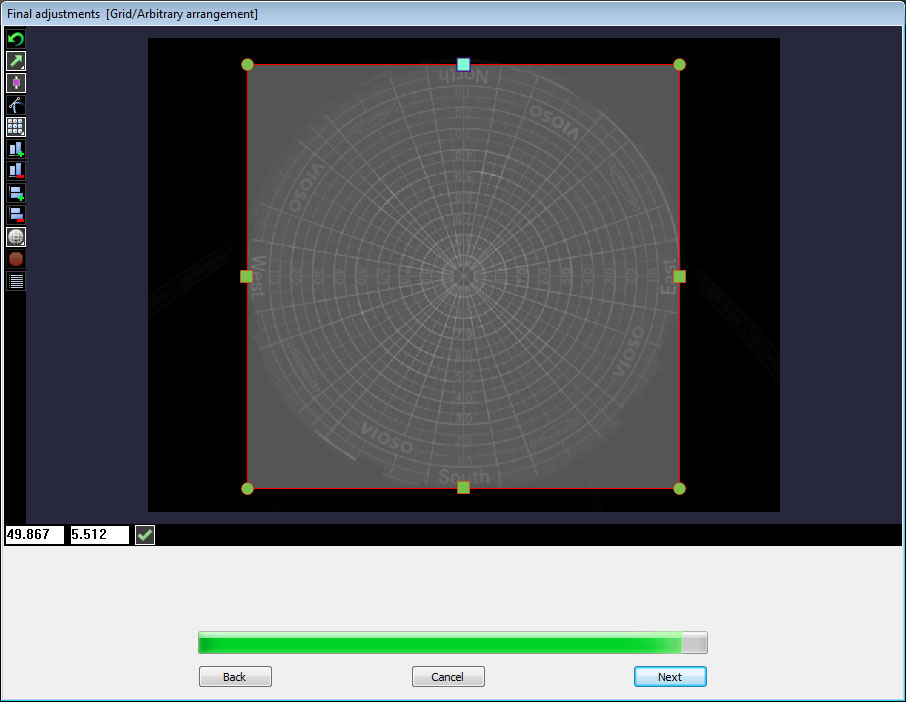
In the last calibration step a test image across all projectors is shown by addressing all Wings Engines of the presentation network. Now the mapping is done, i.e. the adjustment of the overall image to the dome geometry.
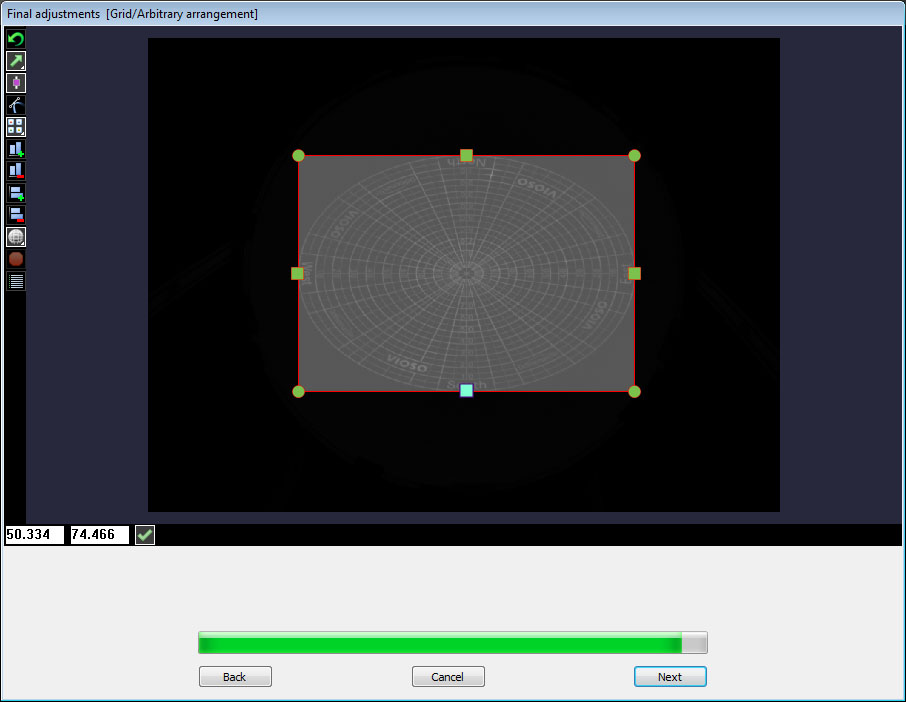
Activate
 Toggle
borders, following which four „handles“ will appear. Highlight
one of it and use it to move the outer edge of the test image towards
the dome basis. Use the keyboard instead of the mouse. By changing
over from
Toggle
borders, following which four „handles“ will appear. Highlight
one of it and use it to move the outer edge of the test image towards
the dome basis. Use the keyboard instead of the mouse. By changing
over from  to
to  Keyboard
fine you reduce the step size per key press. Once all four
sides are aligned the content should be more or less aligned with
the dome. Fine adjustment is done in a final step.
Keyboard
fine you reduce the step size per key press. Once all four
sides are aligned the content should be more or less aligned with
the dome. Fine adjustment is done in a final step.
Click on Next and your settings will be saved. Attention: Saving may take several minutes!
Note:
The last calibration is automatically
transferred to the clients on the presentation network by clicking
F7. Saved calibrations can be found
in the “special Vioso folder” under Extras – Open folder Vioso Data.
After terminating the calibration wizard, Wings Vioso opens up again automatically. You can start playback and, based on your dome content, check whether calibration is ok in principle. Now the fine adjustment follows based on the dome content. Move the locator to an appropriate location. Reopen the Vioso calibration dialog and click on Properties.
Notes:
Blown out highlights in the camera image is no defect and has no influence on the mapping alignment.
Click
on button  to remove the alignment window and extend
to make even finer adjustment possible.
to remove the alignment window and extend
to make even finer adjustment possible.
Check whether option smooth Border has been selected. If not, activate it. Now you can make the mapping fine adjustment based on the dome content as explained above. Moreover, there are further options for adjustment of color, transitions and projectors available under Color & Blending and Adjust Projectors.
After you have made all the necessary settings you click Close and apply following which the calibration is saved, which may take a while. If you want this calibration to be loaded automatically upon starting Wings VIOSO click Save as startup calibration in the start dialog of the Vioso calibration.

Important note: Should the
presentation show scaling artefacts which are particularly visible
at fine high-contrast lines and font edges you can solve
the problem as follows...
If you want to use VIOSO calibrator in stand-alone mode you can start it via main menu Programs.