 Devices with audio mixer.
You can use an SC Master or an Event Control device for remote controlling Wings Vioso RX. This is particularly interesting for HDAV presentations with Wings Vioso RX, as IR remote control allows you to start shows, continue paused playback (Speaker Support) and jump to position markers within the show. Moreover, it also allows simultaneous control of several peripheral devices via the SC Net, such as video projectors or lights. For a device with an audio mixer, the volume of sound track and microphone can also be controlled via an IR remote control unit. Devices with audio mixer.
 Please note that for the type of control system referred to in this topic, SC Master or Event Control cannot run any shows from CF card. If necessary, you need to send serial commands from the SC Master to the Wings Vioso RX computer (there is a driver available; ask for it, if necessary). Essential differences between the two methods.
.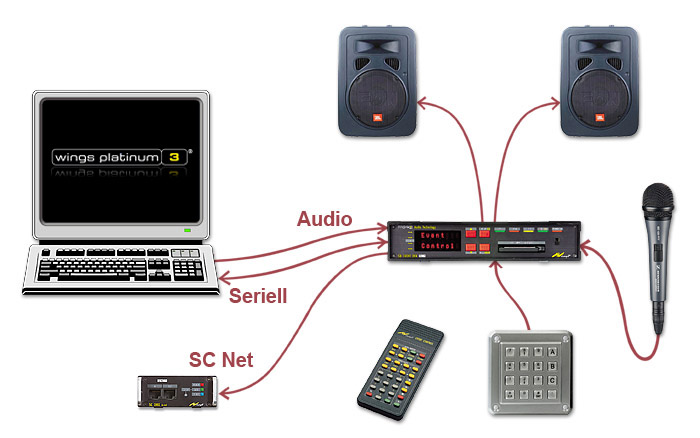
Setting up the system is easy although a variety of different options are possible. Instead of an IR remote control unit you can also use a keypad with up to 16 keys. More info on how to connect keypads can be found under Starting shows via keypads or switches.
In order to allow a Wings Vioso RX project to be remote-controlled via an SC Master (…although this is the only term used, it also refers to all sorts of other compatible models) an SC Net port needs to be configured accordingly and possibly a number of triggers set for the corresponding action be executed by pressing a key on the IR remote control.
The keys on the IR remote control unit produce the following effects:
1 to 0 ....start timeline playback via remote indexes 1 to 10 from position 0:00.000s in presentation mode. If no timeline with the specified remote index is available, the command refers to the trigger with the corresponding remote index. Specifying the remote indexes, therefore, allows you to define whether pressing the key starts timeline playback or executes a trigger. How to start more than 10 shows.
Skip forward ...jumps to the next position marker to the right of the Locator. (*)
Skip back ..jumps to the previous position marker to the left of the Locator (*)
Stop ...puts playback into pause mode; press again to resume playback. (*)
Play ...starts playback from the current Locator position. (*)
The functions marked (*) may require a firmware update for the devices. Information on the required version can be found here.
To allow proper jumping to relative positions, the zoom setting must be zero. To do so, press the X key on the numeric keypad (multiplication).
Triggers allow much more flexible and versatile key assignment. Virtually every type of trigger action can be executed by pressing keys 1 to 0. Use of triggers requires the Advanced License or up or the Show Control Module.
This is how you prepare remote control for a project:
Open the project the presentation of which you want to be remote controlled.
In the Media Pool click category  Devices and select Add port
  Stumpfl SC Net below it.
Right-click device port Stumpfl SC Net and select Properties. If no SC Net port is available yet.
Under General settings place a checkmark each next to Enable SC Net feedback and Enable remote starts.
Close the dialog by clicking on OK.
Trigger actions allow control of a huge variety of different things. Click here for an overview. For presentation of one or several shows, the following functions are mainly used:
Starting shows, while a certain starting point may be defined by a position marker. The arrangement of your show program, i.e. whether all sequences are located on one timeline or distributed on several timelines, is is not really relevant, as the functions can be adjusted via the trigger actions.
Jumping to certain locations within a show defined by position markers.
Now you need to think about what you would actually like to control. The most interesting features are the trigger actions in category Timeline. In principle, however, you can use all trigger actions and assign them to the above-mentioned keys.
Start by creating a trigger for starting the presentation with the first chapter, for example:
In the Media Pool, click category  Trigger.
Right-click some free space and select Add trigger for the Properties Dialog to appear.
Now select category Timeline and action Start presentation (Pause). This means that the presentation starts in fullscreen mode and is waiting for command Continue to start playback. A possible name would be Chapter 1, for example.
The entered remote index could be 1, for example, which allows execution of the command by pressing key 1 on the IR remote control unit.
On the right side of the dialog under Parameters you need to specify the playback position. For Timeline enter 21 as remote index. This remote index should not be between 1 and 10, otherwise the trigger could not be executed by pressing a key, and playback of the timeline from zero would start.
For Position marker enter 1, for instance, and close the dialog by clicking OK.
Now assign the remote index to the timeline. In the Media Pool click category  Timelines. Click the field in column Remote index twice and enter 21. Confirm with Enter.
In the timeline, set a position marker at the location where playback of your show is to start. If no marker track is available yet, add one by right-clicking a track head, selecting Insert track  Marker.
Now right-click the corresponding location in the marker track, e.g. before chapter 1, and select Insert Position Marker. Double-click the marker, enter 1 for Remote index and confirm by clicking OK.
When the device ports are enabled  and PC LED on the unit is on, you can start the presentation at chapter 1 by pressing key 1 on the IR remote control unit, following which playback pauses at the position marker. Continue or start playback by hitting the Play key on the IR remote control unit.
The same way you can create triggers and positions markers for other chapters in your show.
This way you can start any show located on other timelines or one particular show from different locations. To do so, you always create a trigger with the corresponding playback destination and a remote index to be accessed via a key on the IR remote control unit. For the destination set a position marker with the corresponding remote index in the timeline which must also have a remote index.
See also
Optimum show presentation (Workshop)
 and select a computer port for the corresponding device port, e.g.