Optimum show presentation
During the tutorials and workshops you will have found out about the
high quality of playback. The next logical step is therefore direct presentation
of a show from the timeline. You only need to be sure that your computer
has enough capacity for proper playback and that the display data, the
textures, have a sufficiently high resolution. Actually, there are only
restrictions for very complex shows that contain a high number of simultaneously
running videos. In such a case, output of a video file would be a feasible
alternative for presentation at full quality. See Methods
for video creation.
The following steps should be
performed after show completion and before the presentation is actually
run the first time.
Check and, if applicable,
correct the peak level of the sound track. See Peak
level of the sound track.
Setting markers
and creating triggers for key control (...available from the Advanced
License and up)
Following this, you can start your show in fullscreen mode and control
via function keys. The audience will not see any program windows or even
the Windows Desktop on the screen.
Setting markers and creating triggers
for key control
Note:
The screenshots are based on Wings Vioso but it shouldn’t be any problem
to follow and work through the workshop.
In Fullscreen Presentation Mode playback can only be controlled via
keys. Therefore, the actions are by default restricted to the following:
Start
playback from the current Locator position and Pause
by pressing the space bar (in turn).
Stop
by pressing the Esc key
Terminate
fullscreen mode by pressing
Esc twice.
But it is also possible to assign
trigger actions to various function keys. The following ones are important
for playback control:
Continue ...continues
paused playback. As opposed to the space bar this function is obvious.
Pause ...to
activate Pause Mode. As opposed to the space bar this function, too
is obvious.
Play ...starts
playback of the specified timeline. As an option, playback can be
started from a position marker, provided a marker mode and remote
index, if applicable, have been specified.
To Position ...causes
the Locator to jump to the specified position marker. If the Remote
Index is zero, the Locator jumps to 0:00 seconds. Jumping to a position
marker is possible, provided a Marker Mode and remote index, if applicable,
have been specified. Moreover you can also jump to the next or the
previous position or pause marker.
To next pause marker and To
previous pause marker ... the Locator jumps to the previous
or the next pause marker and playback is paused.
Now set a few position markers in
your show. They should preferably be located at the beginning of the show
and at the beginning of a new topic or chapter.
Right-click a marker
track and select Insert position
marker. If a marker track is available, right-click a track
head and select Insert track
 Marker.
Double-click the marker
and click First free remote index.
Enter the designation under Comment,
e.g. Start and close the dialog
by clicking on OK. The info
line will now show the remote index R:1
and the designation.
Move the position
marker to the beginning of the show. Set a pause marker immediately
in front of the position marker. The sense of this action will become
clear to you during testing.
The same way add additional
keyframes at different locations, e.g. at the beginning of chapters.
These position markers have remote indexes 2,
3, 4
and 5. At the end of all this,
the marker track should about look like this (the distances in time
have been compressed for the purpose of this illustration).

Now create the triggers
for starting the actual function. In the Media Pool click on category
 Trigger. Right-click some free area
in the right Media Pool section and select Add
trigger.
Trigger. Right-click some free area
in the right Media Pool section and select Add
trigger.
For Category
click on  and select Timeline.
For Action
click on
and select Play.
Enter the corresponding
designation at Name, e.g.
Play show 1. At the bottom,
enter 1 next to F
key, which stands for the F1
key.
On the right, under
Parameters define remote index
1 as playback position next
to Position marker and close
the dialog by clicking OK.
Now create four additional
triggers for the other position markers. To do so, right-click the
trigger you have already created and select Add
trigger. The Properties Dialog will appear showing the settings
of the first trigger. Now you only need to enter the Name
(e.g. Play chapters 1…4, etc.), the F
key (F5…F8) and the Position
marker (2…5). The assignment of function keys may appear a
bit strange to you, but for this tutorial we have planned to use F1 to F4
for starting shows and F5
to F8 for jumping to certain
chapters. Later on you will be completely free in your choice.
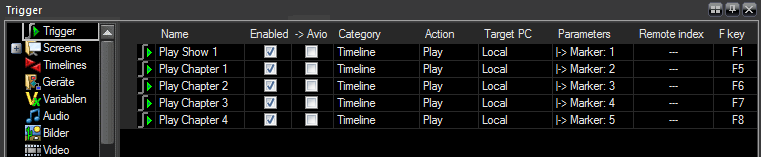
Once all triggers
have been created, you can once again check the parameters for every
individual triggers in the Media Pool. For any necessary corrections
right-click the corresponding trigger and select Properties.
Now you can test the
functions of the keys. Start playback before the pause marker by pressing
the space bar. The Locator will move to the pause marker and put Wings Vioso RX in Pause Mode.
Press the corresponding function keys to jump to the corresponding
location for playback. Just try it.
While Wings Vioso RX is in Playback
or Pause Mode, you can use the function keys for direct triggering
of certain actions. When Wings Vioso RX
is in Stop Mode, the function keys resume their normal functions.
If you want to start the trigger action directly in Stop Mode you
need to hold the Shift key
while pressing the corresponding function key. Just try it out a few
times. Of course all this works in fullscreen mode, too.
Organising a program in several
timelines
If you need to present several shows
in the course of an event, you can create also one timeline for every
show and start playback of the corresponding timeline via function keys.
We will show you how to do this by creating a short sequence in a second
timeline.
In the Media Pool
click on category  Timelines.
Right-click some free space in the right Media Pool section and select
Add timeline.
Timelines.
Right-click some free space in the right Media Pool section and select
Add timeline.
When
you look up column Remote Index
you will see that Timeline 1
has Remote Index 1 and Timeline 2 Remote Index 2.
This is important information for addressing the jumps.

 Every function or every type
of object, respectively has its own remote indexes. Thus it is possible
that there are remote indexes with the same number for timelines, position
markers, triggers, control panel fields,
etc.
Every function or every type
of object, respectively has its own remote indexes. Thus it is possible
that there are remote indexes with the same number for timelines, position
markers, triggers, control panel fields,
etc.
In the Media Pool
click on category  Pictures,
highlight a few and drag them into the empty timeline. Following this,
a track is created containing a sequence of pictures.
Pictures,
highlight a few and drag them into the empty timeline. Following this,
a track is created containing a sequence of pictures.
The same way, drag
some music into the timeline to create a short, sound-tracked passage
of about one to two minutes.
Now add a marker track
and create the same marker structure as for the first show. The
easiest way to do this is to highlight the markers in the first timeline,
copy and then paste them to the marker track in timeline 2. Now you
only need to move the position markers to the desired locations.
In the Media Pool
click on category Trigger. Now that there is a second
timeline available, you need to specify the destination for trigger
Play show 1. Double-click
the green trigger symbol next to Play
show 1. Under Parameter
and Timeline enter the remote
index 1. This way the trigger
does not refer to the current timeline, but always to Timeline
1.
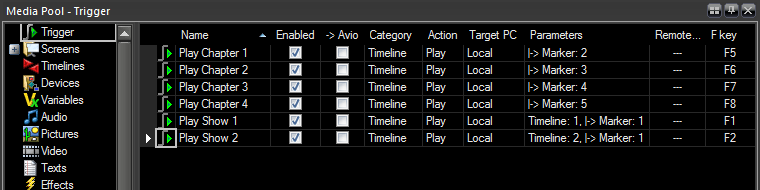
Now create a new trigger
by right-clicking trigger Play show
1 and selecting Add trigger. Enter Play
show 2 for Name and
the figure 2 next to F key. Under Parameter
you specify the destination: Timeline
= 2 and Position
marker = 1. Below you
can see the Media Pool with all triggers and can check whether everything
has been entered correctly.
This configuration
allows you to start both shows in timeline 1 and timeline 2 directly
via the keys F1 and F2. Keys F5
to F8 for jumping to chapters
are effective in both shows, depending on which of the timelines is
presently active.
This way shows and complete events
can be most conveniently controlled. You can draw up your individual concept
for operation, which can also include other trigger actions such as To position and Continue.
Triggers can not only be started via function keys but also via the Control
Panel, the trigger scheduler or serial command.
Refer also to the following topics:
Executing
triggers
Control Panel for direct operation
Remote control of Wings Vioso RX
Time-related conditions for triggers