Mute Function
This function allows you to mute or darken an object via a control track. At this moment this is only possible for picture objects, to produce hard cuts and blinking effects.
Hard cut
-
Right-click the corresponding picture object and select Control tracks – Mute. Following this, a control track will be displayed in the object.
-
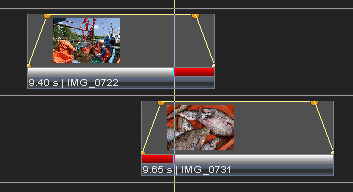
Double-click the control track to set mute areas. The red color indicates the muted area.
-
The length of the red area, i.e. the corresponding point of time can be adjusted by dragging it with the mouse. When you grab the boundary of a red area it is highlighted and can be moved. You can delete the area boundary by right-clicking it and selecting Remove.
-
For a hard cut, two objects are placed in different picture tracks, and the beginning and the end of the mute area must be accurately aligned. This can be done quite easily by activating function  Snap to objects in the function bar which turns the Locator magnetic. See Snap to objects.

 If you shorten or extend the area by double-clicking it, the old area boundaries are displayed as gray lines. They have no direct effects and can be removed by right-clicking them.
Blinking effects
In addition to hard cuts it is also possible to create regular blinking or pulsing effects. To do so by changing the ramp band is much more tedious and the outcome is usually not as regular as via the Mute function.
-
Right-click the corresponding picture object and select Control tracks – Mute.
-
Right-click the picture object once again and select Special Functions – Create ramp.
-
Under Mute off (bright phase) and Mute on (dark phase) you can enter times for the blinking effect.
-
Click on Assign and the dark/bright phases will be displayed in the control track.

-
To change the blinking rhythm right-click the picture object, select Special functions – Create ramp once again and alter the values.
-
Find out about hiding and removing control tracks at Control tracks in objects.
See also
Hard cut with shutter
Editing the ramp band
 Snap to objects in the function bar which turns the Locator magnetic. See Snap to objects.
 If you shorten or extend the area by double-clicking it, the old area boundaries are displayed as gray lines. They have no direct effects and can be removed by right-clicking them.