Mix variables - Instant change of contents
Mix variables allow instant changes between pictures, videos and music
at any time. The contents are sorted into several parallel tracks, which
are allocated to various mix variables. During the presentation you can
enable the corresponding mix group, thereby displaying their contents
on the screen.
This tutorial complements the project used for the tutorial Speaker
Support with interval music and video loop. The following extension
is to be implement:
If you have not yet worked through tutorial Speaker
Support with interval music and video loop you should do so now. This
tutorial requires the Pro License or higher.
Creating mix variables and linking them up with tracks
The presenter of a show wants to be able to change over to the map and
continue at any time with his show after he has made a few explanatory
comments. This is the perfect application for mix variables. Mix variables
allow fading over from current contents to parallel contents that were
previously not visible on the screen. Telling you how you can do so will
be purpose of this tutorial.
Note:
The screenshots are based on Wings Vioso but it shouldn’t be any problem
to follow and work through the workshop.
First of all, open
the project you created during the tutorial Speaker
Support with interval music and video loop.
Before you go on you
should organize the present tracks into group tracks. Right-click
the uppermost track head and select Insert
track  Group. Double-click the field
with the double arrow
  , enter Show
as the name and click OK.
Right-click the track head of the marker track and select Insert
track
  Group. Enter
Marker as the name for the
group track and click OK.
Now
add an additional group track and a picture track as follows: Right-click
the empty black space below the marker track and select Add
tracks... following which a dialog box will appear. Next to
Picture tracks enter 1 and check the box next to Group tracks. After clicking OK both new tracks are shown. Change
the name of the new group track from Pictures
to Map.
Duplicate the video
track with the background video by right-clicking the track head and
selecting Duplicate track.
Now grab the new video track with the mouse and drag it to the very
bottom. You may have to use the vertical scroll bar to change the
timeline portion.
The new tracks are
used for fading in the maps via mix variables. In order to structure
the timeline more clearly, hide all the tracks belonging to the actual
show. Right-click a free area in the tracks to deselect all objects.
Following this you click on button  of group track Show for all
the tracks to be hidden. Following this your timeline, except for
the two objects, should look as displayed below.

In order to make it
look exactly as displayed above, move the video object with the background
image to the right until its beginning is located at 0:12.0 s (i.e.
behind the map at the beginning of the show). Right-click the video
object and select Change duration.
Enter a duration of 1:20 and
click on OK.
Now drag the picture
file Map of Rügen with alpha channel
into the picture track and extend the object as you did with the video.
Put the picture track into alpha mode. Move the nodes for both objects
to the left to achieve a hard fade-in.
Define
two mix variables. One mix variable is to control all the tracks used
for fading in the map. A second mix variable is to control the tracks
of the actual show. In the Media Pool click on category  Variables.
Right-click the empty, right Media Pool section and select Variable
  Value.
Name this variable Map. The
same way, create a second variable called Show.
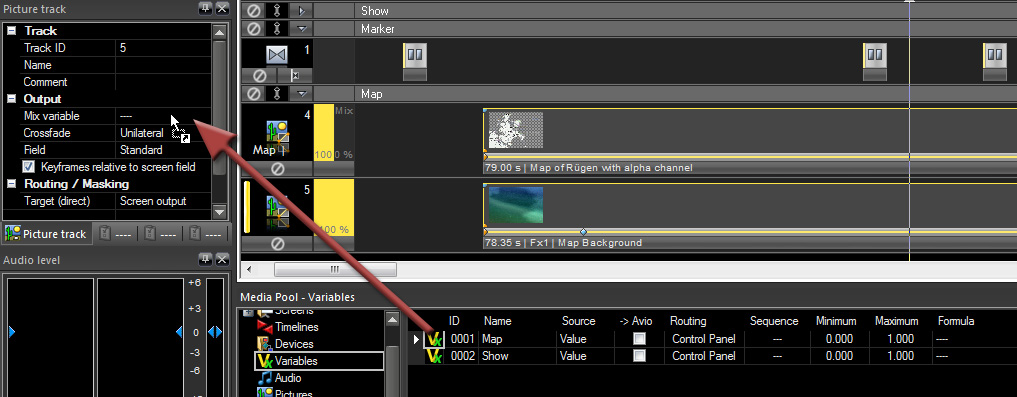
Link
up the variables with the tracks. Highlight the track accommodating
the map object. Grab variable Map
at its icon and drag and drop it onto field Mix
variable in the Properties Table. Following this the name appears
in the track head and the second column Mix
is created in the yellow track slider area. Link up the track accommodating
the background image likewise with variable Map.
Now link up all the
tracks of the actual show with the mix variable Show.
For this purpose, unhide the tracks of group track Show
by clicking on  and link
up variable Show as described
before. As you may have noticed, no mix variable can be assigned to
the asynchronous audio track - it cannot be controlled via mix variables.
Therefore, you should disable this track, as it may be played along
when the map is played.
Continue by adding
the trigger which allows you to fade over to the map. In the Media
Pool click on category  Trigger. Right-click some free space
in the right Media Pool section and select Add
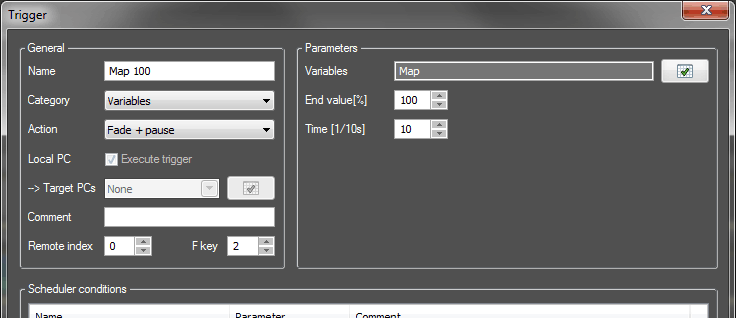
trigger. Choose the following General
settings:
Name
Map 100
Category
Variables
Action Fade
+ Pause ...ensures that playback is paused after fading
in the map.
F
key 2
...this is the function key you press to execute the trigger
later on.
On the right, under
Parameters you make the settings
for the type of fade:
Variables
Map ...click
on  Select,
enable variable Map and click
OK.
End
value 100 % ...is
the target value for the fade-in.
Time
10
...for
a dissolve time of one second.
If,
at the end of all this, the dialog shows the setting below, you can click
OK.
Create a second trigger
likewise, making the following settings:
Name Show
0
Category Variables
Action
Fade and Pause
...ensures that playback
is paused after fading the show.
F
key 2
...this is the function key
you press to execute the trigger later on
Variables
Show
End
value 0 % ...is
the target value for the fade-in.
Time
10
...for a dissolve time of
one second
As you may have noticed,
the F2 key is used for executing
both triggers to fade out the show and fade in the map.
You will now need an additional two triggers
to fade out the map and fade in the show. Create these triggers with
the following settings:
Name
Show 100
Category Variables
Action
Continue + fade
...ensures that the show is continued
and faded in
F
key 1
...this is the function key
you press to execute the trigger later on
Variables
Show
End value 100 %
...is the target value for the fade-out
Time 10
...stands for a dissolve time of one second
Now
there is only the last trigger for fading out the map missing:
Name
Map 0
Category
Variables
Action Continue
+ fade ...ensures that the show is continued and faded in
F
key 1
...this is the function key
you press to execute the trigger later on
Variables Map
End value 0 %
...is the target value for the fade-out
Time 10
...stands for a dissolve time of one second
You’ve
made it. You can use the F1
key to fade over to the show and the F2
key to fade over to the map. Start playback, followed by pressing
F1. At the track beginning
the Mix bar will show you
which tracks have been faded in and which faded out. Press the F2 key to fade in the map and the
Locator will stop. The presenter can now do his explaining for any
period of time and return to the show again by pressing the F1 key.
Note:
Please note that Mix variables only work during playback. In Editing Mode
mix variables do not effect any visible changes.
Creating additional mix variables...
Let's assume that you would like to have the
option of fading in the additional text National
Park in the map. This can be done via the text function and an
additional mix variable.
Right-click the track head of the picture
track below the group track Map
and select Insert track  Picture. Right-click the new picture track and select Insert Text Object...
Start playback and press F2
to fade in the map. Double-click the text object info line to open
up the Properties Dialog. In field Text
enter National Park and choose
bold font, e.g. Arial Black.
For Alignment choose right-aligned
followed by clicking OK.
Right-click the text object and select Change duration. Enter 1:20
for New duration and click
on OK. Align the text object
until it is in the same location as the map and the background image.
In the Media Pool  Variables create a new variable
Value Out named Text
and link it up with the picture track accommodating the text object.
Create two triggers for the new mix variable.
You can duplicate and modify triggers - this saves time. To do so,
right-click trigger Map 100
and select Add trigger. Make
the following modifications:
Name
Text
100
Variables
Text
For
the second trigger right-click Map 0
and select Add trigger. Make the
following modifications:
Name
Text
0
F
key 1
Variables
Text
Since
there is a limit to execution via function keys as only one function
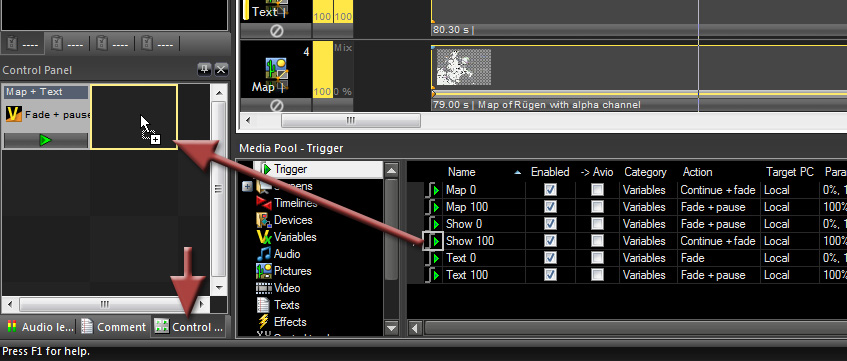
key can be assigned to a trigger we are going to use the Control Panel
for execution. In the left bottom corner of the program window click
 Control
Panel and drag trigger Text
100 from the Media Pool and drop it into the Control Panel.
Following this a control panel field will be created. Now drag trigger
Map 100 and Show
0 one after other and drop onto the control panel field while
holding down the Ctrl key.
Following this a trigger list will be created.
Right-click
the control panel field and select Field
Properties. Enter Map+Text
for the name and close the dialog by clicking OK.

Create
a new control panel field likewise by dragging and dropping trigger
Show 100 into the Control
Panel. Following this drag and drop trigger Map
0 and Text 0 onto the
new control panel field while holding down the Ctrl
key. Name the control panel field Show.
When you start the presentation the show is
run and you can call up the map without additional text by pressing
F2 and the map showing National Park
by clicking the button in the control panel field Map+Text.
If only the map is displayed, you can fade in the text National Park by clicking the control
panel field Map+Text and fade
back to the show by pressing F1
or hitting control panel field Show.
The trigger lists of the control
panel fields now allow you to combine any triggers. As trigger execution
of the control panel fields is also possible via remote control, the mix
variable function can also be executed via serial command, MIDI or DMX,
etc.
The following topics
are also available:
Executing
triggers
Visual
effects
Presenting with mix groups
Remotely controlling Wings Vioso RX
 Group. Double-click the field
with the double arrow
  , enter Show
as the name and click OK.
Right-click the track head of the marker track and select Insert
track
  Group. Enter
Marker as the name for the
group track and click OK.
 of group track Show for all
the tracks to be hidden. Following this your timeline, except for
the two objects, should look as displayed below.
 Variables
 Value
Value
 and link
up variable


 Control
Panel