Once a project is complete and is to be executed on a device it needs to be transferred to the required device, i.e. PC, Avio Master, IObox or FHD Player Pro. Avio Service is usually responsible for execution of the project on the terminal but there are various options for displaying and starting the project. For PCs the interface is also saved as HTML interface in parallel while for IOboxes or FHD Player Pro only the HTML interface is used.
In the main menu click Device Management followed by clicking Manage Device Connections.
In the list displayed place a checkmark for the device to be transferred in column Connected. You can also select a multitude of devices if the same user interface is to be transferred to all of them.
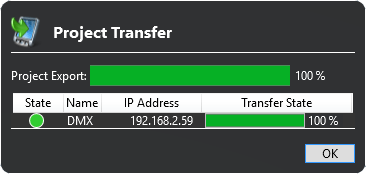
Now click Transfer Project following which a dialog showing the previously selected terminals is opened. Click Transfer to transfer the user interface. If you have chosen Autostart with Service in the Options, the user interface is started automatically after the transfer.
Note: Transfer has been successful if both bars are green, i.e. both Export and Transfer. For IOBox and FHD Player transfer to the device may take several minutes depending on the project size.

After the transfer close the dialog by clicking OK.
You can start and terminate the project via Avio Service:
Right-click the Avio Service icon in the bottom right corner of the task bar and select Wings Touch Projects  Project name
  Execute or Stop.
As Avio Service may no longer be accessible via the mouse once the project has been started you should include a button Close project. See Assigning and testing functions. Alternatively, you can terminate the interface by right-clicking it and selecting Close Project Preview.
Note: If menu Close Project is to be hidden enable Option Disable “Close Project” Menu in the Settings of the interface. See also Defining display and start options.
Once the interface has been started the web server runs along with it and you can display the interface on any terminal using an HTML browser. More about this in topic Displaying user interfaces in the HTML browser.
You can use Avio Service to define individual options for every device and user interface.
Right-click the Avio Service icon in the bottom right corner of the task bar and select Wings Touch Projects  Project name
  Edit Settings.
The following options are available in the Settings dialog:
Autostart with Wings Avio Service ...during a system start the user interface is started at the same time as the Avio Service.
Hide GUI (only allow web view) ...the interface is not displayed on the the web server and runs in the background.
Web Update Interval ...is set to 500 ms by default and defines the time interval between the web server updates. Depending on network performance and interface requirements the interval can be changed.
Send web page jumps to Avio ...allows synchronization of user interfaces on the web and on local computers.
Overwrite Webserver Port ...should be enabled so that the interface is always accessed via the same port. In that case you enter the required port at Webserver port.
Disable "Close Project" Menu ...disables the context menu Close Project which is normally displayed after right-clicking the interface and button Cancel Project Startup when starting up the interface.
Show Project Top Most ...ensures that the user interface is always on top.
Show Project in Taskbar ... the project is available as executed program in the task bar and can be minimized, closed, etc. via the icon.
Show Window Frame ...the project is not displayed without frame but in the usual window.
Hide Mouse Cursor ...hides the mouse cursor.
Under Stretch Mode various display modes are available. These settings do not apply to the display in Avio Service or the web browser.
StretchUniform ...changes to maximum size without distorting it.
FitToScreen ...forces full screen display and the project may be distorted.
DoNotStretch ...displays the user interface as defined in the Properties in Wings Touch. In addition to this you can activate Show Window Centered which causes a centered display or you can specify a certain location instead by choosing Use Position and entering x- and y-values.
Click Save to save the entries and close the dialog.

If the same project is to be executed on different devices but with identical option settings you can make the entries in Wings Touch in the main menu  under Options. See also Program Options.
When you transfer a project that is already being executed to Avio Service again the running project is terminated after the successful transfer and the newly transferred project started.