Creating a multidisplay show using one computer
In this tutorial we are going to show you how easy it is to create and
present a multidisplay show via one PC. Using the corresponding graphics
card you can output up to four displays. This tutorial is based on the
assumption that you know how to handle Wings in general. If not, we recommend
working through the tutorials of workshop Digital
AV Show first.
In this tutorial you will be provided with detailed knowledge about
the special features of a multidisplay show illustrated at the example
of a panorama show for two projectors:
Creating a project
and setting up the multidisplay screens
Getting rid of distortions
via Display Warp
Adjusting soft edge
masks
For our example we are going to use panorama format at 3600 x 1200 pixels,
projected with two projectors and a resolution of 1920 x 1200 pixels each.
On the other hand, we are using a computer with a Multidisplay
License for two displays or a Wings Engine. Your computer must
have three graphics card outputs in order to allow proper adjustment and
show programming on a separate monitor.
Creating a project
Use the Wizard for Mixed-Media Projects
to create your show. On the first page you can make entries that refer
to media and project type.
Media
Specify the types
of media you want to use for your project. For this exercise you should
only choose Audio, Pictures
and Video.
At the bottom you
should specify that you want to create a multidisplay
project.
Click on Next.
Multidisplay screen
Here you can make various settings for screen and display configuration.
Under Output
settings and Display size
enter the resolution of an individual video projector, i.e. 1920 x
1200 pixels for our tutorial.
At Displays
enter the number and arrangement of displays, i.e. in our case, 2 x 1
for two video projectors arranged next to each other.
The next step is to
enter a total size of 3600
pixels in width. The resulting overlap is 240 pixels which are displayed
immediately above. As an alternative, you could also have specified
an overlap and the width of the whole picture would be the result
of this entry.
Next to Multidisplay
configuration click  and select
All displays on the master starting
with monitor 2, so that output 1 is available for the control
monitor.
and select
All displays on the master starting
with monitor 2, so that output 1 is available for the control
monitor.
Click on Next.
Pool template
This dialog allows you to select a project template, Media Pool components
of which can be transferred to the new project. Thus you can use previously
created ramps and effects in a new show.
Place a checkmark
next to Add Media Pool components
from following project template.
The preselected template
Default Pools contains a few
ramps and control tracks for effects.
Click on Next.
Media Pool
Here you select the
required components you want to import. Select Effects,
Control tracks and Ramps.
Click on Next.
Timeline tracks
Here you specify the
number of the corresponding track types to be created in the timeline.
Do not worry about the entries; tracks can be added or removed any
time.
The checkmark next
to Group tracks automatically
installs additional group tracks which allow hiding and displaying
of tracks.
Click Finish
and the timeline with the corresponding tracks appears. If there is
a message saying that Synchronization Mode Multihead
(manual sync adjustment) is recommended, click OK
to select it.
Saving the show
Before you actually start editing you should create a project folder
and save the show. Click  Save in the toolbar below the
main menu and a dialog box will appear. Select the appropriate drive,
create a new folder for your project and enter a name for your show. Finish
by clicking on Save.
Save in the toolbar below the
main menu and a dialog box will appear. Select the appropriate drive,
create a new folder for your project and enter a name for your show. Finish
by clicking on Save.
 If you want to keep saving
all projects to the same location , you can specify a Default
folder under Options.
If you want to keep saving
all projects to the same location , you can specify a Default
folder under Options.
Aligning projectors and adjusting
the softedge masks
Align the projectors by means of test images. Do so by modifying test
picture Pattern black, white background.tif
which was copied to folder Media Samples\Test
Charts from DVD ROM or USB stick. You can find this folder by clicking
Extras - Open folder Sample media. If it is not available no sample media have been
installed yet. In any case, the picture can always be copied from the
installation medium for Wings at :\Wings 5\Media Samples\Test Charts.
Sample media. If it is not available no sample media have been
installed yet. In any case, the picture can always be copied from the
installation medium for Wings at :\Wings 5\Media Samples\Test Charts.
Open the picture Pattern black, white background.tif
with an image editing program and crop the picture to the total size
3600 x 1200 pixels.
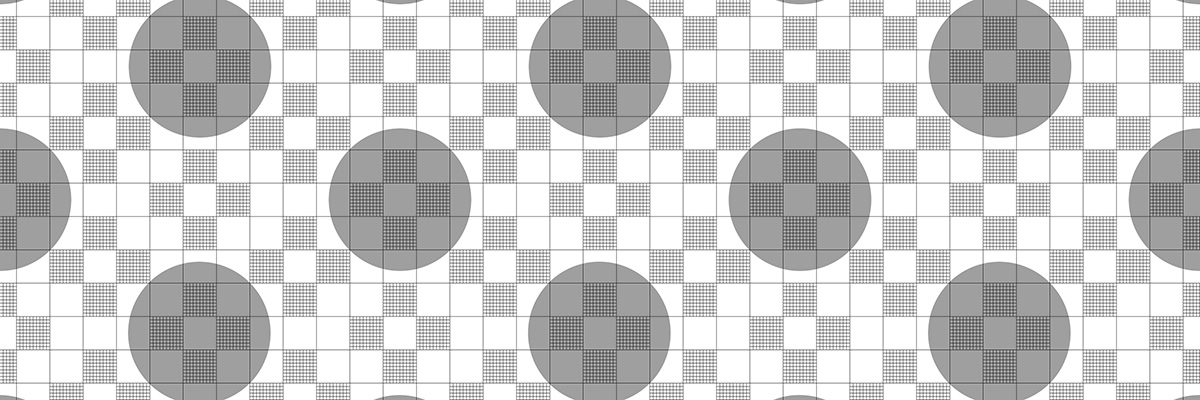
The cropped grid should look as shown in the
illustration (illustration is reduced in size). Important
note: The test image must not
be scaled as it will be reduced in sharpness by interpolation.
Save the image as
Pattern 3600x1200.tif, using
LZW compression if you like so that you can see the size immediately.
Drag test picture
Pattern 3600x1200 and, if
necessary, a couple of other test images from folder Testcharts,
drop them into the Media Pool and arrange the pictures in the timeline.
To ensure that Wings
Vioso RX uses image Pattern 3600x1200
without scaling, go to the main menu and click Media
Pool - Optimize display data
followed by clicking Start.
Check by right-clicking
the object Pattern 3600x1200
and selecting Properties.
At Resulting Picture size,
 Picture
size must be exactly 3600
pixels. After checking, close the dialog by clicking OK.
Picture
size must be exactly 3600
pixels. After checking, close the dialog by clicking OK.
In order to open the
render displays click button  Show
render displays in the toolbar at the top. It may take a few
seconds until the render displays are reliably open. Wait for this
period to elapse before you start playback.
Show
render displays in the toolbar at the top. It may take a few
seconds until the render displays are reliably open. Wait for this
period to elapse before you start playback.
Start playback and
press the space bar to pause it when the test image appears. You can
now align the projectors using image Pattern
3600x1200. The lines should be exactly one pixel wide and be
very well visible. The circles allow you verification of whether the
picture is displayed without any distortion or not.
For the time being
you need to resort to a camera and the separate Vioso calibrator for
final adjustment and creation of softedge masks. The Vioso Calibrator
can be started by clicking Programs
- Vioso Calibrator in the
main menu. In principle calibration is done as described in topic
Camera-based
calibration. However, you need to export the completed calibration
and import it again as follows:
In the main menu
Multidisplay click VIOSO
calibration.... and Load calibration.
After loading
and checking the previously created calibration click on Save
as Startup calibration so that is loaded automatically at Wings
Vioso RX start.
After the calibration
position the other test patterns in the overlap areas. See also Motion:
Position - Zoom - Rotation. Images Grey
_steps_1 and Grey _steps_2
are well suited for checking the softedge masks. All the other test
pictures can be used to check homogeneity with different tonal values
and colors.
Following this you can create the show as described in the tutorials
for single display shows.
You should now be familiar with the most important steps for creating
and presenting a multidisplay show using one PC. Some other interesting
and additional information can be found in
the following topics :
Show
Control Functions