Virtually all data projectors are equipped with a zoom lens. For data projectors, a projection ratio, which is the ratio of the projection distance to the image width, is normally specified for the lenses. So a lens with a projection ratio of 2 : 1 produces a 3 m wide image at a distance of 6 m. For zoom lenses, specifications such as 1.85 – 2.35 : 1 can be found.
Projections over larger or extremely short distances require exchangeable lenses. These are only available for projectors in the medium or upper price range. For some models, special lenses are available, e.g. wide-angle lenses (0.8x) and telelenses (1.2x).
Nearly all data projectors have a fixed image offset. When the projector is horizontal, the bottom edge of the projected image is at about the height of the projector. The advantage is that the projector is at the bottom and does not obstruct the view to the projection screen on the one hand, and that the image remains undistorted, on the other. As an alternative, the projector can also be mounted to the ceiling. If you can't help inclining your projector, the trapezium distortion caused be this can be corrected digitally by the projector. This, however, may result in blurring due to the conversion of the image.
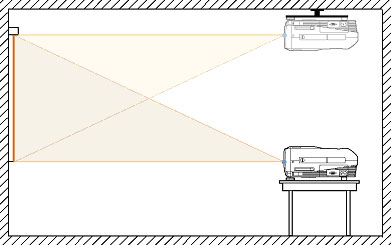
Fixed image offset allows the video projector to be placed on a table or mounted to the ceiling.
What is more flexible and better is keystone correction via a real and adjustable lens shift system. Usually, it allows motor adjustment via the IR remote control unit. In this case the height of the projector location can also be chosen arbitrarily, which may be an advantage for complicated or fixed projection conditions. A special case are short-throw projectors which have a lens with a 0.5 : 1 throw ratio, for example. For an image width of two meters, a projection distance of one meter would therefore suffice so that the projector would no longer be located within the audience.
For permanent projector installation in a room, ceiling mounting is the preferable type of installation. For this purpose the projector is attached to the ceiling up-side-down by means of a special bracket. The projected picture will be upside down as well, so it has to be inverted by the projector software, which can easily be done via a setting in the menu. Ceiling mounting requires a special bracket and the projector must allow rotation of the picture.
For rear projection there are lenses with a projection ratio of 1:1 for short distances without image offset. This means that the projectors are centred and aligned at right angles with the rear projection screen. As the image is displayed right-left reversed, the projector must be able to flip the image.
See also